

Messaging providers are third party companies that securely transmit results, reports, and documents to and from GP practices, specialists, hospitals, and pathology and radiology labs. Third party companies provide and install their own application on your practice server; Bp Premier interacts with that software to import or send the document or file.
Before you begin
Check with each messaging provider your practice uses to identify the folder that the software will download documents to (Incoming) and retrieve documents from (Outgoing). Write the folder locations down; you will need to select the folders when setting up messaging.
Share the outgoing folder
Share the folder and set the permissions on the outgoing message folder, so that all users on your network can create documents. Contact your practice's IT support if you are not familiar sharing folder permissions on Windows.
- Browse to the folder, right-click and select Properties > Sharing.
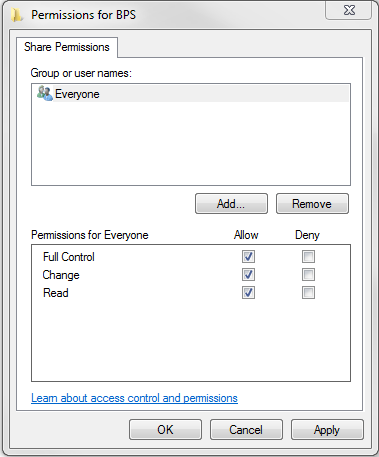
- Click on Advanced Sharing, tick Share this folder, click on Permissions, select the user group Everyone and set Full Control to allowed.
- Click OK to close the Properties screen.
Set up the messaging provider
You will need to create a separate record for each messaging provider that you are using. Perform the following steps on the Bp Premier server only.
- From the main Bp Premier screen, select Setup > Configuration > Messaging tab.
- Click Add and the Messaging provider screen will appear.
- Complete the fields in the screen.
- Click Save to save the messaging provider. You can now select this provider when creating a pathology lab or imaging provider contact.

Field | Description |
|---|---|
Provider Name | Name of the messaging provider |
Path for incoming messages | Location for the incoming messages. This can be either the local path or the UNC path. |
Path for outgoing messages | Location for the outgoing messages. The outgoing path must be different to the incoming messages path. NOTE The path for outgoing messages must be the UNC path for the folder, so that users on workstations can access this folder across the network. An example of a UNC path is '\\server\messagingprovider\out'. |
Use the same path for all computers | Tick this field so that this setting applies to all users. |
Account ID | Account ID for this messaging provider (if applicable). |
Send CDA eReferrals | Tick if your messaging provider has the functionality to transmit CDA format eReferrals. The messaging provider's user documentation or support will be able to tell you if CDA is supported. |
Use as default messaging provider | Tick if this is your primary messaging provider. The messaging provider will be used if the contact you are sending a document to cannot accept eReferrals or does not have a preferred messaging provider. |
Launch URL | If you are setting up an eReferral provider, for example, HealthLink, you may have been provided with a URL to enter into the Launch URL field. Enter only if applicable. |
Port Number | The Port Number field works in conjunction with the Launch URL for eReferral providers. Enter only if applicable. |
Add contacts
You need to configure each contact your practice will be sending messages to. See Add a new contact for more information.
- Select View > Contacts from the main Bp Premier screen. Select the contact and click Edit to display the Contact details screen.
- In the Messaging provider drop-down list, select the contact's preferred messaging provider.
- Enter the contact's Account ID for that messaging provider and the contact's Email address.
- If you know that this messaging provider's software can receive eReferrals in CDA format, select the contact's address and click Edit, or Add to add an address. Tick the box Accepts CDA eReferrals and click Save to update the record.
- Click Save.

