This article describes how to indicate in a provider's preferences whether a laboratory will use preprinted stationery or plain paper.
Set a lab's paper type
- Select Setup > Preferences > Pathology from the main Bp Premier screen. The User preferences screen will be displayed for pathology.
- In the Laboratory Details section at the bottom right, select the laboratory that you want to set up the layout for and click Edit. This will display the Laboratory code screen.
- Complete the fields in this screen:
- Click Save. Pathology requests can now be printed for this laboratory.

Field | Description |
|---|---|
Laboratory code | If you are using pre-printed forms, enter the code for pathology form. The patient information will print in the correct places on the pre-printed form. Contact the pathology lab for the code. |
Preferred laboratory | Tick this box if this laboratory is the user’s preferred laboratory. When the user creates a pathology request from the patient record, the request will default to this pathology lab. |
Use plain paper | Tick this box if the laboratory does not provide pre-printed stationery. |
Paper has specimen labels | Tick this box if the pre-printed stationery has a section for specimen labels. When this box is ticked, the Move duplicate section down and Move labels down fields become available. Enter a measurement in mm to adjust the position from the top left that the duplicate and label sections are printed. |
Print a pathology form
When printing a request from the patient’s record, the Pathology request screen appears.

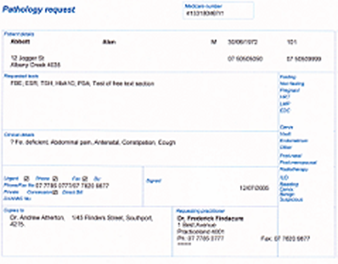
Plain Paper Form
If there is no laboratory selected from the Laboratory drop-down list, the request will print on plain paper.
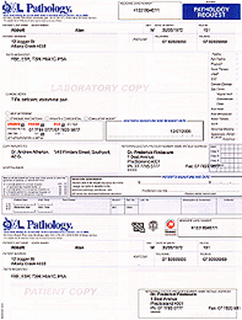
Pre-printed Form
If there is a laboratory selected from the Laboratory drop down list, the request will print so that you can use pre-printed paper according to the lab's layout settings.