

Autofill entries allow a provider to enter text using a shortcut of only a few letters. We encourage users to be mindful of Medicare documentation requirements and ensure that the Autofill text used is sufficient and customised to the context of the patient encounter. Autofill entries can be utilised from Today’s Notes and the Word Processor.
Using pre-defined Autofills
Bp Premier has a number of predefined Autofills available to use.
NOTE Predefined Autofills are only available in Today's notes, not the Word Processor.
To insert a predefined Autofill:
- Type in the predefined Autofill shortcut. The shortcuts can be found in the table below.
- Press Enter or Space.
- If the Autofill contains stop-points for variable entry (caret ^), use Shift+F5 to navigate through the stop-points and enter in the required data. See Adding caret stop-points for more information.
For example, to use the Present complaint Autofill, type PC and then Enter.
The following predefined Autofill shortcuts are available in Bp Premier.
Autofill shortcut | Description |
|---|---|
PC | Presenting complaint: |
HX | History: |
OE | Examination: |
MX | Management: |
DX | Diagnosis: |
RV | Review interval: |
S: | Subjective: |
O: | Objective: |
A: | Assessment: |
P: | Plan: |
AX | Actions: |
Creating custom Autofills
You can add custom Autofills in Today's notes and in the Word Processor.
- From Today's Notes in the patient record, click Autofill. From the Word Processor, select Insert > Autofill. The Autofill screen will appear.
- Click Add. The Autofill Entry screen will appear.
- Enter the Shortcut text. Make sure the shortcut text is not text that might be typed normally. For example, 'and' or 'eye' are likely to be typed in the notes and would not be used as shortcut text. Your practice might start all shortcuts with a '*' character.
- Enter the complete text to be substituted in the Text field, using the formatting toolbar to format the text.
- Enter a caret (^) character to define places in the text where you want to type customised information after inserting the Autofill. See Adding caret stop-points for more information.
- Tick Available to all users to make this Autofill entry available to all users.
- Click Save.
NOTE You can override the Autofill shortcuts that ship with Bp Premier by entering the shortcut text here.

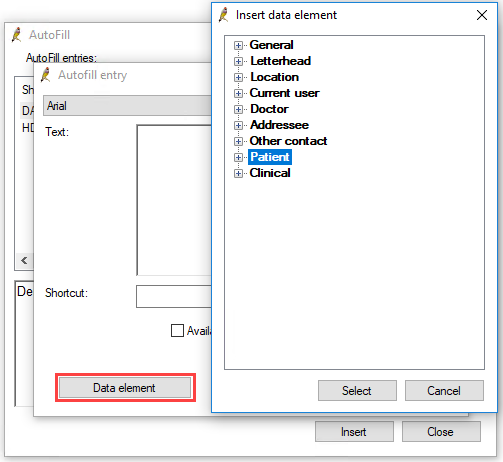
Adding data elements to Autofills in the Word Processor
Autofills added via the Word Processor can include Data elements, which are items of data pulled from the database and inserted, much the same as a Word Processor template field item.
To put data elements in to the Autofill, click the Data element button. The Insert data element window appears. Double-click the required data element.

Using custom Autofills
There are two ways to use your custom Autofill.
- Type in the Autofill shortcut into Today's notes or the Word Processor.
- Press Enter or Space.
- If the Autofill contains stop-points for variable entry (caret ^), use Shift+F5 to navigate through the stop-points and enter in the required data. See Adding caret stop-points for more information.
Otherwise, you can use the following method:
- Click the Autofill button on the bottom of the Today's Notes page, or in the Word Processor, select Insert > Autofill.
- The Autofill window appears.
- Select the Autofill from the list that you want to insert.
- Click Insert.
- If the Autofill contains stop-points for variable entry (caret ^), use Shift+F5 to navigate through the stop-points and enter in the required data.

Adding caret stop-points
Enter a caret (^) character to define places in the text where you want to type customised information after inserting the Autofill.
For example, if your Autofill text was "Patient smokes ^ cigarettes a day", you can use Shift+F5 after inserting the Autofill to move your cursor to the caret position to quickly enter the number of cigarettes the patient smokes per day.
The caret (^) character is located above the 6 on your keyboard. Use Shift+6 to insert the caret symbol.

