
Get Started
Set up
Clinical
Patient Comms
Management
Tools & Utilities
Title
Set up the Management module
This article describes the management functions that most practices need to set up after installing Bp Premier for the first time.
After you have installed Bp Premier for the first time, or converted from a previous clinical software package, you must apply a minimum of configuration to start using Bp Premier. The following provides a general overview on how to set up the components of the Management module of Bp Premier.
Before you begin
Before you start configuring Management functionality, you should have arranged the following:
- Obtain your Site ID and Minor ID from Best Practice Software. If your practice has multiple locations, each location will need a unique Minor ID.
- Obtain your Medicare Site certificate and passcode from Medicare. If you have converted from a previous software package, you will need to let Medicare know your change in software and new Minor ID.
- If you are using Tyro, purchase and install your Tyro terminal and obtain the Merchant IDs for each user who will be processing payments through Tyro.
- Obtain a valid trial or production Bp Premier licence key and enter the licence key into the Bp Premier server. If you do not have a licence key, contact General Products Support on 1300 40 1111
If you have already set up the Clinical module of Bp Premier, you may have already performed some of the steps below.
Complete each section in sequence. Best Practice Software appreciates that it can take some time to configure software to completely suit a practice's preferences and workflows. All of the settings described in this section can be reversed or changed at any later time.
Some procedures may ask you to view other topics in the knowledge base. To open a hyperlink in a new browser tab, right-click on the link and select Open in a new tab, or click with the middle mouse button.
Set date, time, and region
The Windows operating system on the Bp Premier server must have the region, date/time format, and time zone set to 'Australia' for Bp Premier to function correctly. If the date/time format is set to an American usage, for example, Bp Premier may not be able to synchronise with third-party software like messaging services and My Health Record.
- On the Bp Premier server, open the Control Panel and select Date and Time. Alternatively, click once on the clock in the bottom right of the desktop and select Change Date and Time Settings.
- Set the Time Zone to your Australia time zone and enable daylight savings if your state uses daylight savings.
- From the control panel, select Region.
- Set the Format to 'English (Australia)'.
- Set the short date format to a format that lists date, then month, then year. For example, 'dd/MM/yyyy' or 'dd/MM/yy'. Do not use a month-first format.
- Select the Location tab and set the Location to 'Australia'.
- Click Ok to save and exit the Region dialog.
NOTE To reduce the chance of confusion, SMS Reminders will always represent the <ApptDate> template field in the format 'dd/MM/yyyy', regardless of the Windows regional setting.

Enter practice details and locations
If you have converted your data into Bp Premier from another package, the practice details will contain the same information as the old system. If you are starting from an empty database, Bp Premier will prompt to enter the practice details when you first log in.
NOTE Ensure your practice details are correct. Bp Premier uses the practice information entered when printing items like scripts, invoices, and receipts.
There is only ever one practice name in the software. However, you can create multiple practice locations to be printed on scripts, invoices, and reports. A user selects a location when he or she logs in to the software.
Add practice details
- Select Setup > Practice from the Bp Premier screen. The Practice details screen will appear, showing:
- practice name
- a summary of how many licenced users you have
- the licence expiry date
- each practice locations that are set up
- contact details for the first location on file.
- Click Change. The Practice details update screen will appear.
- Update any details and click Save.

Add a location
- Select Setup > Practice from the Bp Premier screen. The Practice details screen will appear.
- Click Add next to the Practice Locations list field. The Location details screen appears.
- Complete the details for this location and click Save.

The Rural / Remote area checkbox controls which Medicare incentive is added to bulk-billed invoices for pensioners, health care card recipients, and children. If unticked, incentive '10990' is used; if ticked, '10991' is used.
LSP Number is the Location Specific Practice Number used when practices provide diagnostic imaging services or radiation oncology services.
ABN can be recorded for individual practice locations. A location's ABN is available for insertion in documents like invoices, receipts, Medicare forms, and general templates.
To delete a location:
- Select the location on the Practice details screen and click Delete. A prompt will appear if any users have provider numbers linked to that location.
- If the location is deleted, users with linked provider numbers will still be visible, but the provider number linked to that location will no longer be visible.
To restore a deleted location:
- Select the Show Deleted checkbox at the bottom of the screen to view deleted locations.
- Select the deleted location in the Practice locations list field and click Restore.
Configure billing
The following components of Bp Premier must be set up for your billing workflows to take effect:
- Manage or turn off links with another billing software package (only if applicable to your practice)
- Set up billing preferences in Setup > Configuration > Billing
- Add account holders
- Set the default invoice text
- Set up notes for invoices
- Set up payer allocation (only if your practice distributes bulk bill payments from a central account)
- Set up bank accounts
- Add bank and drawer names
- Set up private fee schedules and items
Turn off links to a prior billing package
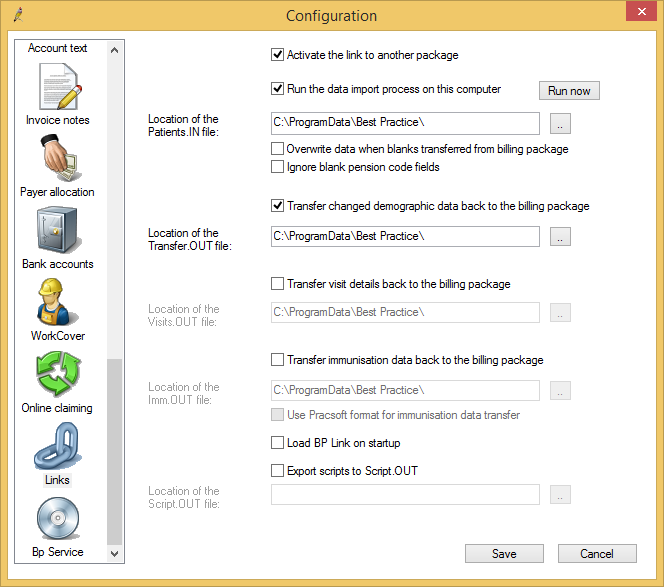
If the practice previously used a third party billing package and had a link established to transfer information between Bp Premier and this third party package, it will be necessary to disable this link.
To turn off the link, untick the selection Activate the link to another package. This will grey out all the paths and disable the linking process.
NOTE Disable this setting on each workstation.
Billing preferences
The Billing tab of the Configuration screen sets up the way accounts, payments, invoice and receipts work at your practice.

Configure the fields in this screen to suit your practice's preferences.
Field | Description |
|---|---|
Default billing | Sets the default billing type when new providers are added. |
New patients | Sets the default billing type when new patients are added. |
Billing precedence | Determines whether the doctor's or patient's billing type is used as the default when creating accounts. The billing type can be changed before printing or saving the account:
|
Payment Type | Determines which payment type will be selected when you first open the Payments screen: None, Cash, EFT, or Credit card. |
Default to the patients usual doctor for new accounts | If ticked, all new accounts generated from the Create Account screen will be billed to the provider listed in the patient's usual doctor field in the patient's demographics record. |
Enforce entry of reason for cancelling payments and invoices | If ticked, users must enter a reason for cancelling payments and invoices. |
Create separate accounts in Debtor list for each doctor | If ticked, the debtor list will generate separate debtor statements for each doctor and a drop down box will appear on the ‘Debtor list screen to allow you to select the doctor. If unticked, the ‘Debtor list screen will produce debtor statements for the practice rather than each doctor. |
Print practice name on accounts, receipts and statements | If ticked, the practice name and address entered in the Setup > Practice details > Edit screen will be printed on all accounts, receipts, and statements. If unticked, the doctor's name and details will be printed on all accounts, receipts, and statements. |
Prevent Direct Bill vouchers without Medicare and DVA no. | If ticked, accounts which are direct-billed to Medicare or DVA can't be entered if the Medicare number or DVA number is not recorded on the patients demographic record. If unticked, accounts can be direct-billed if the Medicare number or DVA number is not recorded. |
Allow invoices with no services to be printed | If ticked, accounts that do not contain any services can be printed. |
Print invoices and receipts on A5 paper | If ticked, all invoices and receipts will print in A5 format. If unticked, all invoices and receipts will print in A4 format. |
Print header on invoices and receipts | If ticked, all invoices and receipts will have the practice or doctor details printed at the top of the page (see also setting for Print practice name on accounts, receipts and statements). If unticked, nothing will be printed at the top of invoices and receipts. The letterhead will be used. |
Bill direct to insurance company if known | Tick this box if you want any accounts created for the patient to default to bill to the insurance company noted on the patient's demographics record. |
Prompt when there is a duplicate service on the same day | Tick this box to display, when saving an invoice, if an item number listed on the invoice has already been billed that day. |
Print Medicare No and DoB on Invoices and receipts | Tick this box to print the patient's Medicare number and date of birth in their invoices and receipts. |
Print health insurance fund details on invoices and receipts | Tick this box to print a patient's health care fund details from their demographic record in the patient's invoices and receipts. |
Include outstanding balance on Invoices and Receipts | Tick this box to print outstanding balances on invoices and receipts. |
Include Practice in the list of billing providers | Tick this box to include the provider's practice in the list of billing providers when creating an account. |
Default to DVA list for DVA accounts for Allied Health Professionals | Tick this box to display the Allied Health DVA item list when creating accounts for DVA patients. |
Include Services when using ‘Use previous account button | If ticked, the Use previous accounts function is available when creating an account to default to, including services. |
Round GST to the nearest 5 cents | Rounds GST amounts up or down to the nearest 5 cents. |
Apply Diagnostic Imaging rules to private accounts | Apply the multiple services rules for diagnostic imaging, as applied to Medicare and DVA accounts, to private fee accounts also. |
Check the 'Credit payment...' box when reversing a payment | When reversing a payment, tick the Credit payment to payer’s account checkbox on the Reverse Payment popup by default. If the Credit payment to payer’s account checkbox is ticked, the refunded amount will be credited to the payer’s account. See Reverse an unbanked payment for more information. |
Print name & address on accounts and receipts __ mm from left of page | Adjusts where the name and address is printed on accounts or receipts from the left of page. |
Start printing body of accounts and receipts __ mm from to top of page | Adjusts where the body of accounts and receipts are printed from the top of the page. This setting is useful if your practice prints on preprinted letterheads or forms. |
Layout of Medicare Claim form | Medicare regularly change the layout of their green claim form. This option allows you to change the print format to match the form you are using. The form number is printed on the bottom left hand side of the Medicare claim form. |
Account Holders
Accounts holders are companies and institutions that can be used as a third party account recipient for patient accounts (for example, Insurance Companies, Employers, or Hospitals). Account holders can also be used as an account recipient for non-patient accounts.
- From the main Bp Premier screen, select View > Account Holders.
- Select Add new to add a new account holder.
Default account text
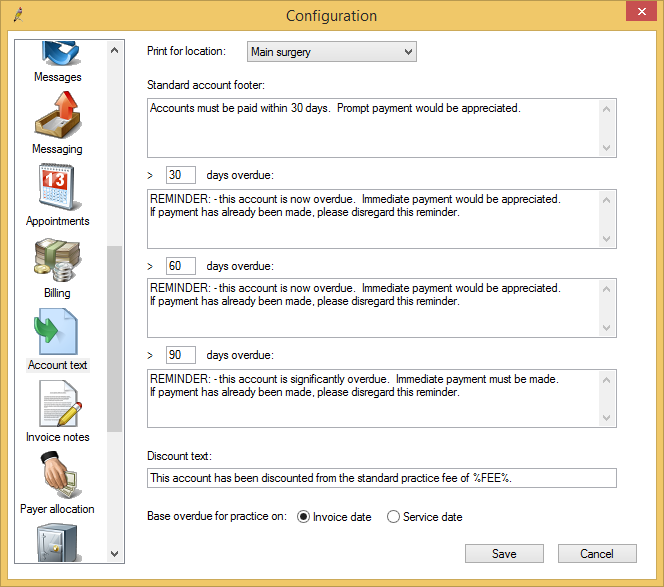
- From the Configuration screen, select the Account text tab. This screen configures the text that is printed at the bottom of accounts.
- If your practice has multiple locations, choose the practice location to set account text for from the Print for location field.
- Set the different text based on the length of the overdue period for none, 30, 60, and 90 days.
- Set the Discount text message. This text is printed on any accounts that are billed at a rate called 'Discount'. Any text here can contain the placeholder %FEE%, which is replaced during printing with the value of the account at the practice fee rate (not the discount rate).
- Click Save.
- Repeat steps 2-5 for each location you want to set invoice text for.
Invoice notes
From the Configuration screen, select the Invoice notes tab. This screen sets up a standard set of notes or service text that can be selected when creating Invoices.
- Select Add to add a new invoice note.
- Click Save when you are finished creating invoice notes.
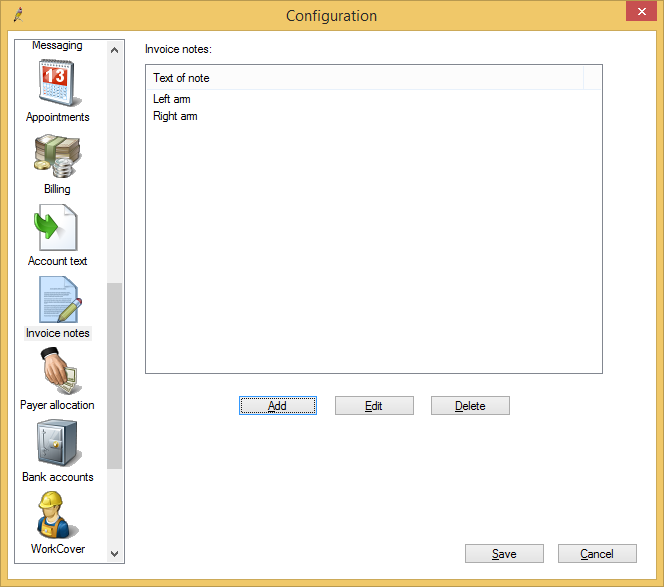
Invoice notes help ensure that Medicare accounts are created consistently.
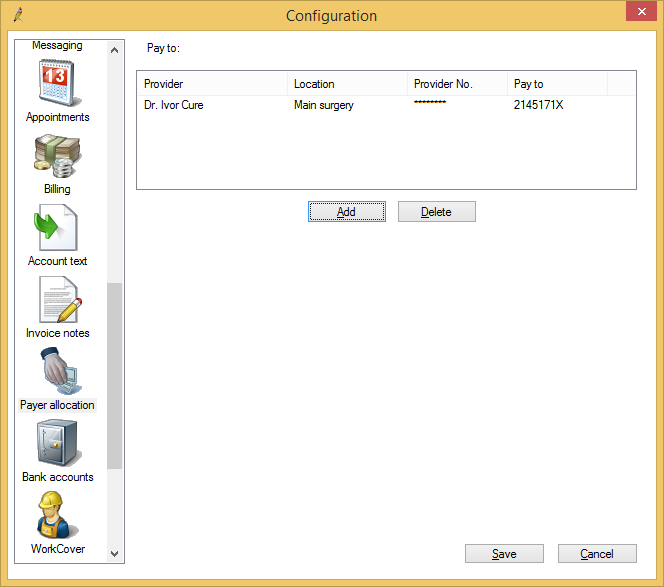
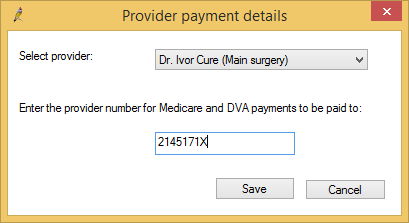
Payer allocation
Use payer allocation settings if an employee doctor's bulk bill payments are paid into the principal doctor's bank account and distributed later.
From the Configuration screen, select the Payer Allocation tab. This screen directs bulk billing payments to a provider other than the actual service provider.
- Click Add to add a new payer allocation. The Provider payment details screen will appear.
- Select the provider who is performing services. Payments to this doctor will be paid into an alternate provider's bank account.
- Enter the provider number for Medicare and DVA payments to be paid to. Payments will be paid to the bank account of the provider entered into this field.
Bank accounts
The Bank accounts tab configure bank accounts for your practice and providers.
- From the Configuration screen, select the Bank accounts tab.
- Click Add under Practice accounts to open the Bank account details screen for the practice.
- Complete the account details and click Save. You can add as many bank accounts for the practice as you need.
- Click Add under Provider accounts to open the Bank account details screen for a provider.
- Complete the account details for the provider and click Save. You can add as many bank accounts for providers as you need.
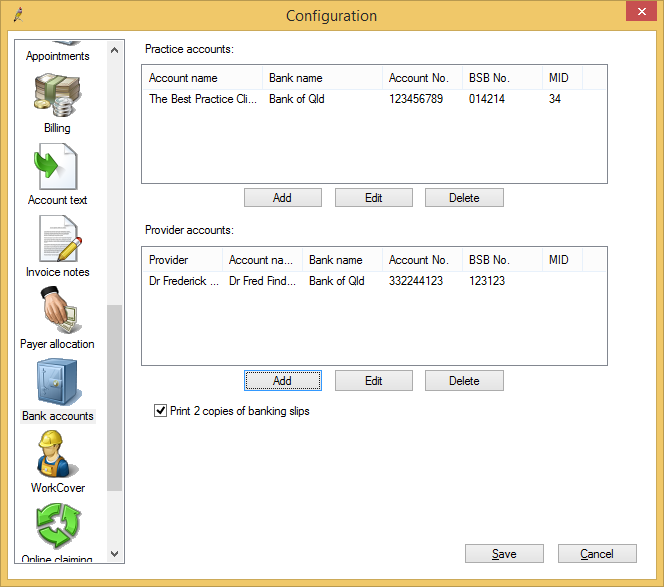
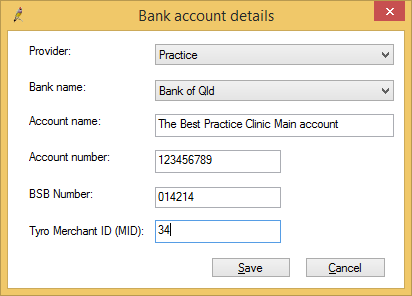
TIP If the bank name you wish to use is not listed, you can add a new bank by selecting Setup > Cheque details from the main Bp Premier screen.
Bank names and drawer details
The Cheque details screen adds the names of banks that are available when adding cheques to the Process Payment screen.
- From the main Bp Premier screen, select Setup > Cheque details.
- Click Add next to the Default bank names list to add a new bank name.
- Click Add next to the Default drawers list to add names of payers who regularly pay by cheque. The names in this list will be available in the Drawer list when adding cheques to the Payments screen.
- Click Save.

WorkCover defaults
The Workcover tab of the Configuration screen records details that will be used on accounts when 'WorkCover' is selected in the Create account screen.

NOTE These details would most likely be used in Queensland where there is a centralised facility for Workcover. In other states, Workcover accounts are often issued to individual employers or insurance companies.
Configure users
Add users
If you have not converted from a previous clinical management package, you will need to create records for each staff member who will be using Bp Premier, including doctors, nurses, reception staff, and practice managers. See Add, update, or deactivate a user for more information.
If you have converted from other management software, you will need to configure the converted users to match your practice's workflows in Bp Premier, and to grant permissions to access reports and functionality appropriate to each user.
Grant user permissions
When a new user is added, Bp Premier automatically allocates permissions according to the Category in the User details screen. You can modify permissions from the default for individual users.
NOTE If your practice has just enabled the Management module for the first time, Bp Premier users that were in the system before enabling Management will have no management permissions. You will need to review their permissions before they can use any of the management features.
Grant user access to reports
Bp Premier provides dozens of reports with the Management module. When you add a new user, Bp Premier will prompt you for the reports the user has access to.
IMPORTANT Only certain categories of user will prompt for reporting permissions when created. Other categories, such as 'Nurse' or 'Junior receptionist', will not be granted access to reports by default. You will need to set the Reports permission on the user's Permissions screen to 'Allow access' to enable the Set Reports button.
If you change a user's Category, Bp Premier will prompt you to reset the user's reporting permissions to the defaults for the new category.
- Open the User Details screen for the user.
- Click Set Reports. The Setup reports screen appears.
- Select the Report Types in the top right you want to grant access to: New, Old, or All. The report types will be displayed in the list of reports on the left hand side.
- Tick each report you want to user to be able to run.
- Set the Practitioner Access:
- All Practitioners — The selected reports will contain data from all practitioners at your practice.
- Self Only Access — The selected reports will contain data only from patients and data for the current user.
- Select the locations included in the reports from the Locations Access list.
- To apply the settings on the right hand side to all selected reports, click Apply to all ticked reports. Otherwise, repeat steps 4-6 to configure access to individual reports.
- Click Save.
User preferences
Preferences are set per individual user. Any user can update their own permissions as long as they have the relevant permission set in their user account. See Add, update, or deactivate a user for more information.
Configure sessions
Appointment book sessions determine the first and last sessions available at your practice and for each provider, as well as:
- lunch breaks
- public holidays and practice closing periods (for example, an office Christmas break shutdown)
- consultations outside of regular hours
- 'on the day' times for walk-ins and on the day appointments
- rostered times for providers on a 1-4 week roster cycle.
See Set up appointment book sessions and holidays for more information.
Configure fees
Bp Premier Management is distributed with the fee schedules for Medicare and the Department of Veterans Affairs.
The built-in practice fee defaults to the Medicare Benefits Schedule fee for each Medicare item. MBS schedules are available for use in the Account details screenwhen creating an account. The Medicare and DVA fee schedules cannot be changed nor added to by the user.
However, the practice fee schedule can be changed and can have other items added to it, and other fee schedules can be added, for example, AMA fees, or Workers Compensation fees.
Fees are configured by selecting Setup > Practice fees. The Setup practice fees screen will appear.

Add custom fee schedules
So that you can group custom fees when creating an account, you can set up as many custom fee schedules as your practice requires.
When staff are processing an account from the Account details window, all fee schedules that you have set up will be listed in the Billing schedule list. After you have selected a billing schedule from this list, any items added to the account will automatically use the fee for that item.
- To add a fee schedule, click Add schedule at the bottom of the Setup practice fees screen. The Fee schedule screen will appear.
- Enter the name of the schedule and indicate the default calculate method. No calculation method means users will enter the fees directly against the schedule.
- Indicate the rounding method, if applicable.
- Click Save to return to the Setup practice fees screen.

NOTE If you create a fee schedule called “Discount”, any accounts generated using that schedule will have the text from the Discount text field on the Configuration and Account text window added at the time of printing.
Add custom items
Custom items are items not included in the Medicare and DVA fee schedules. At the top of the Setup practice fees screen is a list of Customised Fees, which lists all items that have been customised by the practice. This list will appear when finalising a visit or creating an account.
- To add a custom item, such as AMA fees, click Add custom fee. The Setup fee item screen will appear.
- Type in the item number and description of the item in the Item description field.
- Select the fee schedule that you want to set this fee for and click Set fee. The Calculate fee screen opens.
- Enter the desired fee. For items that are not related to an MBS Item number, you can not select Use schedule fee or Schedule fee + n %. Click OK to save the change.
- The fee entered will appear against the fee schedule selected in step 3. Tick Apply the highlighted amount to all customisable items in list to set this fee for all schedules listed.
- Tick Add GST to this item when adding to account if the fee attracts GST.
- Click Save to save the fee. It will now appear in the Customised fee list.


Add a practice fee to an existing MBS item
- Double-click on an item in the Customised Fees list to display the Edit fee item screen. Select the practice fee schedule and click Set fee.
- From the Calculate fee screen, enter the practice fee to charge, or calculate the fee based on a percentage of the schedule fee or by adding a fixed amount to the schedule fee.
- The fee displayed will be saved for that item. This fee is static and does not change when the schedule fee changes, even if it was calculated from the schedule fee.
- This fee will now be used when creating accounts when the practice fee schedule is selected.
Add a practice fee to a new MBS item
- Click Set MBS item fee. The Set MBS Item fee screen will be displayed.
- Enter the item number. The MBS and DVA fees will be displayed in a list below the description of the item.
- Select Practice fee and double click or press the Set fee button to change the fee that will be charged for it. The Calculate fee screen will appear. Enter the fee to change and click Save.
Configure all other Management settings
My Health Record
If the practice has not already been using Bp Premier for patient HI lookups and accessing My Health Record, you must import the practice's certificates and set up eHealth. See Prepare your practice for My Health Record for more information.
Clinical lists
- From the main Bp Premier screen, select Setup > Configuration. The Configuration screen will appear.
- Select the Lists tab.
- Add entries relevant to your practice for the following lists:
- Appointment Type — A set of standard appointment types have been provided with matching icons. Create your own and assign your own icons. See Add an appointment type for more information.
- Reason for cancelling appointments — A standard set of cancellation reasons, to save staff typing in text each time a patient cancels an appointment.
- Contact Categories — Types of contacts (third-party groups and providers) relevant to your practice.
- Click Save.
Appointments
- From the Configuration screen, select the Appointments tab. This page sets up the default appearance of your Appointment book.
- Configure the fields in this screen to suit your practice's preferences for handling the Appointment book.
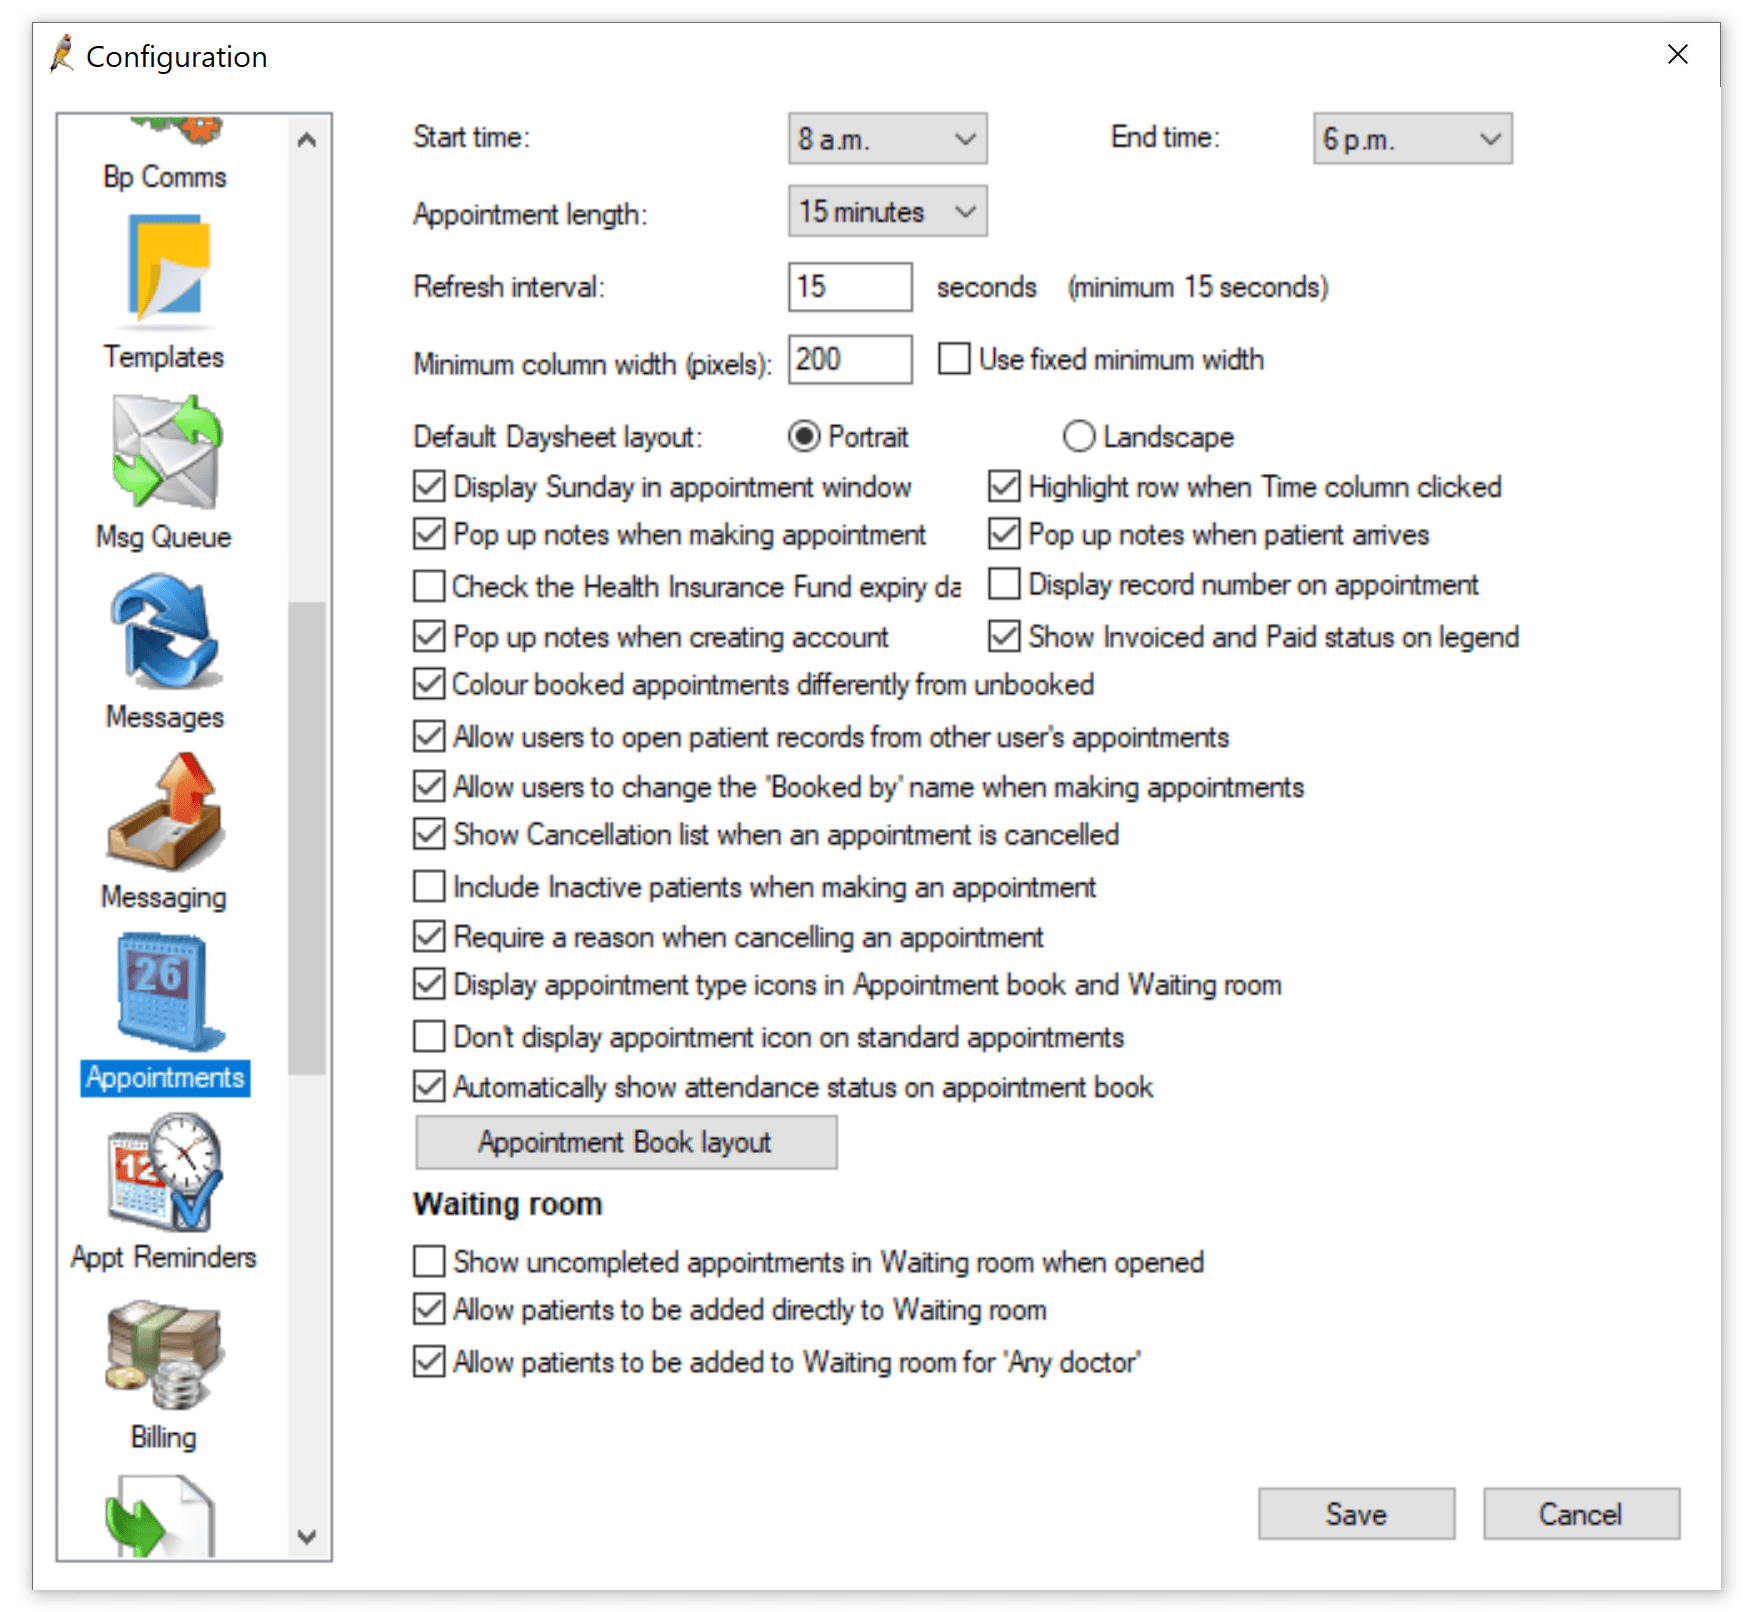
Field | Description |
|---|---|
Start time | Sets the time of the first displayed appointment slot. |
End time | Sets the time of the last displayed appointment slot. These times are independent of the times set up for user sessions. If a user has sessions set up outside these ranges, those appointment slots will not be visible from the Appointment book. TIP It is good practice to set these times one or two slots before and after the first and last appointments of the day. Setting a buffer like this creates a margin at the top and bottom of the appointment window that assists readability. |
Appointment length | Sets the basic length of an appointment slot. All appointments in the system must be multiples of this length. If it is set to 15 minutes, appointments can be made at 15, 30, 45, or 60 minute intervals. If, for example, some doctors have appointments at 10 minutes length and other doctors at 15 minutes length, the Appointment length setting will need to be set to 5 minutes to show both types of appointments on the same Appointment book. Take the following into consideration:
NOTE Individual doctor's appointment lengths are set when setting up their sessions. |
Refresh Interval | Sets the number of seconds between each refresh of the Appointment book. |
Minimum column width (pixels) | Sets the minimum column width (in pixels) for each column on the Appointment book. |
Default Day sheet layout | Portrait or Landscape. |
Display Sunday in appointment window | Tick this box to include Sunday as a column in the display of week view in the Appointment book. If this is not checked, Sundays can still be displayed when the Appointment window is in day view. |
Highlight row when Time column clicked | This checkbox highlights an entire row on the Appointment book when the Time column is clicked. |
Pop up notes when making an appointment | Bp Premier records notes against a patient's name in the Appointment notes field on the Patient demographics screen, and generates notes for items such as a patient has an outstanding account, or is due for a reminder to be sent. If the Pop up notes when making an appointment checkbox is ticked, any staff and system notes are displayed on the Add appointment screen when making an appointment. |
Pop up notes when patient arrives | If ticked, patient notes are displayed in a popup when a patient is marked as 'Arrived' in the Appointment book. |
Check the Health Insurance Fund expiry date | If ticked, the Health Insurance Fund expiry date is checked when accounts are created and a prompt displayed if expired. |
Display record number on appointment | Show the patient's record number from demographics, if any, in booked appointment book slots. |
Pop up notes when creating account | If ticked, patient notes are also displayed in a popup when creating an account for the patient. |
Colour booked appointments differently from unbooked | If ticked, booked appointments are displayed in a pale blue colour. If not, booked and unbooked appointments have the same colour in the same session. |
Allow users to open patient records from other user's appointments | If ticked, users who have access to open patient records will be able to start visits from other user's columns in the appointment book. This option is most commonly used if a practice has a treatment room that is used by many staff, and will allow the next available person to take the appointment. |
Allow users to change the ‘Booked by' name when making appointments | If ticked, users can change the name of the person who has booked the appointment when creating the appointment. |
Show Cancellation list when an appointment is cancelled | If ticked, when an appointment is cancelled, the cancellation list will show any patients who are waiting on an appointment to become available. |
Include Inactive patients when making an appointment | If ticked, both inactive and active patients are displayed in the patient search screen. |
Require a reason when cancelling an appointment | If ticked, the user will be forced to enter a reason for cancelling and appointment. |
Display appointment type icons in Appointment book and Waiting room | If ticked, appointment book icons will appear next to appointments in the appointment book and waiting room. |
Don't display appointment icon on standard appointments | If ticked, and the option Display appointment type icons... is ticked, standard appointments will not have icons displayed. next to them. |
Automatically show attendance status on appointment book | If ticked, an attendance icon indicates whether an appointment's attendance has been confirmed or declined:
|
Show uncompleted appointments in Waiting room when opened | If ticked, patients that are currently “With doctor” or “At billing” remain displayed in the Waiting room screen. If not ticked, the same patients are removed from the Waiting room screen as soon as the doctor opens the patient record and starts a visit. |
Allow patients to be added directly to Waiting room | If ticked, patients can be added to the Waiting room screen without having had an appointment made in the Appointment book. |
Allow patients to be added to Waiting room for ‘Any doctor | If ticked, patients can be added to the Waiting room screen without being allocated to a specific doctor. Patients will be visible in all doctors' Waiting room screens, and any doctor can choose to see them. |
Configure online claiming
Medicare online claiming is configured from the Online claiming tab of the Configuration screen.
See Set up Online Claiming for single Minor ID for more information.


This material is classified as commercial-in-confidence. Unauthorised distribution of this information may constitute a breach of our Code of Conduct, and may infringe our intellectual property rights. This information is collected and managed in accordance with our Privacy Policy, available on our website. © Copyright 2020