

You can set up Medicare Online claiming if your practice has more than one physical location and uses multiple Minor IDs.
Follow the instructions in this section if any of the following apply:
- your practice had several Minor IDs registered with your previous Practice Management Software, and you want to keep using them
- your practice is adding a new location that will have a separate Minor ID and certificate.
IMPORTANT If you are using another Management package that uses Online Claiming, you will need to finalise and receipt all claims in that package before configuring Bp Premier for Online Claiming. Medicare Online Claiming can only operate from one software package at a time.
If your practice has multiple locations, but you only use one Minor ID for Medicare online claiming, follow the instructions for setting up claiming for a single location instead. See Set up Online Claiming for single Minor ID for more information.
For more information about registering multiple Minor IDs and possible impacts on PIP payments, refer to the Department of Human Services website.
Can I install multiple NASH certificates?
Bp Premier sites are able to register and claim against multiple Minor IDs in the software. Each Minor ID will require a matching Medicare Site certificate to enable Medicare online claiming.
However, the NASH certificate (or eHealth Record Site Certificate), which is the certificate used to identify the practice to My Health Record online, is independent of the Minor ID. Your practice does not need to install multiple NASH certificates based on the number of Minor IDs registered in the software.
You only need to update your NASH certificate if your practice changes the HPI-O number (Setup > Practice Details > Change > Health Identifier) or the certificate is about to expire. See Check Medicare certificates for expiry for more information.
NASH certificates and practice incentives
There is no incentive benefit to a practice for installing more than one NASH certificate. A NASH certificate applies only to accessing My Health Record online and secure messaging. NASH certificates have no effect on how Medicare calculates Standardised Whole Patient Equivalent (SWPE) values for a practice.
For more information on practice incentives, refer to the Department of Human Services website.
If you changed to Bp Premier from another billing package
If you recently changed from another billing package, your practice will most likely not have the correct Medicare components installed on your system. Before you continue with the configuration, check the following:
- Check that you have Bp Premier version 1.7.0.500 or higher installed. From the main menu, click Help > About and check that the version or Build No. shows 1.7.0.500 or higher.
- In File Explorer, browse to the C:\ drive of the Bp Premier server PC and look for the folder C:\Program Data\BPOnline.
- Browse again to the folder c:\Program Data\BPOnline. If the folder still does not exist, contact Best Practice Software support for assistance.
If the folder does not exist, the Medicare components have not been installed during the installation of Bp Premier. To apply these components, close down the Bp Premier server and reapply the program upgrade for your version of Bp Premier. When you reach the Online Claiming installation screen, tick Install the Best Practice Software Online Claiming module.
Installing the Medicare module
You can install the Bp Premier Medicare module if you did not select to install this module the first time you installed Bp Premier. This module allows Bp Premier to connect to Medicare to verify patient Medicare/DVA eligibility and send patient and bulk bill claims online.
- Locate the program upgrade media for your version of Bp Premier. This might be a DVD sent to you by Best Practice Software, or an .exe file that you downloaded from the Best Practice Software website.
- Run the upgrade file.
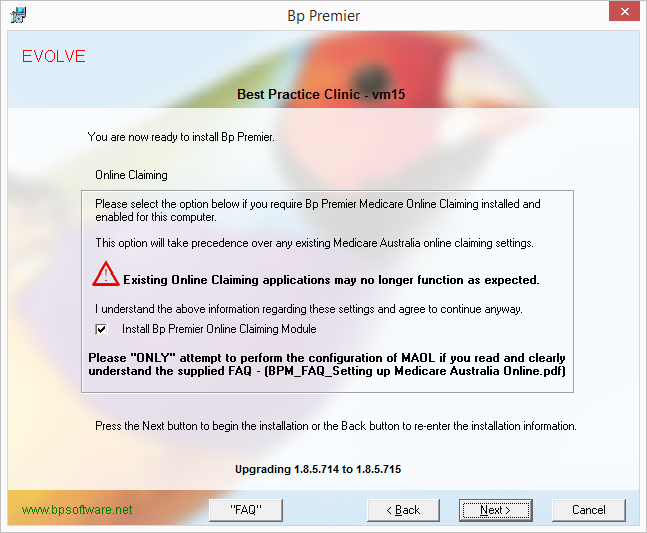
- Proceed through the upgrade screens, leaving default values for everything until you reach the Online Claiming installation option.
- Tick the checkbox Install Bp Premier Online Claiming Module and click Next.
- Complete the rest of the installation using the default values. You can now enable online claiming in Bp Premier.
If you have previously set up Medicare Online at your practice, you may already have completed steps 1. Obtain your Minor ID and 2. Register with Medicare.
1. Obtain your Minor ID
The Minor ID is an 8 digit number derived from your Best Practice Software Site ID.
- Identify your Site ID. Select Help > About from the main Bp Premier screen. Your Site ID is displayed in the bottom left of the screen.
- Take your BP Site ID and prefix it with the letters BPS.
- Pad the ID with zeroes so that the total length is 8 characters.
For example, if your Best Practice Software Site ID is '849', your Medicare Minor ID number would be 'BPS00849'.
If your practice uses multiple Site IDs, you will have a Minor ID for each Site ID.
If you are adding a new location to your existing Bp Premier installation that will require a new Minor ID and Medicare Site Certificate, contact the Best Practice Software Relationship team on 1300 40 1111.
2. Register with Medicare
You must register and obtain a Medicare Site certificate for each practice location.
- If you are already registered but are using another management package, you can use your current site certificates to set up Medicare Online in Bp Premier, but you will still need to notify Medicare to tell them you are now using Bp Premier. You will have to supply all Minor IDs.
- If you are not currently registered, you will need to register and apply for a Medicare Site Certificate. You will have to supply all Minor IDs.
- Each time you add a new doctor to a location, you will have to notify Medicare to add this doctor.
The Practice Details Form for online claiming and Payee Provider Banking Details Form can be found in the list of Medicare forms at:
https://www.humanservices.gov.au/health-professionals/forms/
3. Enable online claiming
If you have obtained a current Medicare Site certificate and Minor ID for each of your practice locations, you are ready to set up Medicare Online claiming in Bp Premier.
I have already set up Medicare Online claiming for one practice location
If you have already configured Bp Premier for one practice location, and just need to add the site certificates for new practice locations, select Setup > Configuration > Online Claiming from the main screen and tick the Multiple Medicare Locations checkbox. Go to 4. Import site certificates.
This is the first time I am setting up Online Claiming for Bp Premier
- Log in to the Bp Premier server as a user with administrator permissions.
- Select Setup > Configuration from the main screen. Select the Online claiming tab.
- Complete the fields in this screen, using the table below for guidance.
- Click Change to display the Path to Certificate Store screen. Click Save. Bp will prompt that the certificate store does not exist and ask ‘Would you like to create one now?'
- Click Yes to create the store. You will be prompted for a passphrase for the certificate store.
- Click Import Medicare certificate to import the Medicare Australia public key. The HeSA Certificates screen will appear, showing the currently installed certificates.
- Click Change folder. Browse to your Medicare CD, or the location where you have stored your PKI certificates, and click OK.
- Select a certificate labelled 'Medicare Australia...' and click Attach. If the certificate is imported successfully, Bp Premier will display 'The certificate was successfully imported'.
- Repeat step 8 for each certificate labelled with 'Medicare Australia'.
- Click Close to close the HeSA Certificates screen. Keep the Configuration screen open.

Field | Description |
|---|---|
Activate Online Bulk Bill Claiming | Tick to activate online claiming for bulk billing, if your practice offers bulk billing and wishes to process bulk billing claims through Medicare online claiming. |
Activate Online Private Patient Claiming | Tick to activate online claiming for private patients, if you wish to process patient claims through Medicare online claiming. |
Activate Tyro Integrated EFTPOS | Tick this option if your practice uses a Tyro terminal and you wish to process online claims through the Tyro terminal. See Configure Tyro for more information. |
Activate EasyClaim Private Patient Claiming | Tick this option if you wish to process Easyclaim payments through the Tyro terminal. See Configure Tyro for more information. |
Always send private patient claims by best available method | Tick if you intend to use the Online Patient Claiming for private billings and wish to default for all private claims to be sent to Medicare. |
Minor ID | Leave this field empty. |
Multiple Medicare Locations | Tick this checkbox. IMPORTANT If your practice has multiple Minor IDs associated with your practice locations, you must create each location in the Setup > Practice Details screen and assign each location the correct Minor ID to successfully process online claims. See 5. Assign certificates to practice locations for more information. |
Proxy details | If your practice network uses a proxy server, enter the Proxy ID and Proxy password for the proxy server so that online claiming can connect through the proxy. |
A5 Vouchers | Tick to print Medicare and DVA vouchers as two separate A5 pages. If not selected, the two copies will print side by side on a single A4 page. |
Print 2 copies of vouchers | Tick if you wish to print two copies of each Medicare assignment form. |
Maximum No of vouchers in a batch | Defaults to 80. This is the recommended maximum batch size, but can be reduced. Best Practice Software do not recommend that you increase this value. |
Default number of months to display when viewing all batches | Sets the default number of months to display when viewing batches from the Direct Bill Batches screen. |
Path to Certificate Store | The certificate store is created on the Bp Premier server and shared by all workstations where transmission to Medicare is to occur. This path is where Bp will store the certificates after they are imported using the Import Medicare Certificate and Import site certificates buttons. DO NOT copy your Medicare certificates manually into this folder. Certificates must be imported using the buttons. Do not change this folder from C:\ProgramData\BPOnline\. |
NOTE Do not misplace this password. You are responsible for this password; Best Practice Software cannot retrieve this for you.
4. Import site certificates
If you ticked Multiple Medicare Locations, the Import Site Certificates button will be disabled. You must import Medicare Site certificates using Medicare's PKI certificate manager.
- Install the PKI certificate manager on the Bp Premier server.
- Run the PKI Certificate Manager. The Store Setup Wizard will appear.
- Select Use an Existing Store and click Next.
- Click ... and browse to the file C:\ProgramData\BPOnline\hic.psi. Click Open, and click Finish on the Store Setup Wizard. The PKI Certificate Manager screen will appear.
- Click Import.... The Certificate Import Wizard will appear.
- Enter the passphrase for the certificate store, supplied to you by Medicare. The passphrase is the same password set for the certificate store when first setting up Medicare Online. Click Next.
- Click ... and browse to the folder containing the site certificate for the location you want to add. Select the file fac_encrypt.p12 and click Open. Click Next.
- Enter the PIC password for the location's site certificate. Click Next. The certificate will be displayed ready for import.
- Click Finish to import the fac_encrypt.p12 certificate into the PKI Certificate Manager screen.
- Repeat steps 5—9, but select the file fac_sign.p12. Both certificates should be imported into the PKI Certificate Manager screen.
- Repeat steps 5—10 for each practice location you want to configure Medicare Online for. You will need to import the fac_encrypt.p12 and fac_sign.p12 files for each location.
- Record the value in the Email column for each certificate pair shown in the PKI Certificate Manager screen. You will need to enter associated email addresses in 5. Assign certificates to practice locations.
- Close the PKI Certificate Manager.
Go to the Department of Human Services PKI page and click the link at the bottom of the page to install the PKI Certificate Manager Installer software.


If you have previously configured Bp Premier for Medicare Online, two certificates will already be listed in the Personal tab. These certificates apply to the location you had specified as the primary location for your practice. If you have not set up Medicare Online before, the Personal tab will be empty.


5. Assign certificates to practice locations
To handle online claiming, Bp Premier must know which certificates are associated with which practice locations.
- Select Setup > Practice Details. The Practice Details screen will open.
- Select the first location in the Practice Locations list and click Edit. The Location Details screen will appear.
- Enter the Minor ID for the location.
- Enter the Medicare Certificate E-mail for the location. The associated email for a certificate can be found in the PKI Certificate Manager.
- Click Save.
- Repeat steps 2—5 for each practice location.


6. Test the link to Medicare on the server
Before sending your first batch, Best Practice Software recommend that you test the link to Medicare for each location.
- Log in to the Bp Premier server and select the first Location from the Login screen. Click Login to continue logging in.
- From the main screen of Bp Premier, select View > Patients. The Patient list screen will appear. Enter a surname or part to Search for.
- Select a patient name and click View details. The Edit patient screen will appear.
- Click Medicare / DVA eligibility check at the bottom of the screen. This will contact Medicare and check whether the Medicare No. is valid for this patient. If the communication is working correctly, Bp Premier will display a message similar to the one below.
- If the test is successful, exit the Edit patient screen and perform the test from step 1 for each practice location.

If the test is not successful, contact Best Practice Software Support to diagnose the problem.
7. Configure all workstations
I have already set up Medicare Online claiming for one practice location
If you have already configured Bp Premier for online claiming, and just added site certificates for new practice locations, perform 6. Test the link to Medicare on the server on each workstation to test connectivity to Medicare.
If each location connects to Medicare on each workstation, setup is complete.
This is the first time I am setting up Online Claiming for Bp Premier
- Exit from Bp Premier on the server.
- Browse to the folder C:\ProgramData\BPOnline on the server and share the folder across the network.
- Give all Windows users who access Bp Premier ‘full control’ permissions to the folder and its contents.
- Browse to the file HIC.psi, right-click and select Properties > Security tab. Ensure that all users have ‘full control’ permission to this file.
- Go to the first workstation.
- Log in to Bp Premier on the workstation.
- Select Setup > Configuration from the main screen. Select the Online claiming tab.
- Tick Activate Online Bulk Bill Claiming, Activate Online Private Patient Claiming, or both, depending on the online claiming services your practice offers.
- Set the Location Name to your practice's Main Surgery and the Location code for your practice is correct.
- Beside Path to certificate store, click Change and either type in the UNC path to the certificate store on the server (for example, '\\servername\BPOnline') or browse to this folder and click Save.
- Click Check certificate expiry. If sharing has been set up correctly for the certificate store, Bp Premier will display the certificates and their expiry dates.
- Follow the steps outlined in 6. Test the link to Medicare on the server to confirm that the workstation can communicate to Medicare.
- Repeat steps 5—12 on all workstations on the network.
NOTE Your practice's IT support can help if you are unsure how to share folders and change access permissions.
Check the folder C:\ProgramData\BPOnline exists on that workstation. If this folder is not found on the workstation, reapply the program upgrade for the server version of Bp Premier on this workstation. When you reach the Online Claiming installation screen, tick Install the Best Practice Software Online Claiming module.
Best Practice Software recommend that you create an online batch with just a few transactions and transmit this as a test. If the text batch is successful, you can create larger batches for transmission.

