

eRx Script Exchange (eRx) is an industry initiative led by Fred Health with the support and endorsement of the Pharmacy Guild of Australia. It is the first nationally deployed barcode prescription transmission system in Australia. Prescriptions are encrypted and transmitted from prescribers to the secure eRx exchange and retrieved from eRx by pharmacists for dispensing upon presentation of a prescription.
Refer to the web site www.erx.com.au for more details and registration.
Before you begin
Before you can begin configuring and using eRx Script Exchange, Best Practice Software recommend upgrading to the latest version of Bp Premier to ensure the latest version of the eRx adapter is installed. Your Bp Premier server PC should also satisfy the system requirements.
The practice must also:
- have registered with eRx. Each practitioner who wishes to participate must have received their Entity ID. You will need the entity IDs for configuration.
- use Medicare online. You will need the Medicare Site Certificate for the Practice and the PIC password for eRx configuration.
My practice uses SafeScript
Bp Premier's integration with eRx supports SafeScript checks. A provider must enable SafeScript in their user preferences to enable checking. You can only configure a provider for either eRx or MediSecure, not both, if that provider has SafeScript enabled. See SafeScript (Victoria) for more information.
Install eRx
Perform the following procedures on the Bp Premier server only.
Enter the Entity IDs for each doctor
- Browse to the folder C:\Program Files\Best Practice Software\BPS and double-click on the file eRX Setup.exe, or browse to Start > Best Practice Software eRx setup.
- Log in using your Bp Premier username and password. The eRx Setup screen will appear.
- Enter the name of the Bp Premier server in the Server name field.
- Change the Port from the default value if required (you only need to change this if you know that port 3440 is used by another process).
- Insert the Medicare Site Certificate CD into the server computer.
- Click on the Setup Users button to display the eRx users screen. This screen lists all providers set up in Bp Premier. For each provider who has registered for eRx, you should have received an Entity ID.
- For each provider registered for eRx:
- Select the provider's name in the list and click Change. A second eRx setup screen will appear.
- Enter the provider's Entity ID.
- Click on the ... button next to Enter the certificate file to use field and browse to the Medicare Site certificate CD.
- Select the file called FAC_Sign.p12 and click OK.
- In the Enter the certificate file’s password, enter the PIC password for the Medicare certificates (the password will be on the letter received from Medicare with the certificates).
- Click Save.

- Click the Close button to return to the eRx setup screen.

Import the eRx certificates into Bp Premier
Click the Import Certificates button on the eRx setup screen. The system will automatically import the eRx certificates. You may receive a Windows Security Warning about the validity of the eRx Script Exchange certificate. If you have inserted the correct original Medicare Site certificate CD, click Yes to continue.
Patient Consent
(Optional)
By default, all scripts are sent electronically to eRx. If you know one or more patients do not wish to give consent to use eRx, click the Patient consent button to exclude them from having their scripts transmitted. You can edit a patient's eRx consent at any time. See Change a patient's eRx consent for more information.
Log eRx Transactions
(Optional)
Tick the checkbox Log eRx transactions on this computer only if you have been asked to do so by eRx or Best Practice Software Support. This option records information during transactions for troubleshooting.
Click Close to save the settings and exit the eRx setup screen.
Start the eRx Services in Windows
Perform this step on the Bp Premier server only.
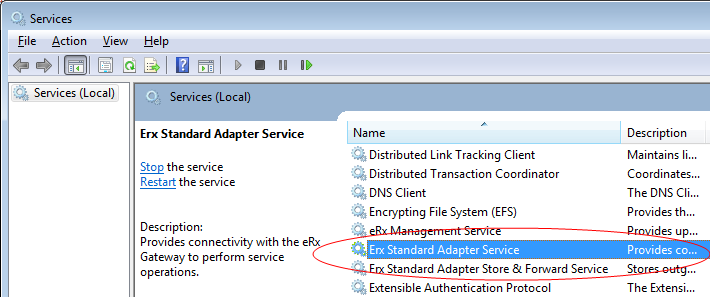
- In Windows, navigate to the Services screen. Click the Windows logo in the bottom left. Click the down arrow to open applications and navigate to Control Panel > Administrative Tools > Services. The Services screen will appear.
- Scroll down the list and look for ERx Standard Adapter Service and ERx Standard Adapter Store & Forward Service.
- Double-click on the eRx Standard Adapter Service. Set the Start up type to Automatic.
- If the Service Status is 'Started', click Stopand click the Start button. Otherwise, click the Start button.
- Double-click on the eRx Standard Adapter Store & Forward Service. Set the Start up type to Automatic.
- If the Service Status is 'Started', click Stop and click the Start button. Otherwise, click the Start button.
- Check that both services have a status of 'Started'.
- Close the Services screen.
Activate eRx on workstations
After you have configured the services on the server, log out of Bp Premier on each workstation and back in again to activate eRx on each workstation.
Troubleshooting
eRx releases new versions of the adapter that transmits scripts to eRx. As part of a Bp Premier server upgrade, the old eRx adapter is uninstalled and replaced with the new version. The eRx adapter files are stored in the folder C:\Program Files\eRx rather than in the folder C:\Program Files\Best Practice Software\BPS\eRx.
If a Bp Premier upgrade or eRx configuration fails due to permissions, access to this folder may be a cause. Practices with IT policies that restrict access to local and network folders will need to provide access to the folder C:\Program Files\eRx for the upgrade.

