Rather than deleting an appointment when a Client does not show up, cancelling an appointment allows these changes to be tracked and reported on. The Appointment Summary report can be used to track cancelled appointments.
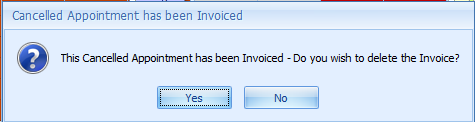
On occasion an Appointment that has already had an Invoice created may need to be cancelled. The business rules on whether a cancelled appointment is charged for vary from practice to practice. There are instances when the Invoice will need to be deleted and some when it will not.
To cancel an appointment, open the Appointment in the Appointment Book.
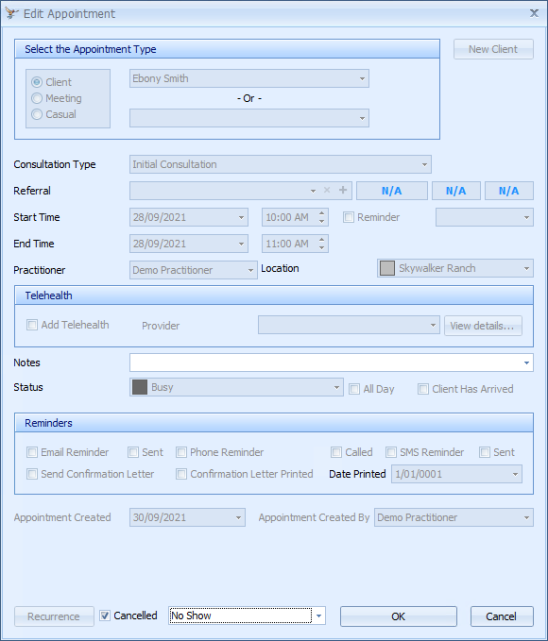
- Click on the Cancelled tickbox.
- Choose a Cancellation Reason.
- Click OK to save the changes.
- Click OK.
- Click Yes to delete, or No to Keep the Invoice.
The Appointment form will turn grey, as shown above.
This is optional but it can be used to do some analysis about why Clients cancel.
Cancellation Reasons are configurable and can be changed in Data Maintenance.
If the Appointment has related SMS or Emails reminders, these will be cancelled and included in the Appointment Cancelled notification.
Reinstating an Appointment does NOT reinstate the required reminders.
If the Appointment has been Invoiced, the Cancelled Appointment has been Invoiced dialogue box will display.
By default the Appointment will turn Red unless the Cancelled Appointment colour has been changed in Options > Appointment Book.
Cancelled appointments can also be removed from being displayed in the Appointment Book by clicking on Show Cancelled button in the Appointment Book Navigator toolbar.


 AU
AU 