This article describes how to generate documents in Lyrebird Health, such as medical certificates, patient and specialist letters, CCM plans, letters to referring clinicians, and mental health care plans in Bp Premier.
In this article:
Generate Post Consultation Documents
With just one click, Lyrebird can create a single document or multiple documents at once. With this feature, you can choose whom you want to receive your letters, ensuring that each letter's content is accurate and contains the most important details.
TIP Uploading examples of previously written documents will allow Lyrebird to scan them, understand your unique writing style, and replicate them in seconds for future consults. For more information, see Customisation in Lyrebird.
After the initial or review consultation has been completed, you will be provided with the opportunity to create post-consultation documents such as Medical Certificates, Patient and Specialist Letters, Letters to referring Clinicians and Mental Health Care Plans.
NOTE Documents generated by Lyrebird must be manually copied from the Lyrebird Health browser and pasted into a word processor document or template in Bp Premier.
- To generate post-consultation documents, select Write Document.
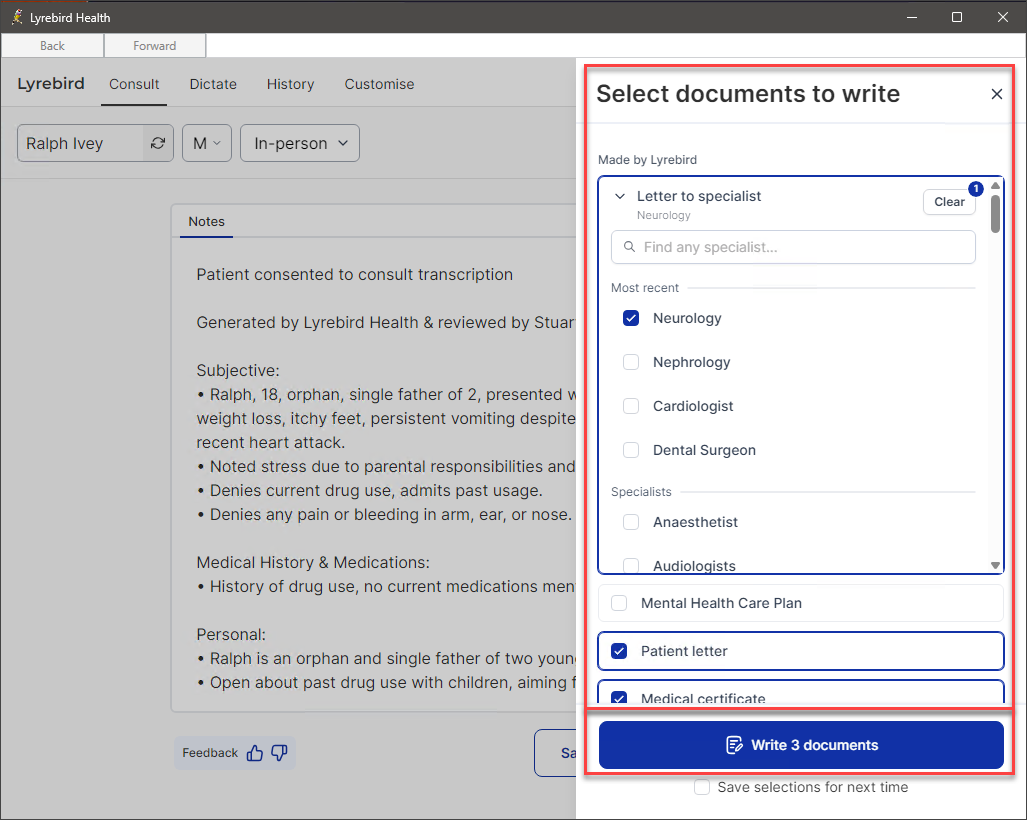
- The Select Documents to Write panel will appear. Select one or more Document Types, then click Write Document.
- Medical certificates
- Patient letters
- Specialist letters
- Letters to referring clinicians.
- Mental health care Plans
- The selected Document Types will be generated by Lyrebird in a new textbox on the Consult screen. When Lyrebird creates multiple documents, each will be displayed in a separate tab.
- Once Lyrebird has finished generating the document, you will be provided the option to:
- Click Save to save the document to Lyrebird. Documents saved are viewable on the Lyrebird Health browser's History screen.
- Click Copy to copy the contents of the document, which can then be pasted directly into a Word processor document or a template in Bp Premier.
- Only for document type Patient Letters: To send the Patient Letter via email from Lyrebird, click Share to patient. For more information, Send Patient Letters via email from Lyrebird.
- Once all the required post-consultation documents have been completed, resume the Lyrebird Consult workflow.
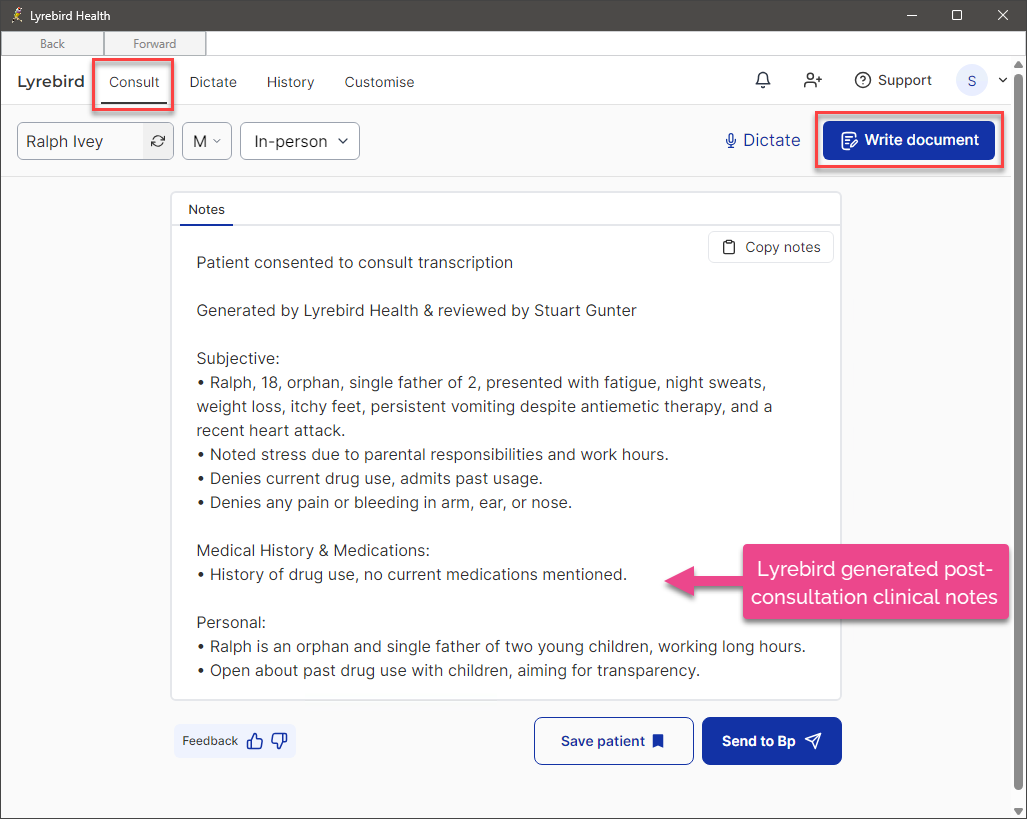
The following Document Types can be generated by Lyrebird:
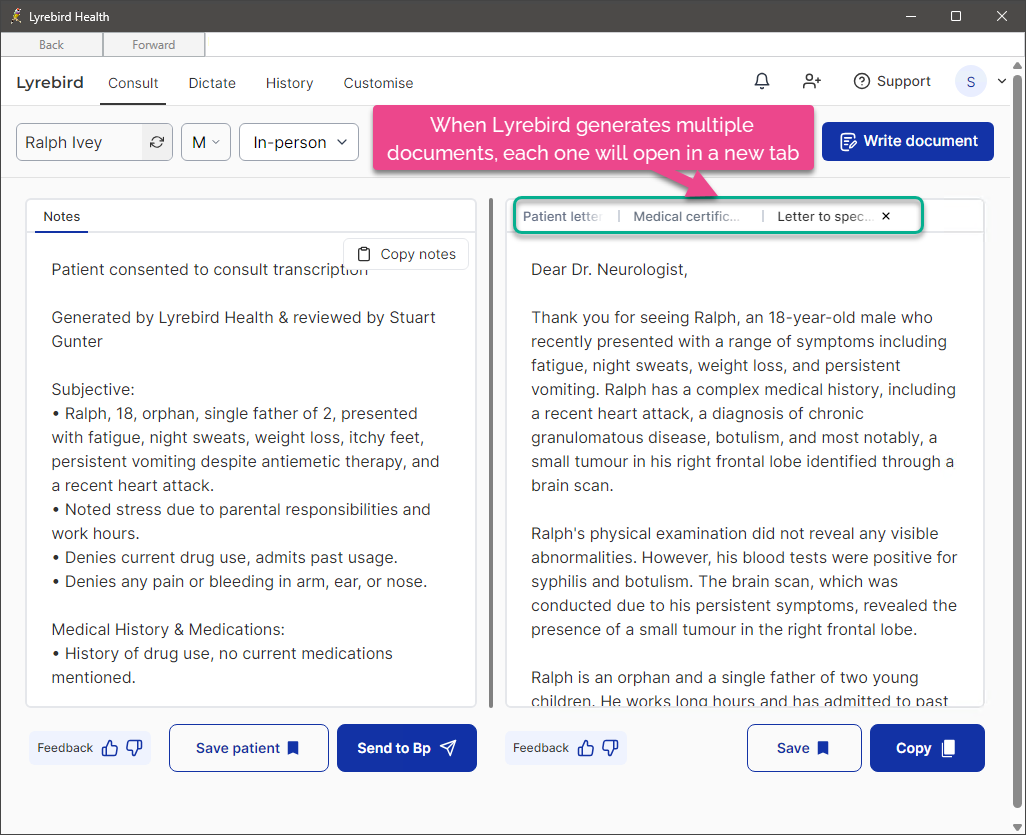
TIP Each document type must be saved or copied individually for each open tab.
Generate Documents from Saved Patient Consult Notes
With just one click, Lyrebird can create a single document or multiple documents at once. With this feature, you can choose whom you want to receive your letters, ensuring that each letter's content is accurate and contains the most important details.
TIP Uploading examples of previously written documents will allow Lyrebird to scan them, understand your unique writing style, and replicate them in seconds for future consults. For more information, see Customisation in Lyrebird.
Lyrebird can generate Documents from saved patient consultation notes, including Medical Certificates, Patient and Specialist Letters, Letters to referring Clinicians and Mental Health Care Plans.
NOTE Documents generated by Lyrebird must be manually copied from the Lyrebird Health browser and pasted into a word processor document or template in Bp Premier.
- From the patient record, click the
 Lyrebird Health icon on the toolbar. The Lyrebird Health browser will appear.
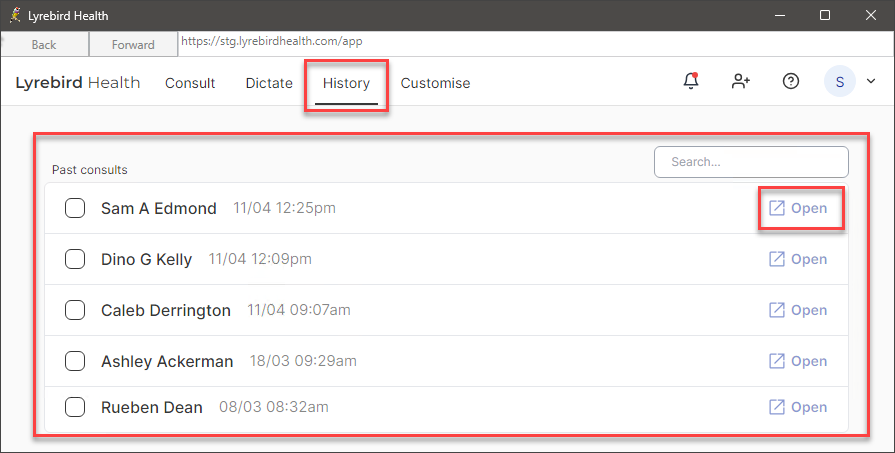
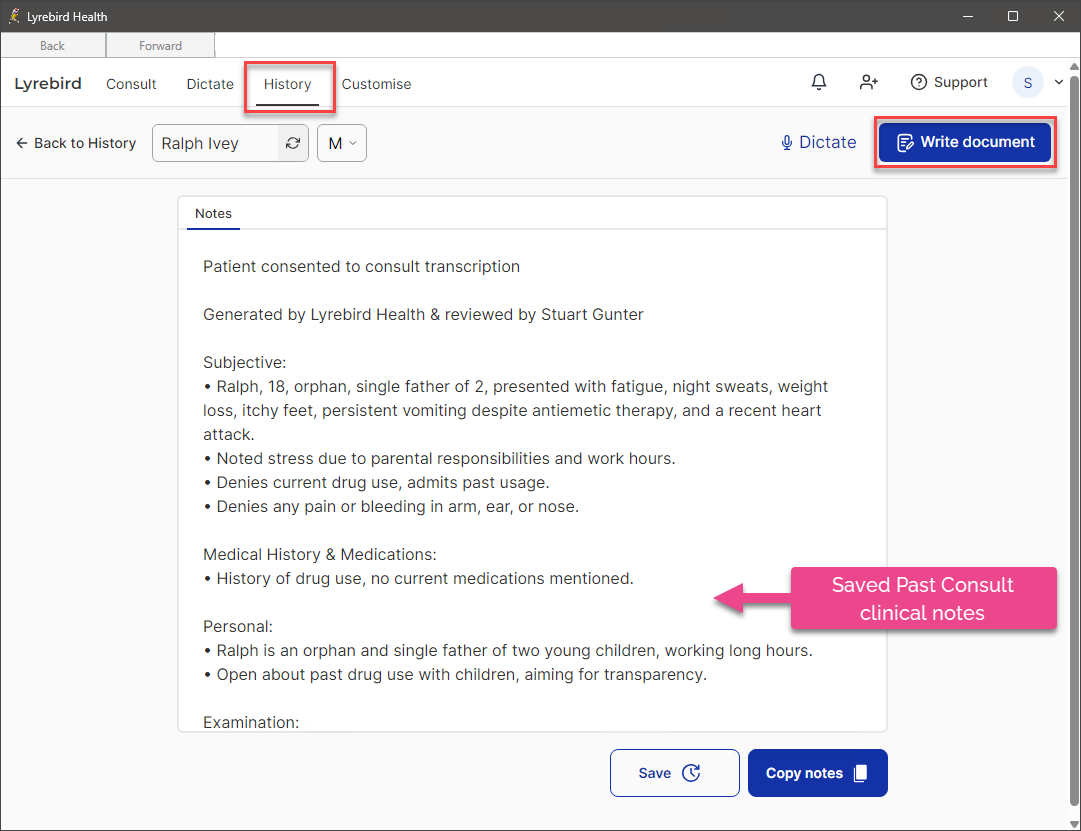
 - From the menu in the Lyrebird Health browser, click History. The History screen will appear.
- To view saved past consults, search for the patient by name and click Open on the required consult.
- To generate documents, select Write Document.
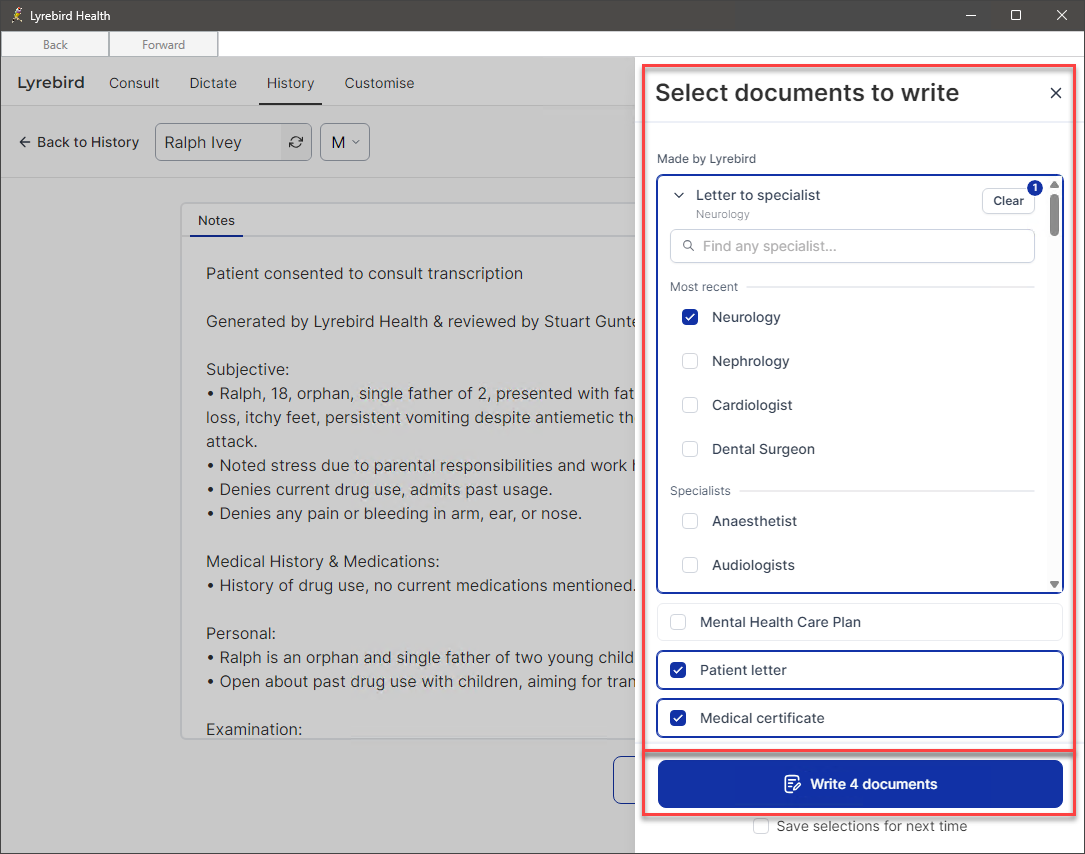
- The Select Documents to Write panel will appear. Select one or more Document Types, then click Write Document.
- Medical certificates
- Patient letters
- Specialist letters
- Letters to referring clinicians
- Mental health care Plans.
- The selected Document Types will be generated by Lyrebird in a new textbox on the History screen. When Lyrebird creates multiple documents, each will be displayed in a separate tab.
- Once Lyrebird has finished generating the document, you will be provided the option to:
- Click Save to save the document to Lyrebird. Documents saved are viewable on the Lyrebird Health browser's History screen.
- Click Copy to copy the contents of the document, which can then be pasted directly into a Word processor document or a template in Bp Premier.
- Only for document type Patient Letters: To send the Patient Letter via email from Lyrebird, click Share to patient. For more information, Send Patient Letters via email from Lyrebird.
![]()
The following Document Types can be generated by Lyrebird:

TIP Each document type must be saved or copied individually for each open tab.
Generate Mental Health Care Plans in Lyrebird
Lyrebird Health has developed a new workflow for Mental Health Care Plans that is designed to enhance efficiency for general practitioners. When activated, Lyrebird Scribe is capable of identifying discussions related to Mental Health Care Plans during a consultation and provides tools to:
- Complete a DASS-21 assessment either during or following the consultation
- Create pre-populated templates for Mental Health Care Plans and referral letters
- Ensure that all documentation is saved directly in Bp Premier to Correspondence Out, eliminating the need for any manual copying or pasting.
Visit the Lyrebird Health website to watch a video walkthrough of the Mental Health Care Plan workflow.
- When Lyrebird detects that a Mental Health Care Plan is being discussed during a consultation, the consult Notepad displays the 'Action Detected' message. It will prompt, 'Mental Health Care Plan, Would you like to begin documentation and assessment?' to proceed, click Start.
- The Mental Health Care Plan ‘In Progress’ screen will appear. To complete the DASS-21 assessment:
- Click Open in Browser to complete the assessment with the patient on your computer during the consultation.
- The patient's mobile number will be pre-populated from the patient record. Confirm the patient's mobile phone number before clicking Send; the patient can complete the DASS-21 Assessment during or after the consultation.
- When the DASS-21 Assessment has been completed, the results are calculated and saved in the consult Notepad along with the completed form.
- At the end of the consultation, Lyrebird will automatically generate a Specialist letter to a psychologist and a Mental Health Care Plan template.
- When you have finished adding information to the Mental Health Care Plan, click Review & Finalise.
- A preview of the GP Mental Health Treatment Plan will be displayed. Tick to confirm that you have discussed the following with the patient:
- The patient consented to the GP Mental Health Treatment Plan
- Psychoeducation has been provided to the patient
- The assessment has been discussed with the patient
- All aspects of the plan were discussed with the patient, and a date for review has been agreed upon.
- To save the Mental Health Care Plan to Bp Premier, click Save to Correspondence Out. The Mental Health Care Plan will be stored in the Correspondence Out section of Bp Premier.

The Mental Health Care Plan workflow can be triggered manually in Lyrebird by navigating to Notepad > Workflows.


The images below show an example of the DASS-21 Assessment that was sent to the patient's mobile phone number.

|

|

To view the completed DASS-21 Assessment form in Lyrebird, click View Completed form. The Patient DASS21 Form Answers screen will appear.

The completed DASS-21 Assessment form will be stored in Correspondence Out within the Patient record in Bp Premier.

NOTE The DASS-21 Assessment scores will not be automatically recorded in Observations or Today’s Notes within the Patient Record.
The Specialist Letter will not be written back to Bp Premier. Click Copy to copy the document's contents, which can then be pasted directly into a Word processor document or a template in Bp Premier.
The Mental Health Care Plan template will pre-populate with relevant details from the consult and the patient record. Review the content and add any other pertinent information.

Lyrebird Health will suggest an MBS Item Number for which the patient may be eligible. Best Practice Software recommends that you confirm the patient's eligibility for the MBS Item Number before submitting a claim to Medicare.
NOTE The MBS Item Number suggested by Lyrebird Health will not be auto-populated in the Finalise Visit screen; you will need to manually enter the MBS Item Numbers to Bill.

The DASS-21 Assessment and the Mental Health Care Plan will be saved in an RTF format in Bp Premier.

TIP To view the Mental Health Care Plan in Correspondence Out, manually refresh the patient record by pressing F5 on your keyboard.
The Mental Health Care Plan workflow has been completed.
To learn more about the Mental Health Care Plan workflow in Lyrebird, visit the Lyrebird Health Help Centre.
Generate Chronic Condition Management Plans
The new framework for Chronic Disease Management introduced the GP Chronic Condition Management Plan (GPCCMP), which replaces the existing GP Management Plan (GPMP), Team Care Arrangement (TCA), and related review items. Watch Lyrebird's free education session, Mastering the CDM to CCM Transition with Lyrebird to learn more.
The existing items for GPMP (721) and TCA (723) have been replaced with new item numbers:
-
965 for the initial development of a GPCCMP; and
-
967 for the quarterly review of a GPCCMP.
To assist with billing sustainability, eligibility has been expanded. This means that while the current approximate eligible patients in a clinic is around 16%, expanded eligibility should put that figure closer to almost 60%.
How does Lyrebird Scribe help?
To support the transition, Lyrebird Health and Best Practice have worked together to deliver a greater experience for users while documenting and managing patient consultations related to chronic diseases. Lyrebird will evaluate whether the patient is eligible for CCM billing automatically, based on their clinical history and the updated Medicare rules.
How does this change the Lyrebird workflow?
- For users with an active Lyrebird Health subscription, Lyrebird will automatically activate in the background when a GP opens a patient record.
- Lyrebird Scribe will evaluate whether the patient is eligible for CCM billing automatically, based on the patient's clinical history and the updated Medicare rules.
- If the patient is eligible, Lyrebird Scribe will launch a prepopulated care plan workflow, ready for review once the consult has been completed.
- Lyrebird Scribe will update the clinical record after the care plan has been created and reviewed, ensuring that the correct billing item has been used (965 or 967). The required clinical notes for Medicare compliance will be captured.
For users with an active Lyrebird and Cubiko subscription, Cubiko's care prompts will be shared directly from within Lyrebird.


Additional resources
- Lyrebird Health have prepared resources, user guides and video tutorials to assist with these changes.
- Watch Lyrebird's free education session, Mastering the CDM to CCM Transition with Lyrebird.
Email Patient Letters directly from Lyrebird
Lyrebird offers the convenient option of emailing Patient Letters directly to patients; this helps to keep patients well-informed and up-to-date about their health conditions, including any future action items they may need to take.
After selecting 'Share to Patient', Lyrebird will automatically create a password-protected PDF file using the patient's date of birth. This file will then be attached to an email and sent directly to the patient.
NOTE The Send Emails via Lyrebird feature is only available for Patient Letters.
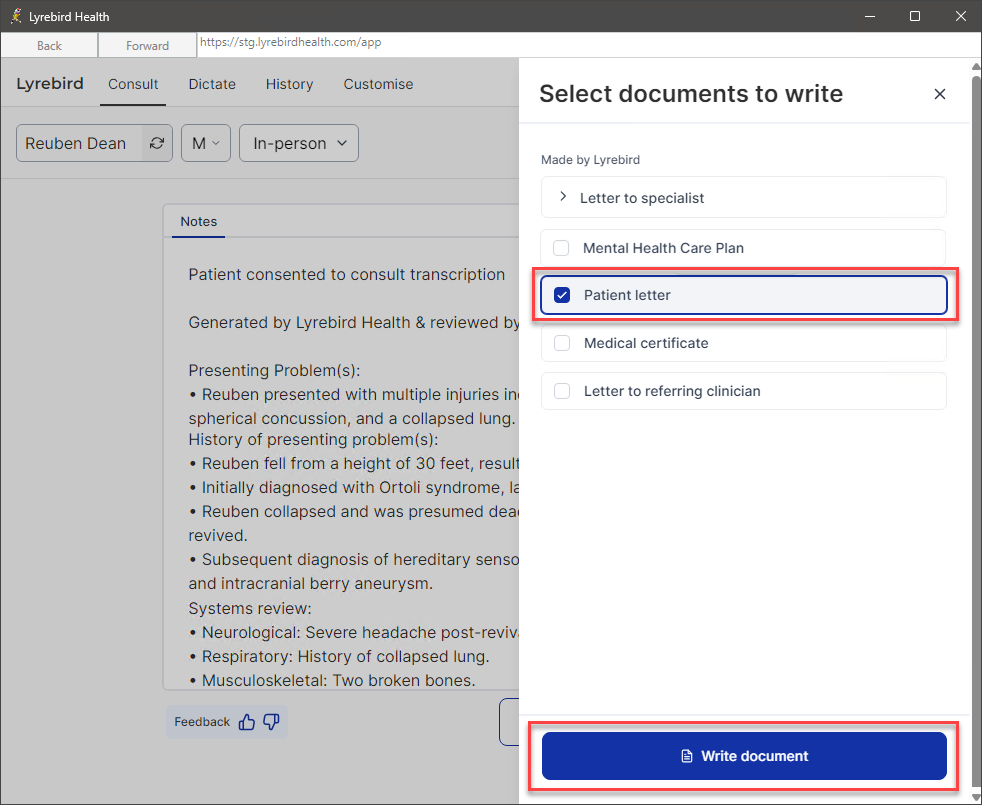
- To create a Patient Letter from the post-consultation screen:
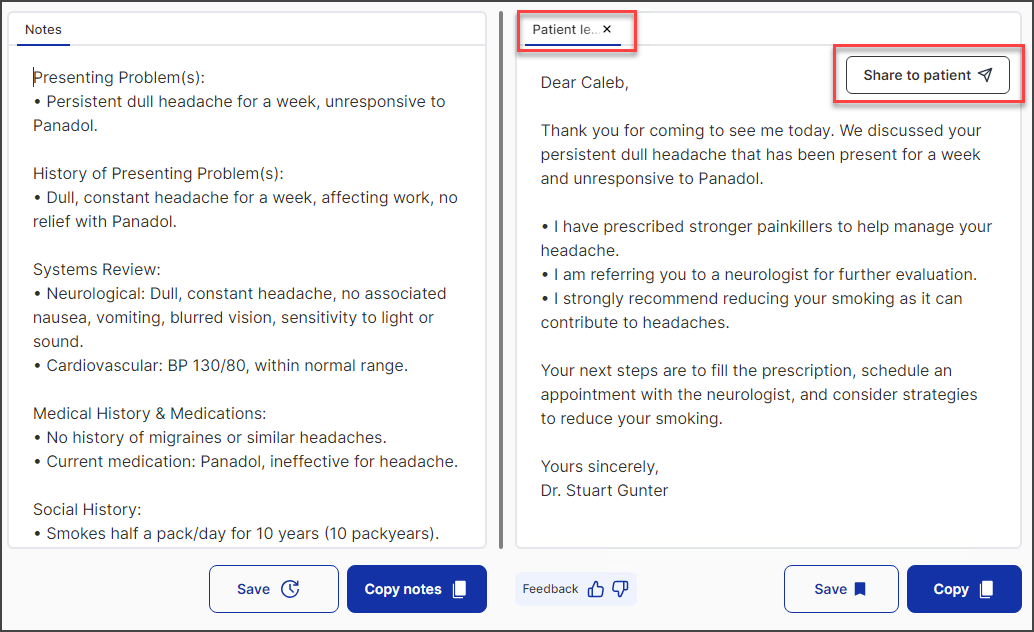
- Select Letters > Patient Letters from the Consult screen to generate a patient letter following a consultation.
- Lyrebird will generate the Patient Letter in a new textbox on the screen.
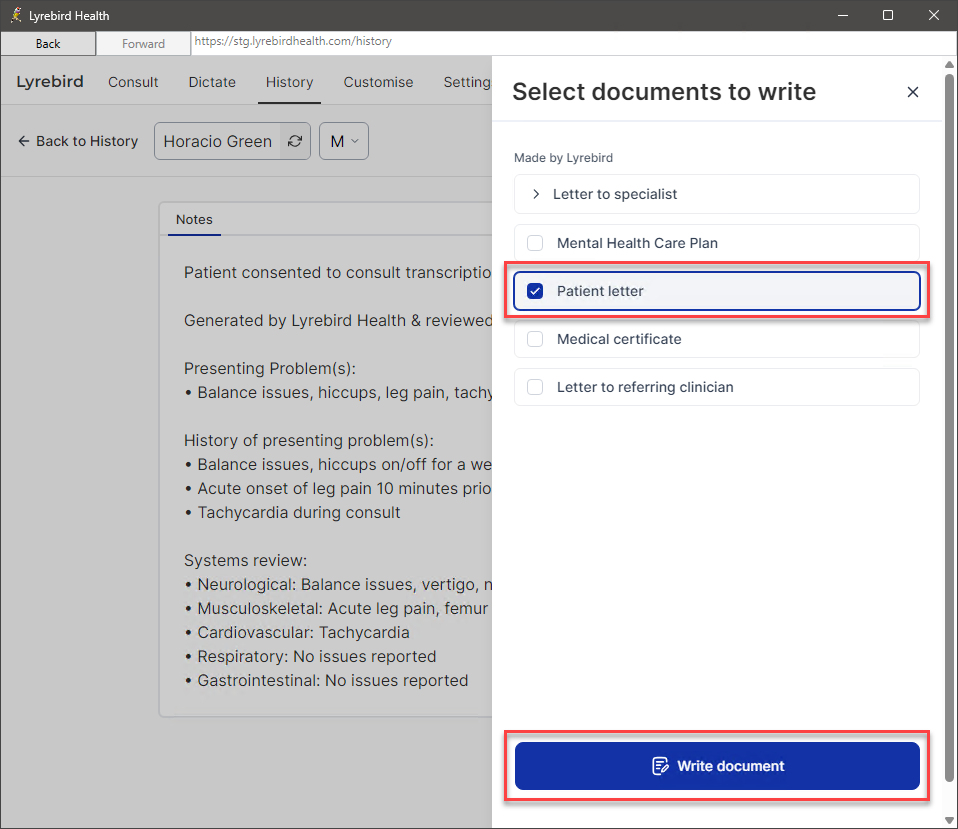
- To create a Patient Letter from the Past Consult Notes screen:
- From the menu in the Lyrebird Health browser, click History. The History screen will appear.
- To view saved past consults, search for the patient by name and click Open on the required consult.
- Select Letters > Patient Letters from the Past Consult Notes screen to generate a patient letter following a consultation.
- Lyrebird will generate the Patient Letter in a new textbox on the screen.
- When Lyrebird has finished generating the Patient Letter, click Share to Patient.
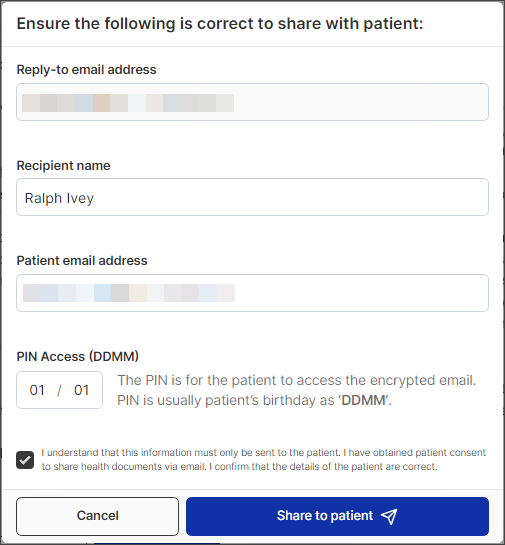
- The Ensure the following is correct to share with the patient screen: will appear.
- Verify that the Reply-to email address is correct.
- Verify that the Recipient Name is correct.
- Enter the Patient's email address.
- Enter the Patient's Date of Birth as DD/MM in the Pin Access (DDMM) field. The patient must enter the PIN to gain access to the encrypted email.
- Tick the Declaration to confirm your acceptance, then click Share to Patient. Lyrebird will confirm that the email was sent successfully.
Generate Post Consultation Patient Letters
Generate Patient Letters from Saved Past Consult Notes

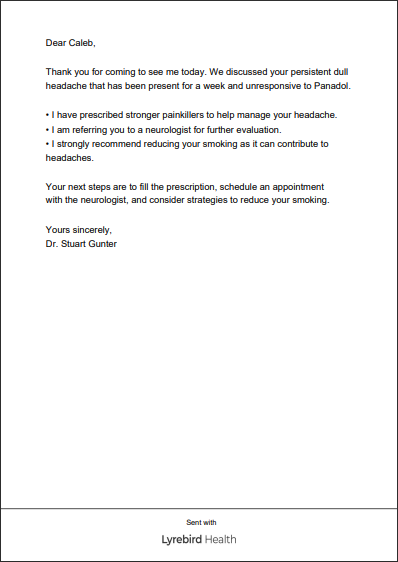
The images below displays an example of the Patient's Letter received by email the patient.
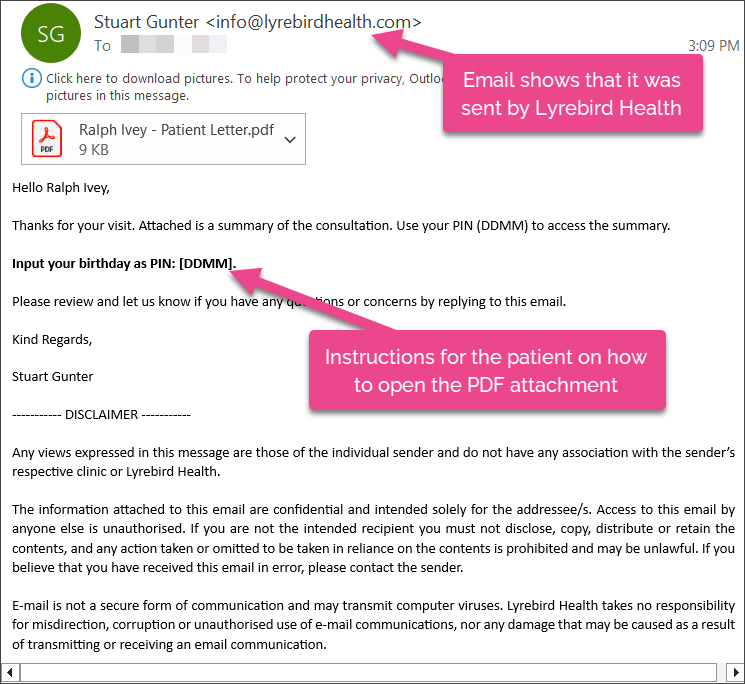
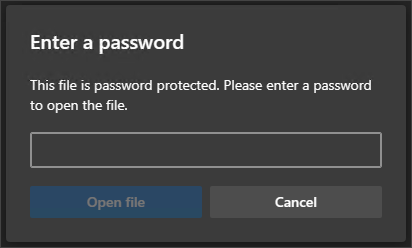
When the patient opens the PDF email document, they will be asked to enter their DOB in DDMM format.
The PDF of the Patient's Letter will be opened.
Information correct at time of publishing (03 February 2026).