
In this article, we will explore the various account preferences that you can find in Lyrebird Scribe.
Multi-factor authentication (MFA) is one of the most effective ways to protect your Lyrebird Health account against unauthorised access.
To activate multi-factor authentication (MFA) on your Lyrebird Health account, an authentication app is required. Lyrebird Health recommends Google Authenticator due to its easy configuration process. To learn more about Google Authenticator, visit the Google Support website.
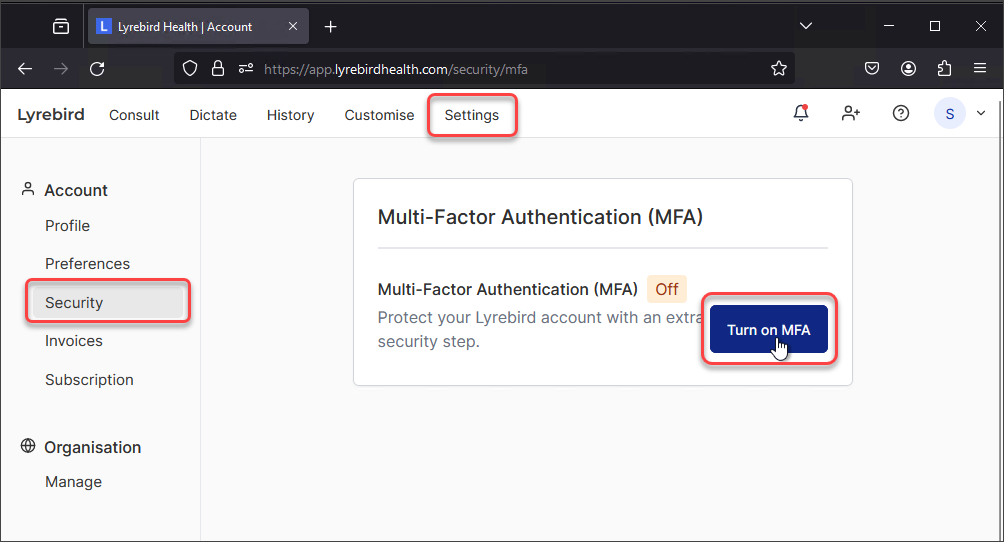
- From the menu in Lyrebird Health, click Settings. The Account Settings screen will appear.
- From the left side menu, click Security. The Account Security Settings screen will appear.
- To increase the security of your Lyrebird Health account, click Turn on MFA.
- Follow the on-screen instructions provided by Lyrebird Health to enable Multi-Factor Authentication (MFA).

The steps below describe how to change a known password. If you have forgotten your password and need to reset it, follow the steps outlined here to restore your account.
- From the menu in Lyrebird Health, click Settings. The Account Settings screen will appear.
- From the left side menu, click Security. The Account Security Settings screen will appear.
- To change your Lyrebird Health account password, click Change Password. The Change your password screen will appear.
- Enter your Previous password and then enter your New password.
- Click Update Password.


Lyrebird Health's data retention policy aims to strike a balance between clinician access needs and patient privacy. Consult notes and documents saved directly to Lyrebird are only retained for seven days by default before being permanently deleted; this period can be reduced to 24 hours or extended to six months.
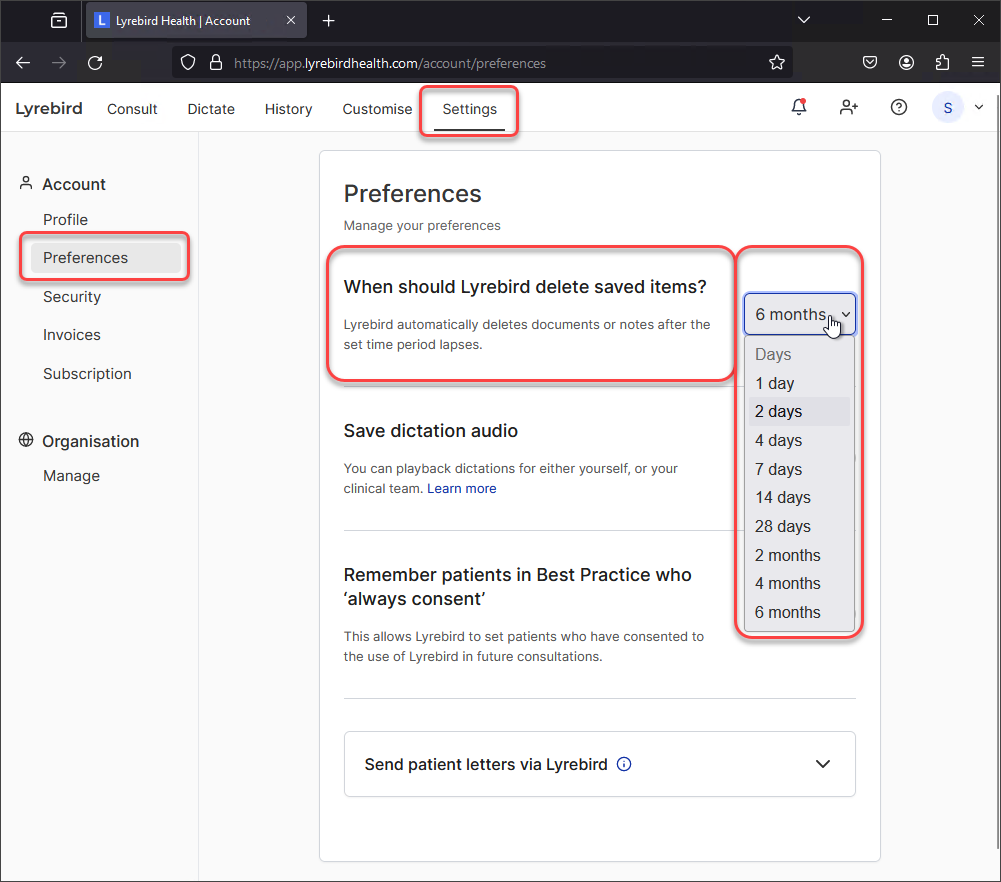
- From the menu in Lyrebird Health, click Settings. The Account Settings screen will appear.
- From the left side menu, click Preferences. The Preferences screen will appear.
- Locate the When should Lyrebird delete saved items? option and select the frequency with which saved items should be deleted from the options presented.
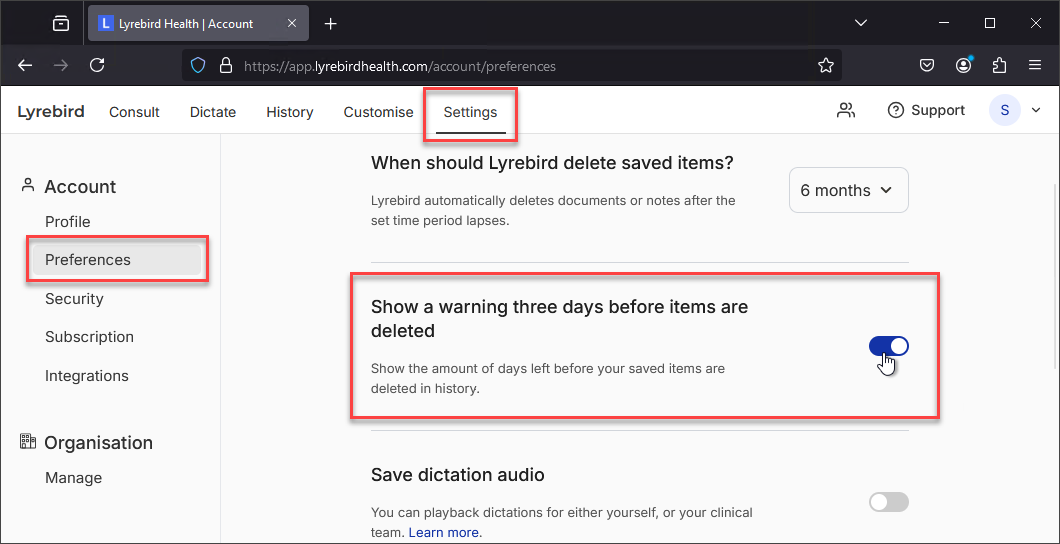
By default, Show a warning three days before items are deleted preference is toggled off. To show the number of days left before your saved items are deleted from History:
- From the menu in Lyrebird Health, click Settings. The Account Settings screen will appear.
- From the left side menu, click Preferences. The Preferences screen will appear.
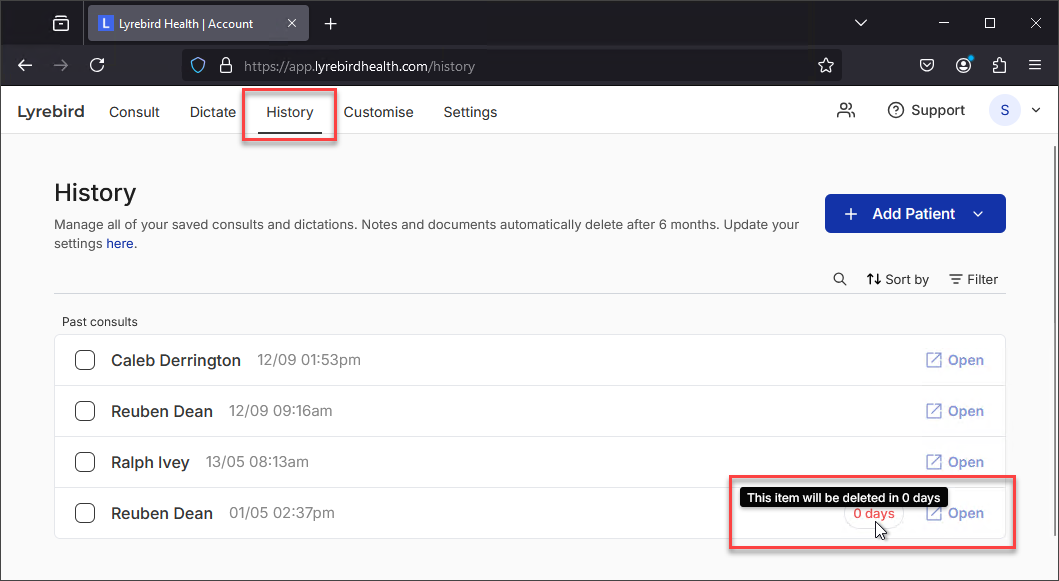
- Turn on the Show a warning three days before items are deleted toggle. Lyrebird will display the number of days remaining until saved items are deleted from the History.
To select your preferred Date format in Lyrebird:
- From the menu in Lyrebird Health, click Settings. The Account Settings screen will appear.
- From the left side menu, click Preferences. The Preferences screen will appear.
- Select your preferred date format from the options: DD/MM/YYYY or MM/DD/YYYY.

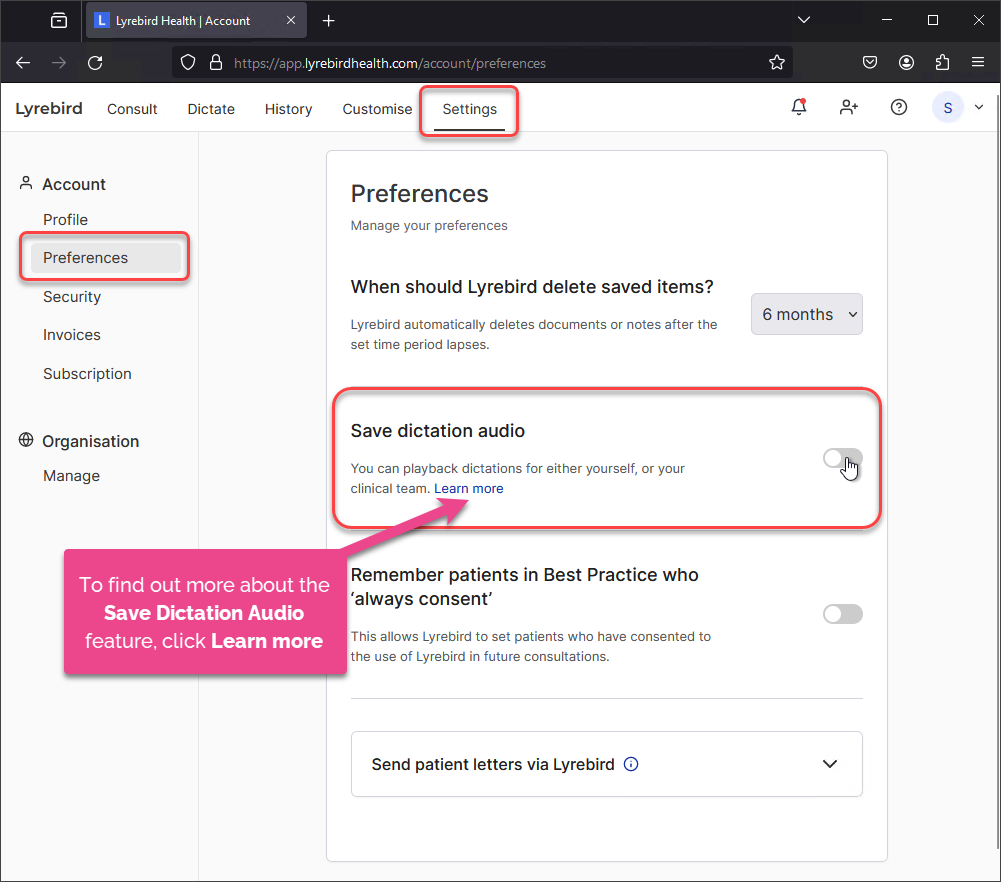
Save Dictation Audio is an account setting that clinicians may enable. This feature allows clinicians to conveniently playback and listen to recordings after completing the dictation. The account preference for Save Dictation Audio is turned off by default.
NOTE Consult notes, documents and dictation recordings saved directly to Lyrebird are only retained for seven days by default before being permanently deleted; this period can be reduced to 24 hours or extended to six months. See When should Lyrebird Health delete saved items? for more information.
To allow Lyrebird to Save Dictation Audio:
- From the menu in Lyrebird Health, click Settings. The Account Settings screen will appear.
- From the left side menu, click Preferences. The Preferences screen will appear.
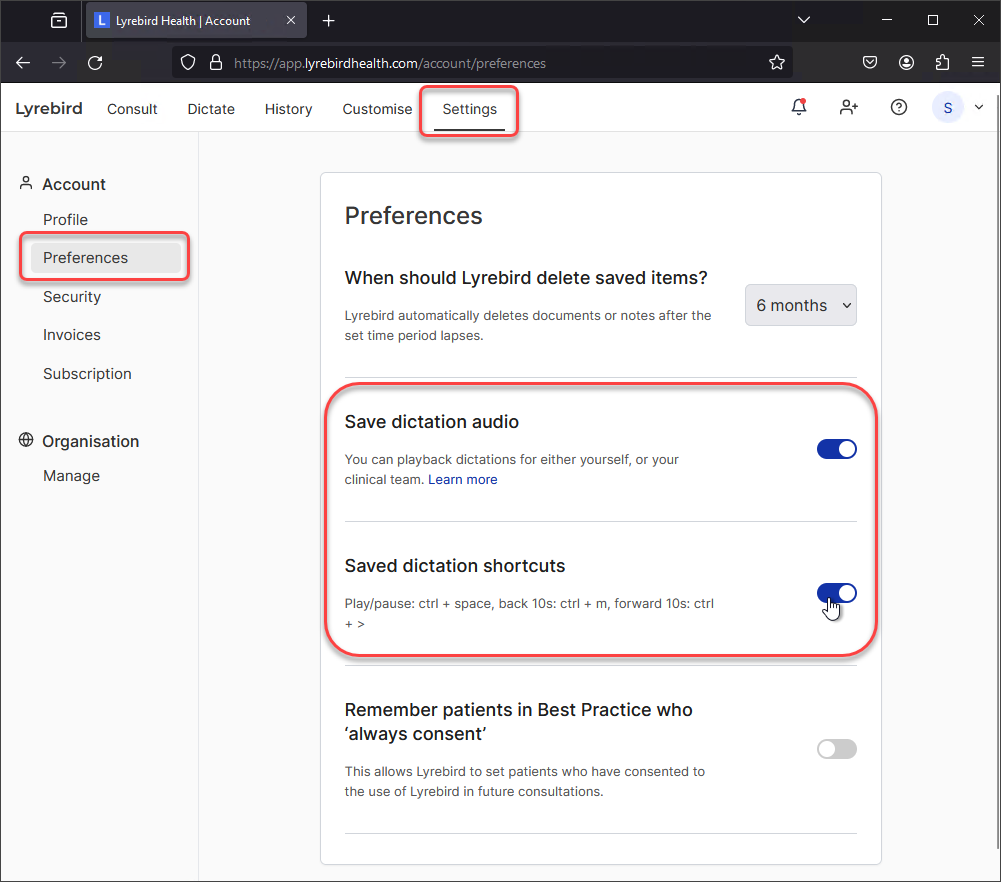
- Turn on the Save Dictation Audio toggle to enable Lyrebird to save dictation audio.
- Turn on the Saved Dictation Shortcuts toggle to enable audio player shortcuts.
- The Save Dictation Audio feature will be turned on.
The audio recordings from dictation are stored in the Past Documents section on the History screen and are saved under the patient's name. See View and playback audio from dictations for more information.
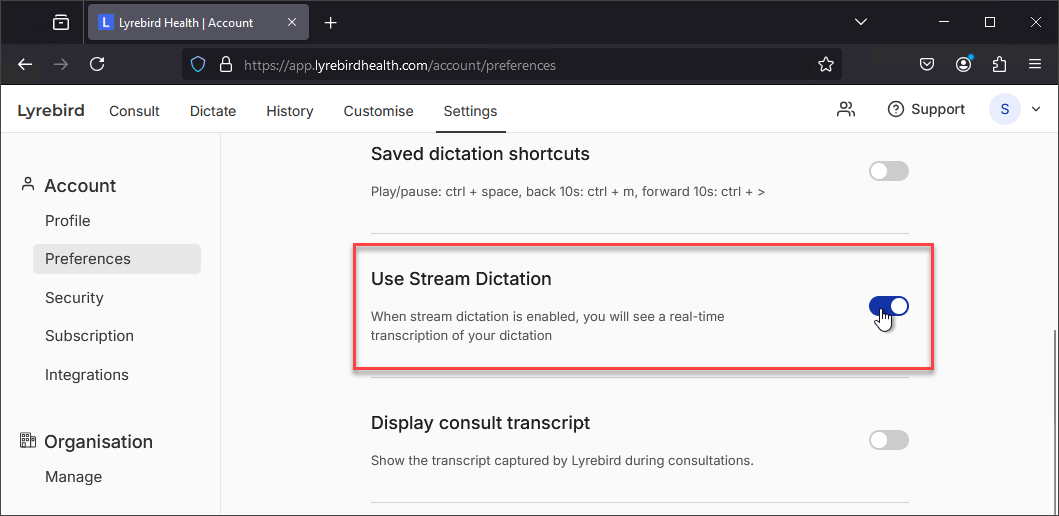
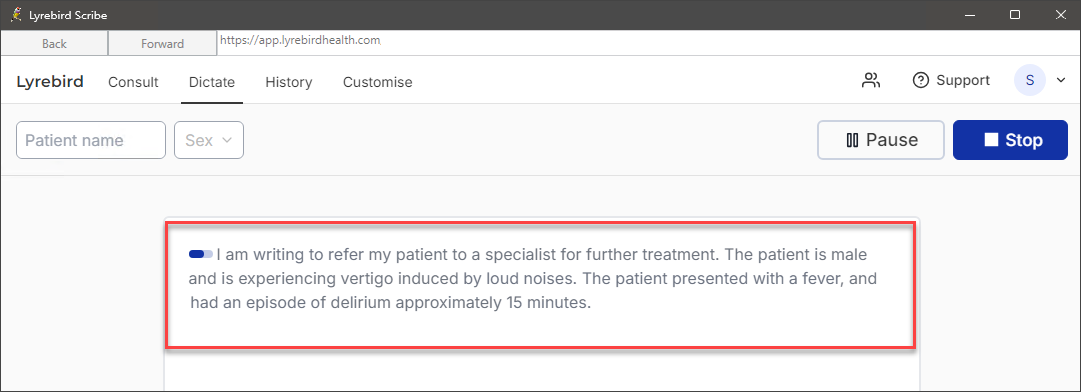
With stream dictation enabled, you'll be able to view real-time transcription of your dictation as you speak.
By default, the Use Stream Dictation preference is toggled off. To enable Use Stream Dictation:
- From the menu in Lyrebird Health, click Settings. The Account Settings screen will appear.
- From the left side menu, click Preferences. The Preferences screen will appear.
- Turn on the Use Stream Dictation toggle. With stream dictation is enabled, you can view real-time transcription of your dictation as you speak.
If you detect that information is being omitted from your notes, you can enable the Display Consult Transcript preference. A tab labelled Transcript will be added to the top of your notes, allowing you to conveniently access the word-for-word transcript captured by Lyrebird, which you can use to verify the accuracy of the captured information.
By default, the Display Consult Transcript preference is toggled off. To enable Display Consult Transcript:
- From the menu in Lyrebird Health, click Settings. The Account Settings screen will appear.
- From the left side menu, click Preferences. The Preferences screen will appear.
- Turn on the Display Consult Transcript toggle.
- A tab labelled Transcript will be added to the top of your notes, allowing you to conveniently access the word-for-word transcript captured by Lyrebird, which you can use to verify the accuracy of the captured information.
![]()
![]()
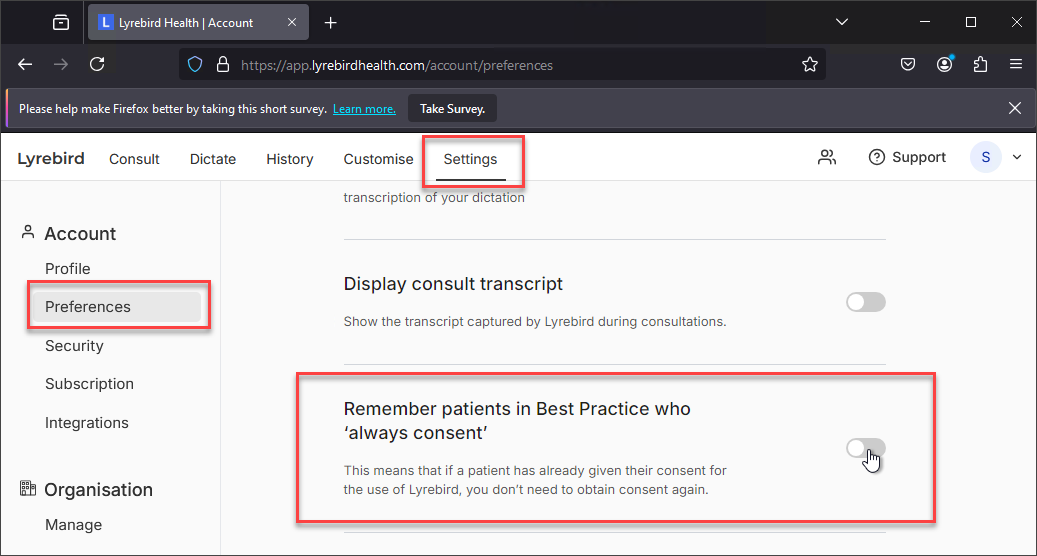
For each consultation visit, clinicians will be required by default to obtain the patient's consent before using Lyrebird Health's Consult Transcription service to generate clinical notes. You can, however, enable an account setting that allows Lyrebird to remember Bp Premier patients who have consented to using Lyrebird in all future consultations.
- From the menu in Lyrebird Health browser, click Settings. The Account Settings screen will appear.
- From the left side menu, click Preferences. The Preferences screen will appear.
- Scroll the page until you see Remember patients in Best Practice who 'Always Consent'.
- Turn on the Remember patients in Best Practice who 'Always Consent' toggle to enable Lyrebird to remember patients who 'Always Consent'.
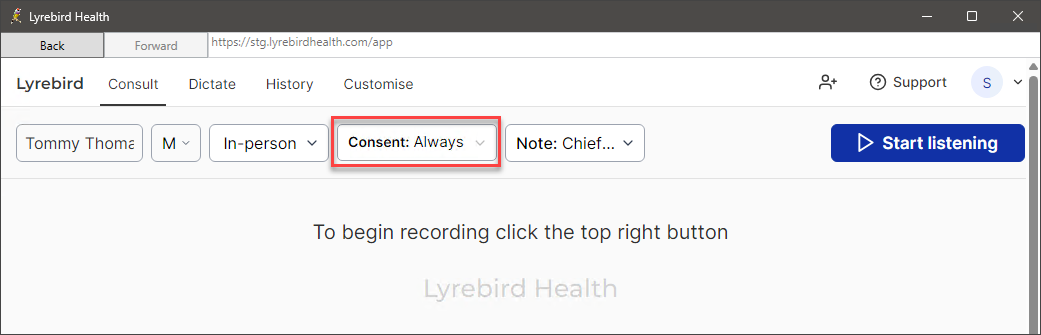
The patient's consent preferences will be saved in the Bp Premier database. If the patient has consented to Once or Always in a previous consultation, the Patient Consent status will be pre-populated from Bp Premier in future consultations. Clinicians will not be prompted to request consent for future Lyrebird consultations if the patient chooses Always as their consent preference.
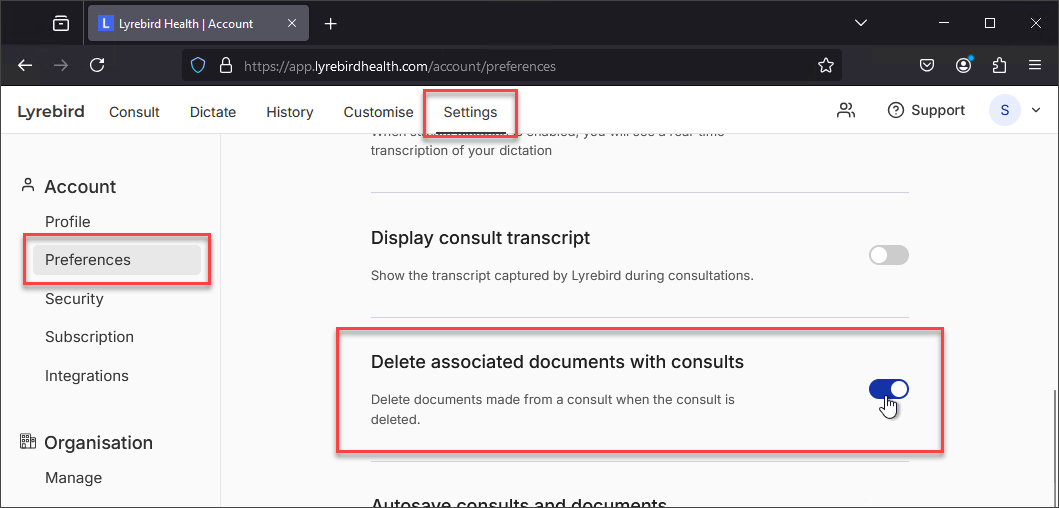
By default, the Delete associated documents with consults preference is toggled off. When a consult is deleted in Lyrebird, to automatically delete documents associated with that consult:
- From the menu in Lyrebird Health browser, click Settings. The Account Settings screen will appear.
- From the left side menu, click Preferences. The Preferences screen will appear.
- Turn on the Delete associated documents with consults toggle. When a consult is deleted in Lyrebird, any associated documents generated from that consult will also be deleted.
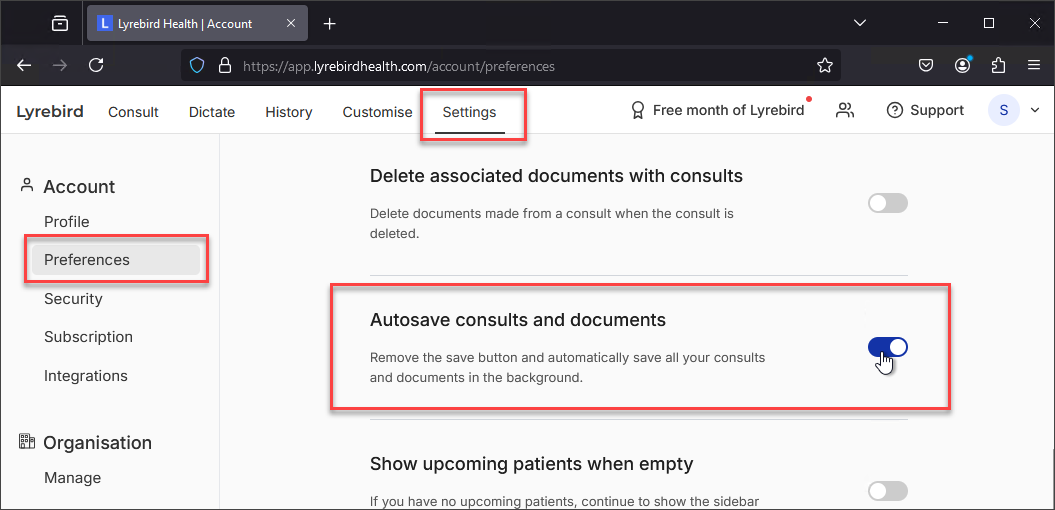
By default, the Autosave consults and document preference is toggled off. To enable Autosave and avoid the loss of dictations, documents, and consultation notes:
- From the menu in Lyrebird Health browser, click Settings. The Account Settings screen will appear.
- From the left side menu, click Preferences. The Preferences screen will appear.
- Turn on the Autosave consults and documents toggle. Lyrebird will automatically save your consultation notes, dictation and documents.
NOTE Lyrebird will delete saved documents, dictation, and consult notes according to the time period you select in When should Lyrebird delete saved items?
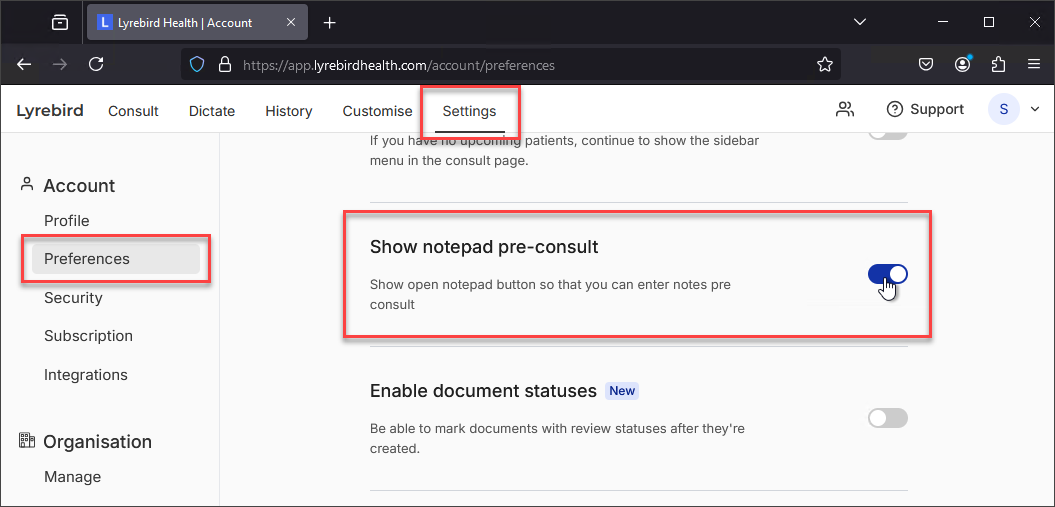
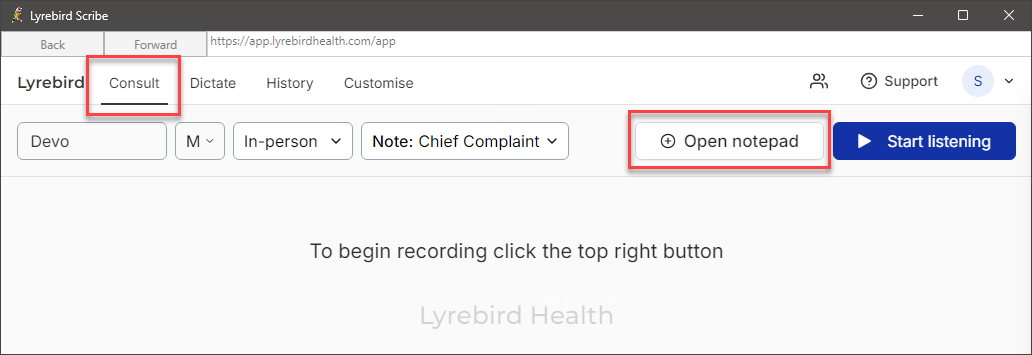
To display the Notepad and record notes in Lyrebird before beginning the consultation:
- From the menu in Lyrebird Health browser, click Settings. The Account Settings screen will appear.
- From the left side menu, click Preferences. The Preferences screen will appear.
- Turn on the Show notepad pre-consult toggle.
- The + Open Notepad button will appear in the Consult window, allowing clinicians to record notes before beginning the consult. The post-consult summary will include any notes made before beginning the consultation.
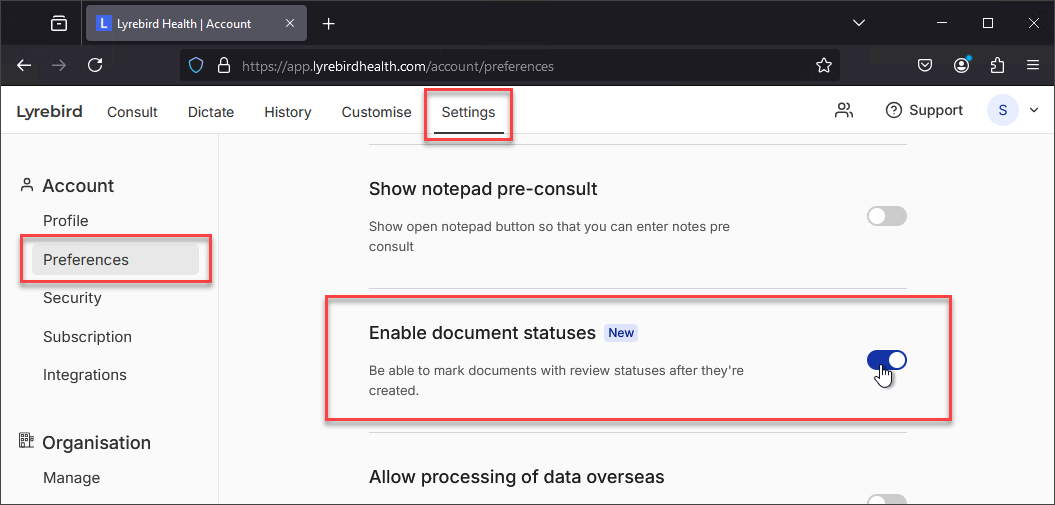
By default, the Enable document statuses preference is toggled off. To Enable document statuses:
- From the menu in Lyrebird Health, click Settings. The Account Settings screen will appear.
- From the left side menu, click Preferences. The Preferences screen will appear.
- Turn on the Enable document statuses toggle.
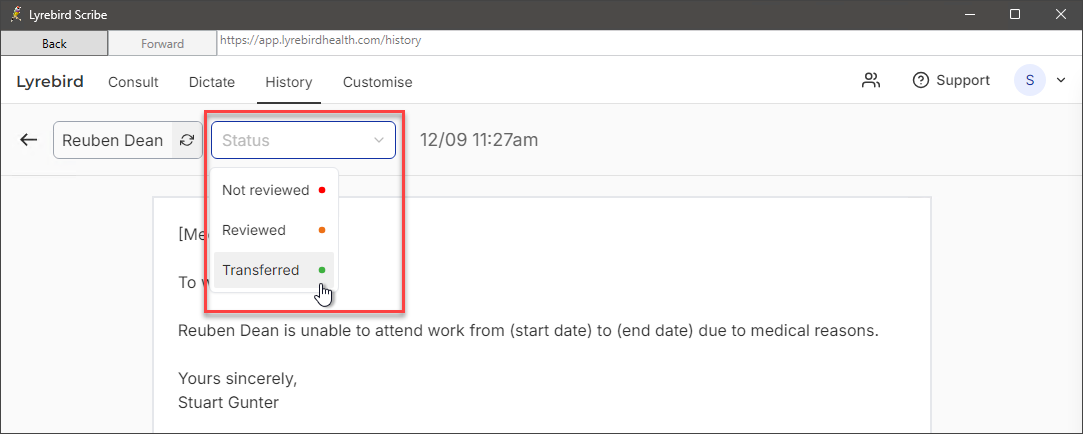
- The Document Status drop down will be displayed on the History page in Lyrebird, allowing users to categorise documents as reviewed, not reviewed, or transferred outside of Lyrebird.
By default, the Mental Health Care Plan preference is toggled off. To automatically suggest workflows in Notepad for Mental Health Care Plans:
- From the menu in Lyrebird Health, click Settings. The Account Settings screen will appear.
- From the left side menu, click Preferences. The Preferences screen will appear.
- Scroll the page until you see Mental Health Care Plan and turn on the toggle.

See Generate Mental Health Care Plans in Lyrebird for more information.
Show a pop up modal at log in to keep you informed about the latest features and updates in Lyrebird.
By default, the Enable new feature pop up preference is toggled on. To disable Enable new feature pop up:
- From the menu in Lyrebird Health, click Settings. The Account Settings screen will appear.
- From the left side menu, click Preferences. The Preferences screen will appear.
- Scroll the page until you see Enable new feature pop up and turn off the toggle.

Lyrebird offers the convenient option of emailing Patient Letters directly to patients; this helps to keep patients well-informed and up-to-date about their health conditions, including any future action items they may need to take.
After selecting 'Share to Patient', Lyrebird will automatically create a password-protected PDF file using the patient's date of birth. This file will then be attached to an email and sent directly to the patient.
The Send patient letters via Lyrebird setting is turned off by default. To Enable Send patient letters via Lyrebird:
- From the menu in Lyrebird Health, click Settings. The Account Settings screen will appear.
- From the left side menu, click Preferences. The Preferences screen will appear.
- Scroll the page until you see Send patient letters via Lyrebird and click the arrow to expand the drop down.
- To be automatically copied into the Patient Letter emails, turn on the Be Notified toggle.
- Enter a Reply-to email address. If a patient responds to a Patient Letter sent via Lyrebird, this is the email address where the response will be received.
- Optional: Enter Email footer text. Lyrebird has included a standard disclaimer in the email footer that can be modified as required.
- Click Save. Lyrebird will confirm that your Email Settings have been successfully saved.
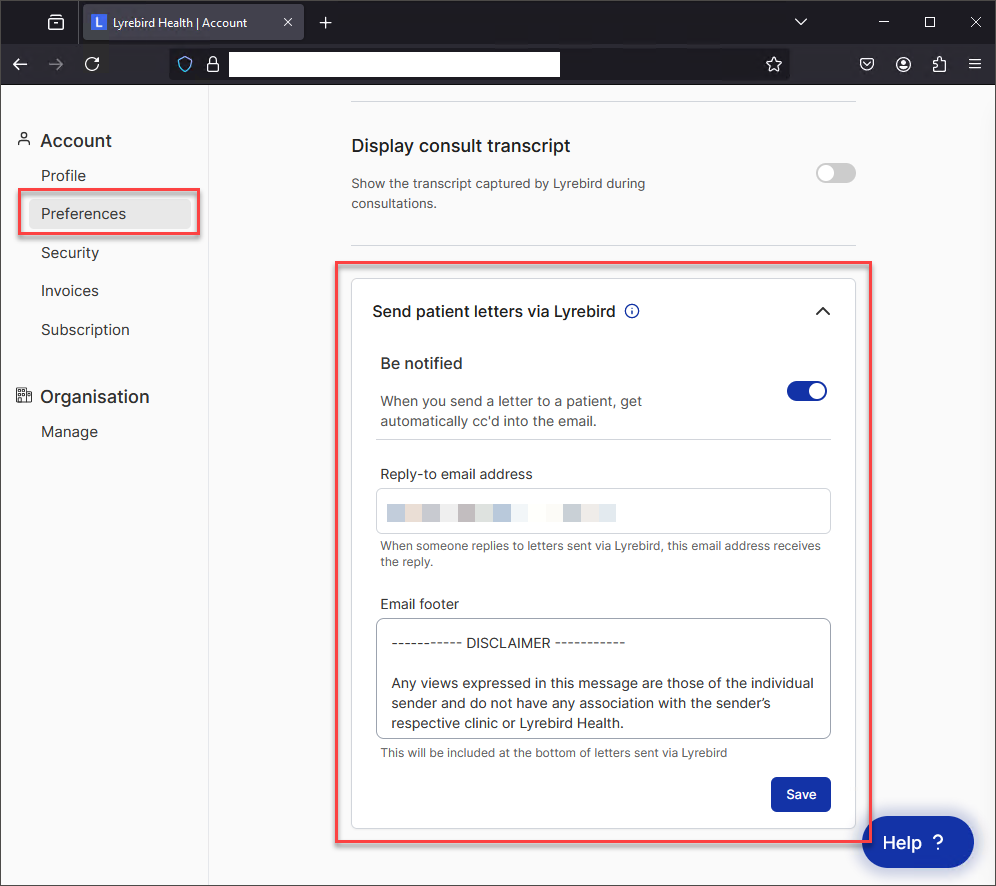
An example of the text that Lyrebird has incorporated as a standard disclaimer in the email footer is provided below.
----------- DISCLAIMER -----------
Any views expressed in this message are those of the individual sender and do not have any association with the sender’s respective clinic or Lyrebird Health.
The information attached to this email are confidential and intended solely for the addressee/s. Access to this email by anyone else is unauthorised. If you are not the intended recipient you must not disclose, copy, distribute or retain the contents, and any action taken or omitted to be taken in reliance on the contents is prohibited and may be unlawful. If you believe that you have received this email in error, please contact the sender.
E-mail is not a secure form of communication and may transmit computer viruses. Lyrebird Health takes no responsibility for misdirection, corruption or unauthorised use of e-mail communications, nor any damage that may be caused as a result of transmitting or receiving an email communication.
See Email Patient Letters directly from Lyrebird for information on how to generate Patient Letters Post Consultation or from Saved Past Consult Notes.
Lyrebird, an intelligent AI, can generate documents and consult notes that can be customised almost entirely according to your style.
- Customise: General Preferences
- Customise: Note templates
- Customise: Documents templates
- Customise: Macros
- Customise: Word Replacement
- Customise: Direct dictate
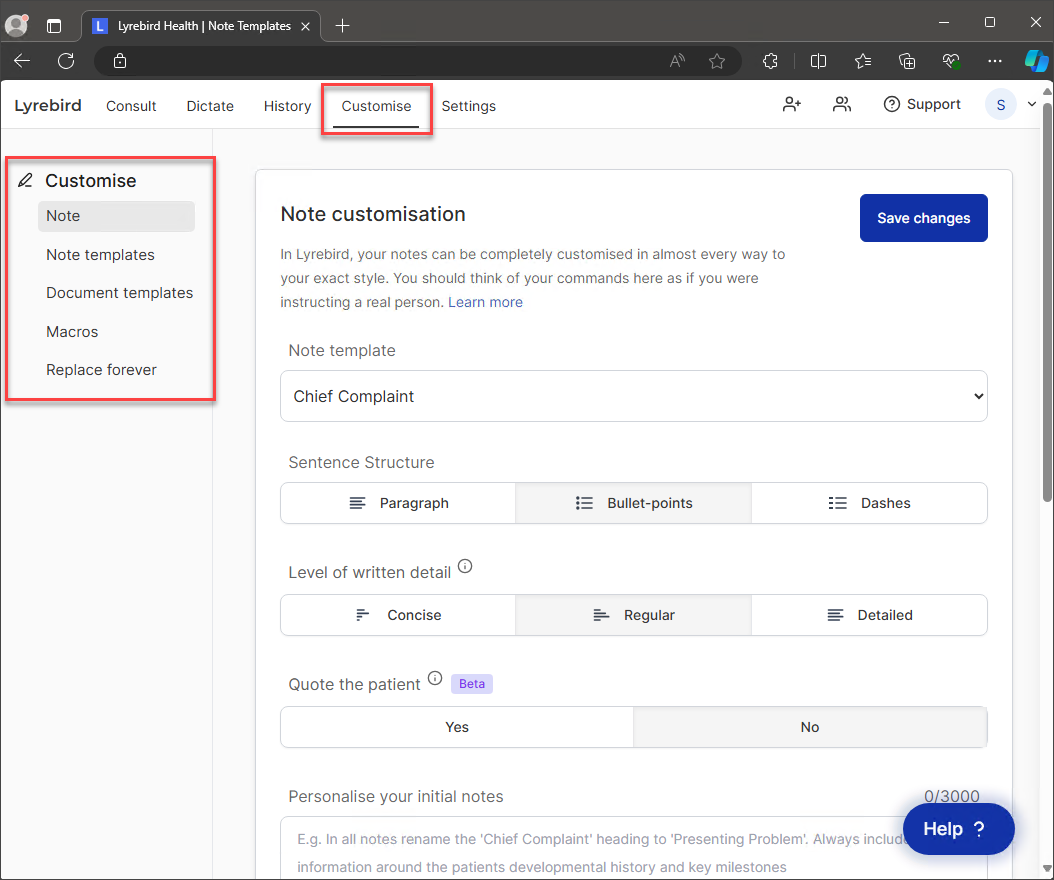
- From the menu in Lyrebird Health browser, click Customise. The Customise your Lyrebird screen will appear.
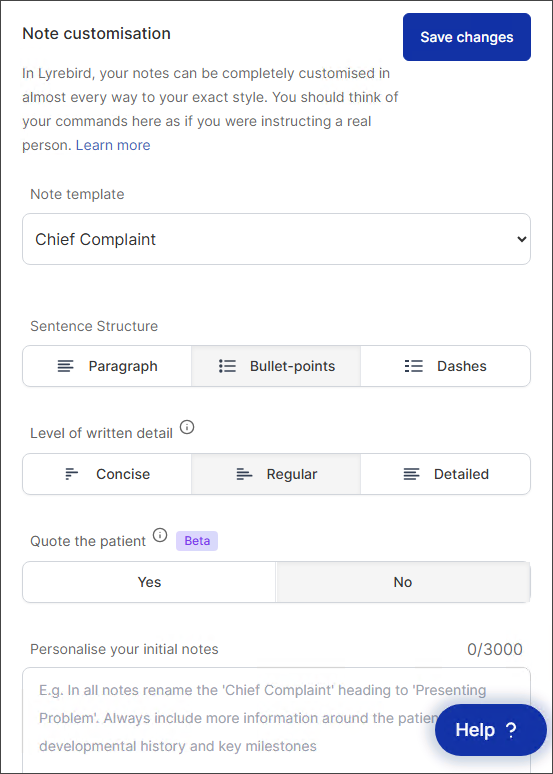
- From the menu, click General. The General Preferences screen will appear:
- This is where you can customise Lyrebird to suit your workflow. Go to the Note templates or Document templates sections to customise your note or document templates.
- Select your preferred default note template, include a telehealth default sign-off, or select your preferred note formatting preference.
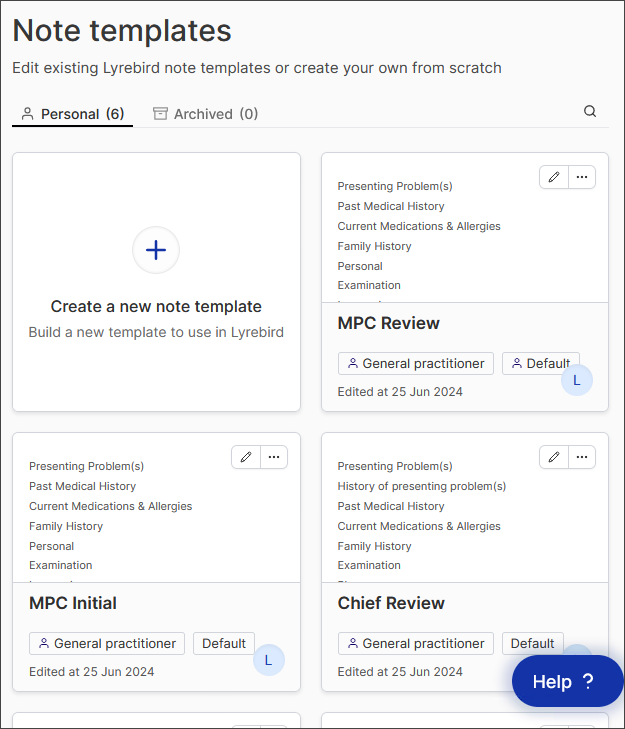
- From the menu, click Note templates. The Note templates screen will appear:
- Lyrebird's note templates are customisable in almost every aspect. You have the option to modify existing Note templates or create your own templates.
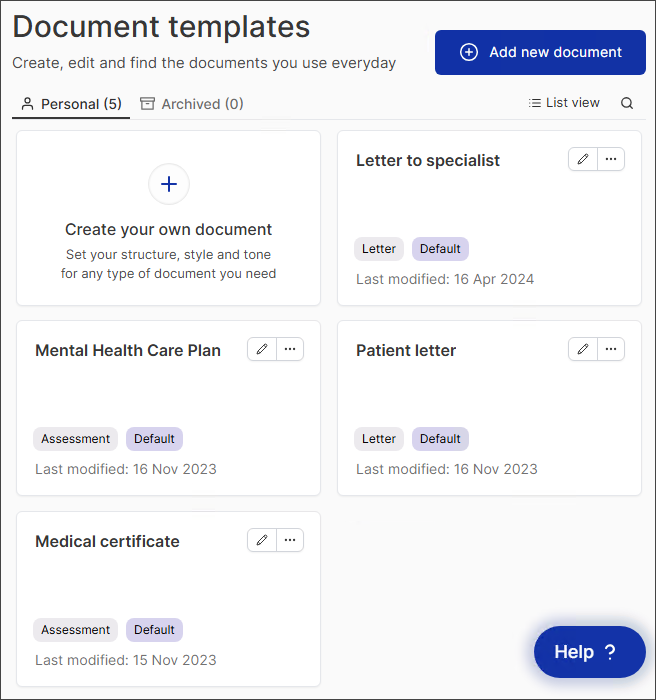
- From the menu, click Documents templates. The Documents templates screen will appear:
- Lyrebird's document library allows you to create and customise how Lyrebird writes documents. Uploading examples of previously written documents will allow Lyrebird to scan them, understand your unique writing style, and replicate them in seconds for future consults.
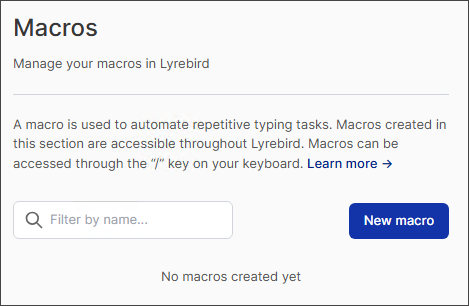
- From the menu, click Macros. The Macros screen will appear:
- Macros allow you to insert pre-written text blocks, which is convenient when you use the same terminology for specific tasks, such as recording patient consent or explaining the side effects of a particular medication.
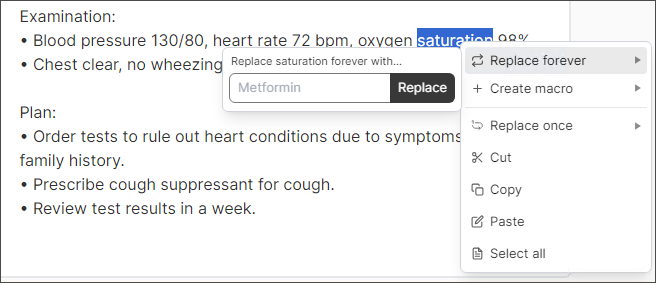
- From the menu, click Word Replacement. The Word Replacement screen will appear:
- If you observe that a specific phrase or word is not being spelt correctly, you can highlight it and use the Permanent Replace feature to teach Lyrebird the correct spelling; Lyrebird will then use that spelling as part of your vocabulary in the future.
- From the menu, click Direct dictate. The Direct dictate screen will appear:
- Direct Dictate allows you to quickly and easily convert your speech into text. Lyrebird allows you to customise your Direct Dictation; for example, you might say, ‘Always remove my and’s’ or ‘always use the patient’s first name’.
Customise: General Preferences
Visit the Lyrebird Health website to learn more about how you can customise your notes.
Customise: Note templates
Visit the Lyrebird Health website to learn more about how you can customise your notes.
Customise: Documents templates
Visit the Lyrebird Health website to learn more about how you can customise your documents..
Customise: Macros
Visit the Lyrebird Health website to learn more about how you can customise Macros.
Customise: Word Replacement
Visit the Visit the Lyrebird Health website to learn more about how Lyrebird can replace words..
Customise: Direct dictate
Visit the Lyrebird Health website to learn more about how you can customise Direct Dictate.

Information correct at time of publishing (07 March 2025).


 AU
AU 