
Get Started
Set up
Clinical
Patient Comms
Management
Tools & Utilities
Title
Overview
This article explains how to add, edit or cease a prescription in Bp Premier.
If you wish to create and prescribe a custom preparation, see Create a custom preparation.
The below video demonstrates the end-to-end process for adding a current Rx. The rest of this article explains each step of the process in detail.
This video includes the workflow for medicines included on the LMBC. To view the workflow for medicines not included on the LMBC, see How Active Ingredient Prescribing Works in Bp Premier.
Select a drug
- From the patient record, select Current Rx from the tree on the left hand side. Click Add above the list to the right. The New Rx screen will appear.
- Select to search by Product Name or Therapeutic class, search for Custom preparations, or search Favourites that have been recorded for this provider.
- Enter the first few letters of the search term in the Search for field. Matching drugs or preparations will be listed below.
- Select the medication you want to prescribe from the list.
- If the medication you are prescribing is included on the List of Medicines for Brand Consideration (LMBC), a notice will appear at the bottom of the screen indicating that you may wish to consider prescribing the medication by brand. If you wish to prescribe by brand, click Select brand. The brand names available for the medication will appear in the Available formulations: list.
- Select the formulation to prescribe from the Available formulations list to the right. Tick Show PBS/RPBS listed only to only show listed formulations.
- If you are likely to prescribe the same medication in the future, you can click Add to favourites to add the drug to your Favourites list.
- If the patient requires a combination of drugs, and your practice has configured the drug combination in Bp Premier, click Drug combination to prescribe the combination.
- The buttons at the bottom of the screen have the following actions:
- After you have selected the formulation you want to prescribe, click Next. The New Rx screen will continue.

TIP Depending on the type of drug searched for, a hyperlink at the bottom of the New Rx screen may appear that links to PBS guidelines for prescription of that drug.
Button | Action |
|---|---|
Same drug class | Select a drug from the Available formulations and click this button to view formulations in the same therapeutic class for comparison. |
Equivalent products | Select a drug from the Available formulations and click this button to view alternate similar products. |
Product Information | Opens the MIMS product information viewer for providers. |
CMI | Open the Consumer Medicines Information viewer for providers to show or print for patients to take home, providing information about the drug. |
Allergies/Reactions | Opens the Allergies/Adverse reactions screen to view or add allergies for the patient. |
NPS RADAR | Opens NPS RADAR if there are any alerts or patient information leaflets relevant to the selected formulation. |
Add dosage information

- Select the Dose, Frequency of administration, whether to take with Food, and any Other instructions. To assist in calculating the correct dose for a patient, click Dose calculator to open the dose calculator tool.
- Tick p.r.n if the medication is to be taken 'as needed'.
- Change the Route of administration if necessary.
- Enter any Complex instructions to be printed on the script, if any. Click Store to store complex instructions for later reuse.
- If the patient requires compliance checking for medication, enter the Number of tabs per day to check for. Otherwise, tick No compliance checking.
- If the selections made in this screen are likely to apply to further prescriptions of the drug, tick Save this dose as the default for this preparation.
- Click Next. The New Rx screen continues.
NOTE If you tick the p.r.n. checkbox , Bp Premier does not consider the medication 'regular medication' for the patient. This affects the ability to insert the prescription into template fields. See Regular medication and p.r.n for more information.
Complex instructions can be copied from the MIMS information available at the top of the screen and pasted into the Complex instructions field if required.
Regular medication and p.r.n
If you assign patient medications to clinical functions like care plans and asthma plans, you may see that the medication does not appear as a 'regular medication', even though the medication has been added in the Current Rx section.
When prescribing medications, the checkbox p.r.n. in the dosage screen indicates that the medication is to be taken as needed.
If p.r.n. is ticked, the prescribed medication will not be printed on a care plan or any template that uses the field <Current Rx List (Regular)>.
Select further prescription options
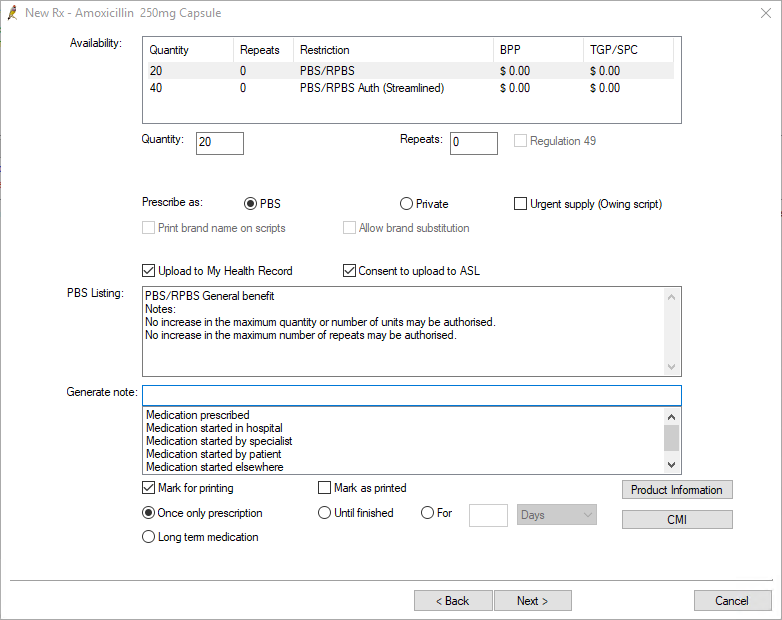
The fields in this screen have the following actions:
Button | Action |
|---|---|
Availability | Shows availability for your selection. |
Quantity | You can manually edit the Quantity if required. If you increase the Quantity for an Authority prescription, Bp Premier will prompt you to confirm. If you select yes, an additional authority approval screen will appear before the Rx is finalised. |
Repeats | You can manually edit the number of Repeats if required. |
Regulation 49 | Tick to endorse Regulation 49 on the Rx. For more information on Regulation 49, refer to the Pharmaceutical Benefits Scheme website. |
Prescribe as | Bp Premier will default the Prescribe as value based on the patient's DVA status and the medication. If the patient has a DVA Gold card recorded in their demographics and the medication is listed on the RPBS, RPBS will be selected in this window. Patients with white or orange DVA cards will not default to RPBS. If the medication is for a condition listed under the patient's white card, you must manually select the RPBS option. Select urgent supply to prescribe as an owing script. |
Print brand name on scripts | If you want to ensure a particular brand is prescribed, and you are prescribing medication that is not excepted from Active Ingredient Prescribing, tick Print brand name on scripts. If you chose to select a brand for a medication listed on the LMBC when selecting a drug, Print brand name on scripts will be ticked and disabled. Otherwise, if prescribing a particular brand is not necessary, Print brand name on scripts can remain unticked. |
Allow brand substitution | Tick Allow brand substitution to allow the dispenser to suggest a brand alternative. In Saffron SP1, The Allow brand substitution checkbox functionality is linked to the Print brand name on scripts checkbox. If you select a brand in the first panel of the New Rx wizard, the Allow brand substitution checkbox in the third panel will be greyed out and unticked. If you select Print brand name on scripts, the Allow brand substitution checkbox will be enabled and ticked. You can then choose whether or not to leave the Allow brand substitution checkbox ticked. |
Upload to My Health Record | Tick if the patient consents to their prescription being uploaded to My Health Record via a prescription exchange service |
Consent to upload to ASL | Tick Consent to upload to ASL checkbox if the patient has consented to upload the script to their Active Script List. See Consent to upload to Active Script List for more information |
PBS listing | Includes notes about the drug. |
Generate note | Select the Rx origin from the Generate note dropdown. |
Mark for printing | Tick Mark for printing if the Rx needs to be printed. |
Mark as printed | Tick Mark as printed if the Rx has already been printed for the patient. |
Once only prescription | Select Once only prescription if the patient will not require a repeat script. As of Saffron SP2, when Once only prescription is selected, you will have the option to indicate the duration that the medication should be taken for, or to indicate that the medication should be taken until finished. This information will be printed on the prescription. |
Long term medication | Select Long term medication if the patient is likely to require repeats in the future. |
Product information | Opens the MIMS product information viewer for providers. |
CMI | Opens the Consumer Medicines Information viewer for providers to show or print for patients to take home, providing information about the drug. |
Select your desired options and click Next. If you selected an Authority prescription, the New Rx authority screen will appear. If the script is not an authority, skip the New Rx authority screen section, and go straight to Add a reason for the prescription.
Consent to upload to Active Script List
This checkbox records the patient’s consent to upload the new or repeat Rx to the patient’s Active Script List. It is ticked by default.
Active Script List (ASL) is a form of electronic prescribing that is identity-based, rather than token-based. If the script is uploaded to the active script list (stored securely online), a patient can present his or her identity to an authorised dispenser, and the dispenser can look up the patient’s active script list using the pharmacy’s Prescription Dispense System, and dispense the medication.
ASL is not yet available but the Department of Health, Australian Digital Health Agency and software vendors are working toward making ASL available as a complementary model to the current token-based electronic prescribing model.
Best Practice Software recommend that the patient understand if he or she provides consent to upload, when ASL becomes available at a future date, any new prescriptions will automatically be uploaded to a secure location online (their ASL), where they can only be accessed by an authorised dispenser.
The checkbox can be disabled on a per medication basis should the patient not consent, and those medications will not be uploaded to the patient’s ASL. This checkbox currently will not appear if your practice uses MediSecure for its Prescription Exchange Service. ASL upload for MediSecure will be available in a future version of Bp Premier.
New Rx authority screen
The Authority screen will appear if you are:
- prescribing an authority medication
- prescribing a streamlined authority medication
- increasing the number of repeats or increasing the quantity of a medication when prescribing.
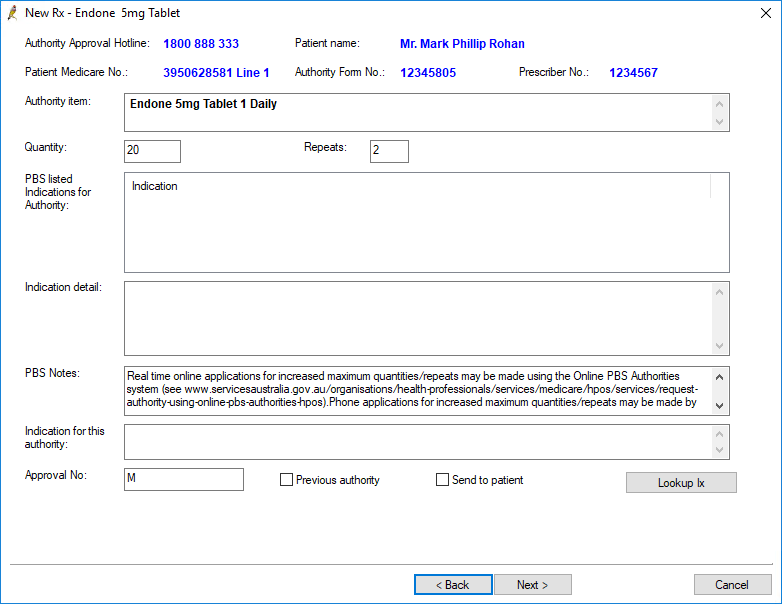
Prescribing an authority medication
- Double-click the corresponding indication in the PBS listed Indications for Authority field. The Indication detail and Indication for this Authority fields will populate.
- Obtain an approval number by either contacting the Authority Approval Hotline via the phone number listed at the top of the screen, or by logging into HPOS via your PRODA account. Visit the Services Australia website for more information on obtaining an approval number via HPOS.
- Enter the Approval number into the Approval No. field.
- Click Next.
If no indications are listed in the PBS listed Indications for Authority field, type an indication into the Indication for this Authority field.
Prescribing a streamlined authority medication
- Double-click the corresponding indication in the PBS listed Indications for Authority field. The Indication detail, Indication for this Authority, and Approval No. fields will populate.
- Click Next.
If no indications are listed in the PBS listed Indications for Authority field, type an indication into the Indication for this Authority field.
Prescribing PBS medication with an increased number of repeats or an increased quantity
- On the Authority screen, double-click the corresponding indication in the PBS listed Indications for Authority field. The Indication detail and Indication for this Authority fields will populate.
- Obtain an approval number by either contacting the Authority Approval Hotline via the phone number listed at the top of the screen, or by logging into HPOS via your PRODA account. Visit the Services Australia website for more information on obtaining an approval number via HPOS.
- Enter the approval number into the Approval No. field.
- Click Next.
If no indications are listed in the PBS listed Indications for Authority field, type an indication into the Indication for this Authority field.
Add an authority medication to the patient record without prescribing
In some situations, you may wish to include an authority medication in a patient's Rx list even if you have not prescribed the medication. For example, if a patient has received a prescription from a specialist, you may wish to include the medication in the patient's Rx list.
- Enter the medication details into the first two screens in the New Rx wizard.
- On the Select further prescription options screen (the third screen in the wizard) select Medication started by specialist from the General note: options.
- On the Authority screen, double-click the corresponding indication in the PBS listed Indications for Authority field. The Indication detail and Indication for this Authority fields will populate.
- Select Previous authority and click Next. You will not need to enter an approval number.
If no indications are listed in the PBS listed Indications for Authority field, type an indication into the Indication for this Authority field.
NOTE Authority details are printed on the script. For more information on authority prescriptions, refer to the Pharmaceutical Benefits Scheme website.
Add a reason for the prescription

- Select the condition treated by the medication from the patient's existing conditions, or select New condition to enter a new condition.
- Click Finish to return to the Current Rx list, or Another to add another Rx.
Depending on whether a new condition has been selected, and the type of condition, some or all of the fields on the right hand side will be enabled. The fields in this screen are the same as when entering a condition from the Diagnosis screen from Today's notes.
Print, send, or store the prescription
Print the prescription
To print a prescription, tick the checkbox for the medication in the Current Rx list you want to print, and click Print.
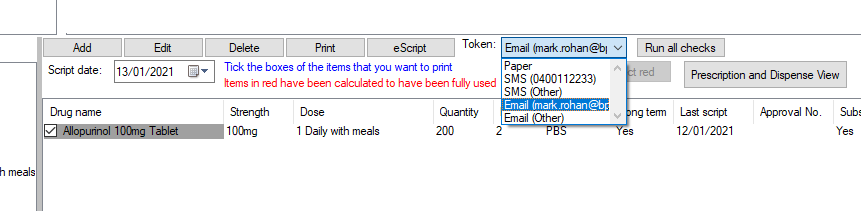
Send the prescription
To send the prescription as an electronic prescription, tick the checkbox for the medication in the Current Rx list you want to send, select a method for sending the electronic prescription from the Token: drop-down menu, and click eScript.
NOTE If your qualifications listed under Setup > Users > Edit > Qualifications exceed 50 characters in length, you will receive an error message.
Store the prescription
If you are not ready to print or send the scripts, when you close the patient record, Bp Premier will ask what to do with unprinted Rx. Select Store them for printing later and click Ok. You can print stored Rx later from the patient record or the Stored Prescriptions screen.
Real Time Prescription Monitoring
If Real Time Prescription Monitoring is enabled, when the prescription is printed or sent as an electronic prescription, Bp Premier will automatically connect to the Real Time Prescription Monitoring database (The National Data Exchange, or NDE), perform checks, and indicate the results.
Find, edit, or cease a current Rx
Find a current Rx
Once a prescription has been printed or sent, you can view it under Past prescriptions in the patient record left-hand menu.
Otherwise If you know the script ID for a printed or sent script, you can look it up.
- From the main screen, select Utilities > Prescription Lookup. The Prescription Lookup screen will appear.
- Enter the Script No. and click Lookup. The screen will show an image of the printed script.

Edit a current Rx
- Open the patient record you want to cease medication for.
- Select Current Rx from the tree on the left hand side.
- Right-click the Rx you want to edit. A number of editing options are listed in the right-click menu. Select the item you want to change for the Rx.
- Some editing options, such as No substitution, update the Rx record in the list. Other options will open the Edit Rx screen so the record can be updated.
- Make the changes in the screen and click Save.
Cease a current Rx
- Open the patient record you want to cease medication for.
- Select Current Rx from the tree on the left hand side.
- Right-click the Rx you want to cease and select Cease Rx. The Cease Rx screen will appear.
- Change the Date ceased from the current day if necessary.
- Enter or select a Reason for cessation. Reasons entered as free text will be available for selection the next time the screen appears.
- Tick Add to allergies/adverse reactions to add the medication to the patient's Allergies list.
- Click Delete.
Related topics
Feedback
Medicare Web Services | Pathology | Bp Comms | Best Health App | Multi-location |    |
|
|
This material is classified as commercial-in-confidence. Unauthorised distribution of this information may constitute a breach of our Code of Conduct, and may infringe our intellectual property rights. This information is collected and managed in accordance with our Privacy Policy, available on our website. © Copyright 2023 | |
 AU
AU 