This article describes how to upload a document for Advance Care Planning (ACP) to My Health Record.
Advance Care Planning (ACP) is the process of establishing and documenting one's medical care preferences in the event that they are unable to make decisions in the future due to illness, injury, or disability.
Advance Care Planning comprises choosing a substitute decision-maker, expressing one's ideas, beliefs, and aspirations, and identifying treatments one wishes or does not wish to receive under specified conditions. The outcome of Advance Care Planning is often a living will or advance care directive, which can guide medical professionals and loved ones in making decisions on the individual's behalf.
Visit the website of the Australian Digital Health Agency for additional information on Advance Care Planning.
Your important health information is available when it's needed
Advance care planning: A carer's story
Users with My Health Record Access permission set to Allow Access can upload Advance Care Planning documents. Users without this permission will have the option greyed out.
The Patient can also upload a copy of their Advance Care Planning document to My Health Record via their myGov account.
Visit the website of the Australian Digital Health Agency for additional information on Advance Care Planning.
Minimum data requirements
To upload an Advance Care Plan document to My Health Record. Patients must have the following recorded in their demographic details:
- Family name
- Date of birth
- Individual Health Identifier
The user logged in to Bp Premier must have one of the following entered into their User Profile:
- Phone number
- Fax number
- Practice E-mail
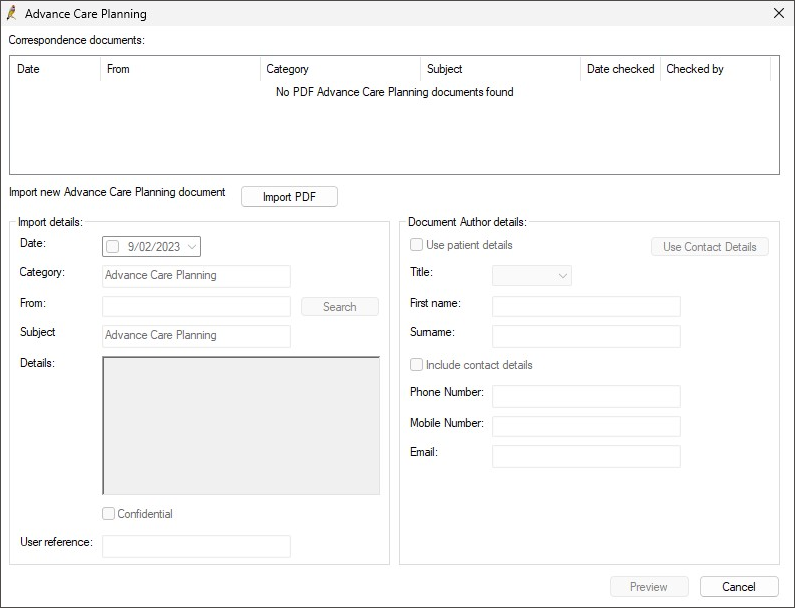
- From the patient's clinical record, select My Health Record > Upload Advance Care Planning from the menu, or press Shift-F9. The Advance Care Planning screen will appear.
- Advance Care Planning documents can only be uploaded as a PDF. Click the Import PDF button to import a new Advance Care Planning document. Browse to the folder containing the PDF file to be imported.
- Select the document to import and click Open.
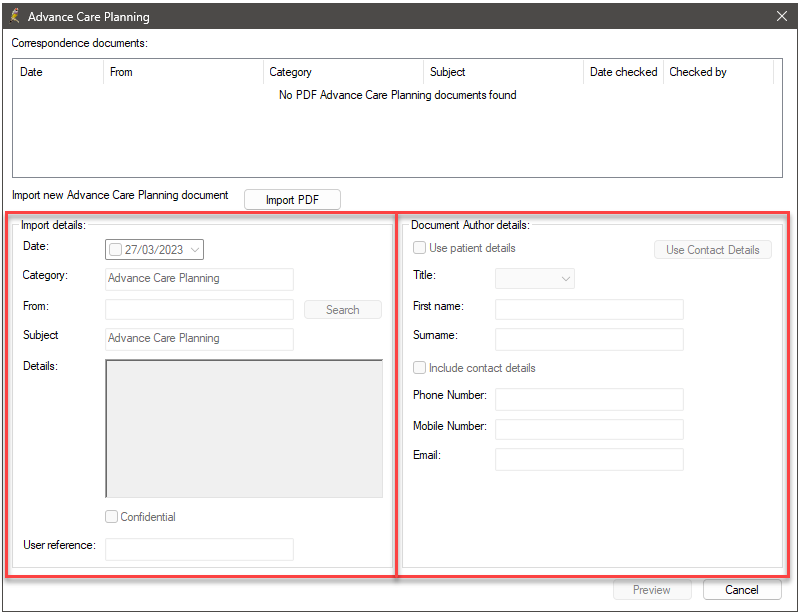
- Complete the Import details section. The Category is hard coded to Advance Care Planning, and this cannot be updated. The subject will default to Advance Care Planning but can be updated by the User as needed.
- Enter the author's information. If the Patient is the author, tick the box next to Use Patient Details; the details can be entered as free text. If the document author is a contact in your address book, you can search for their information by selecting Use Contact details.
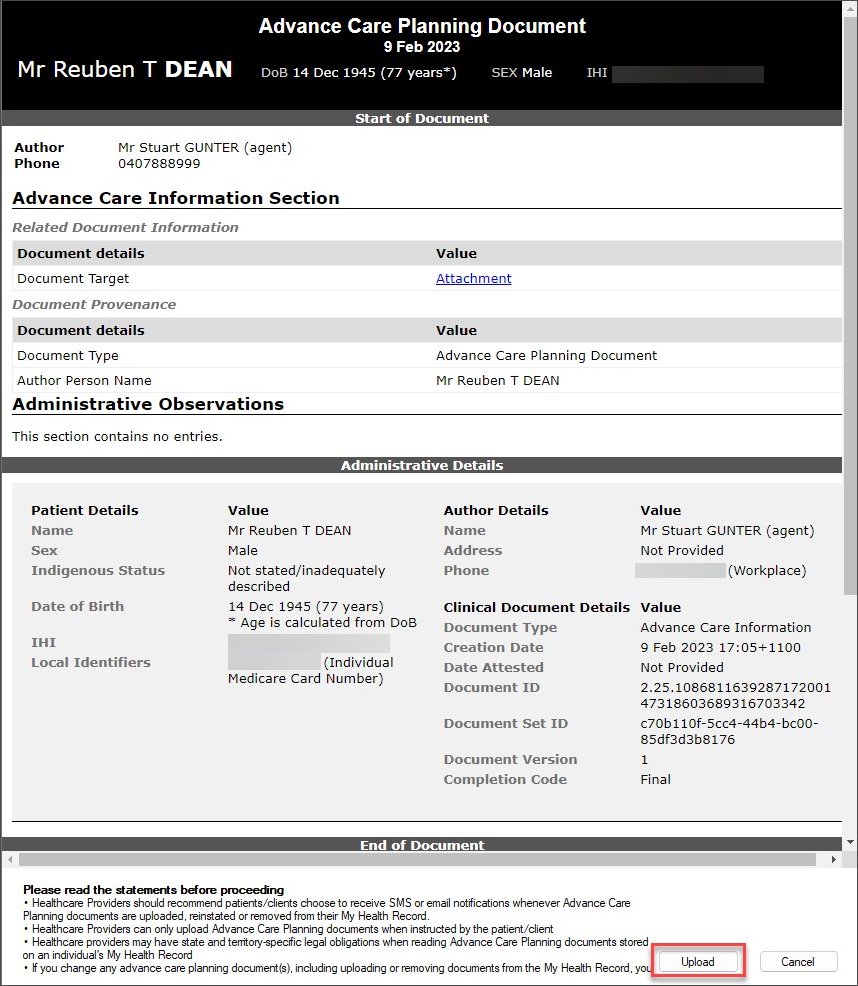
- When all the relevant details have been entered, click Preview. A preview of the Advance Care Planning Document will appear.
- Review the Advance Care Planning document. Read the Statement at the bottom of the screen and then click the Upload button in the bottom right corner.
- Bp Premier will connect to My Health Record and upload the Advance Care Planning document.
In Today's notes, an action stating that an Advance Care Planning document was uploaded to My Health Record will be recorded. A copy of the uploaded document will be saved to Correspondence In.
If the patient provided a copy of their Advance Care Planning document to your Practice before installing Orchid SP1, you may still upload it to My Health Record from Correspondence with the patient's permission. However, if you have not already done so, you must first update the document category to Advance Care Planning.
IMPORTANT Advance Care Planning documents can only be uploaded as a PDF.
Update the category type for an existing document
Updating the document category to Advance Care Planning ensures that this document will be visible in the Correspondence document section of the My Health Record > Advance Care Planning window.
- Locate the previously imported Advance Care Planning document in Correspondence In, right-click, and select Edit Details.
- In the Category, select from the list 'Advance Care Planning' and click Save.
Upload an Advance Care Planning document from Correspondence
- From the patient's clinical record, select My Health Record > Upload Advance Care Planning from the menu, or press Shift-F9. The Advance Care Planning screen will appear.
- PDF documents with the category Advance Care Planning will be shown in the Correspondence document section. Tick the document that you wish to upload to My Health Record.
- Enter the author's information. If the Patient is the author, tick the box next to Use Patient Details; the details can be entered as free text. If the document author is a contact in your address book, you can search for their information by selecting Use Contact details.
- When all the relevant details have been entered, click Preview. A preview of the Advance Care Planning Document will appear.
- Review the Advance Care Planning document. Read the Statement at the bottom of the screen and then click the Upload button in the bottom right corner.
- Bp Premier will connect to My Health Record and upload the Advance Care Planning document.
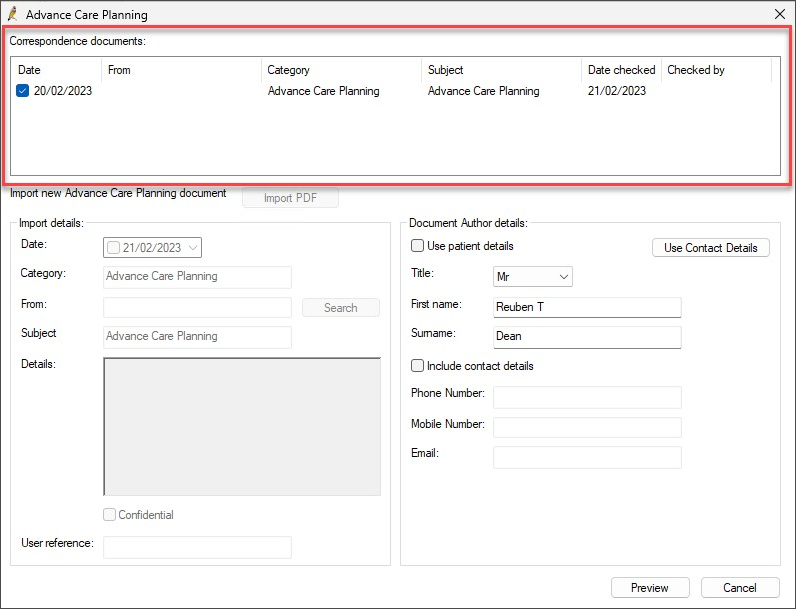
When selecting an existing Advance Care Planning document from Correspondence, the Import Details section is greyed out. If you wish to modify any of these details, you must do so in the Correspondence section of the Patient Record.

In Today's notes, an action stating that an Advance Care Planning document was uploaded to My Health Record will be recorded.
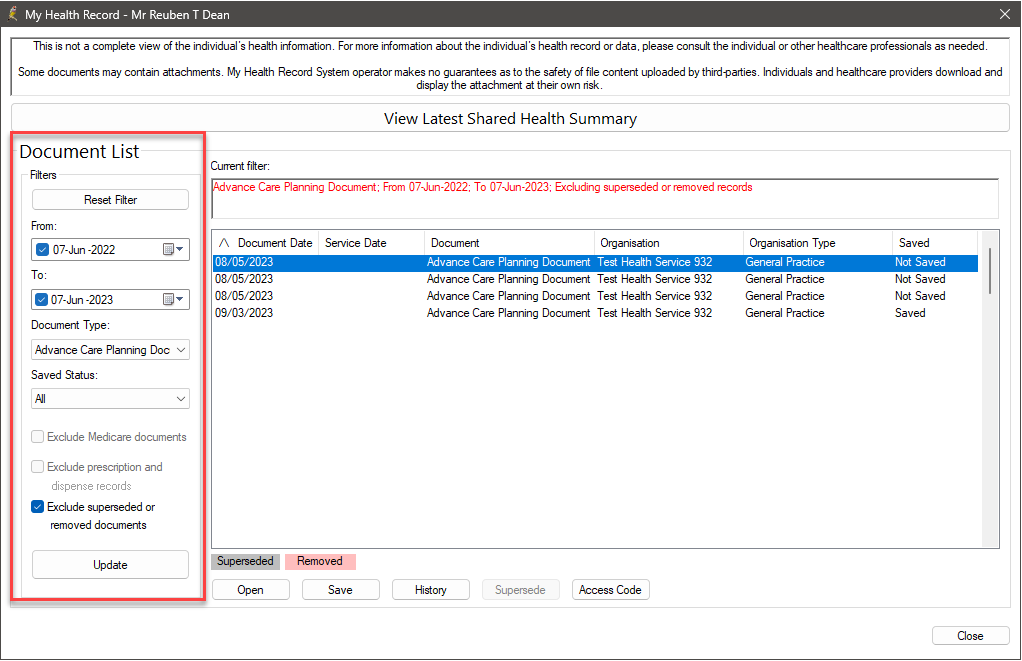
The My Health Record home screen allows you to view and manage documents that have been uploaded to a patient's My Health Record. You can also download documents from here to the patient's record in Bp Premier.
- From inside the patient record, select My Health Record > Document List from the menu or press Ctrl+F9. The My Health Record screen will appear.
- Reset Filter — Resets filter values to default.
- From / To — Include documents uploaded during the date range.
- Document Type — Limit documents shown to the selected type.
- Saved Status — Show only saved, unsaved, or both.
- Exclude... — Don't show documents of the selected type.
- Set the filter Document Type to Advance Care Planning Document and then apply any additional required filters.
- Click Update to apply filter settings to the list of documents.
- Click on a column heading to sort the list by that column. '/\ 'or '\/' in a column header indicates whether the list is sorted by that column in ascending or descending order.
The home screen shows all uploaded documents, such as advance care planning documents, donor registrations, discharge summaries, referrals, specialist correspondence, and prescriptions. This screen will only list up to 1000 My Health Record documents. If your search returns more than 1000 documents, Bp Premier will prompt you to use the filters to reduce the number of documents returned.
The Filters on the left side can be used to change the age and type of documents shown:
How can I remove an incorrectly uploaded document?
Users must have an HPI-I number in their User Profile to remove documents from My Health Record. Users without an HPI-I number in their User Profile must request a user with complete access to My Health Record to remove the document.
- From the patient record, select My Health Record > Uploaded documents. The Uploaded My Health Record Documents screen will appear.
- Select the document and click Remove.
Tick the Include removed documents check box to include removed documents in the displayed list.
How do I save a document from My Health Record to a patient record?
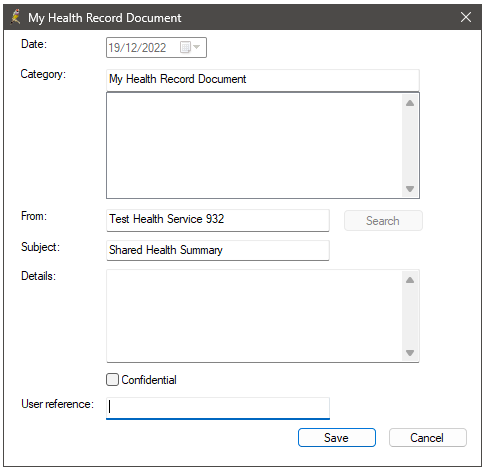
- From the My Health Record home screen, select a document and click Save or right-click on the document and select Save. The My Health Record Document screen will appear.
- Most fields cannot be edited. Complete any Details you want to note about the document, and tick whether the document is confidential. See Understanding confidentiality and patient notes for more information.
- Record a User reference if applicable and press Save. The document will be saved to the Correspondence In section of the patient record, and the document Saved status will be updated to ‘Saved’.
Document Saved status
A status of ‘Saved’ in the Saved column of the My Health Record home screen indicates that a document has been downloaded and stored in a patient record. If the document is deleted from the patient record, the Saved status will be reset to ‘Not saved’ to indicate that the document no longer exists in a patient record.
Documents saved from My Health Record to a patient record cannot be moved to another patient record. However, you can move documents to Correspondence Out or Investigations in the same patient record.
Last updated: 06 March 2025.