This article is for practices that batch and send direct bill (bulk bill) claims through Medicare Online, and describes how to:
- Activate online claiming for direct bill accounts.
- Bill an invoice to 'direct bill' and store for batching.
- Send claim batches to Medicare Online and check for payments.
- Read the payment and processing reports and reconcile common unpaid scenarios.
- Adjust a service for reconciliation.
- Troubleshoot some common errors that may occur during online patient claiming.
The steps in this article assume that you have set up Medicare Web Services. See Connect to Medicare Web Services for more information.
Enable online claiming for batched direct billed accounts through the Bp Premier Configuration screen.
- Log in to the Bp Premier server as a user with administrator permissions.
- Select Setup > Configuration from the main screen. Select the Online claiming tab.
- To activate direct billing, tick Activate Online Bulk Bill Claiming.
-
Optional settings that can be enabled in Online Claiming:

For instructions on how to activate and process direct bill Easyclaims, see Online Claiming: EasyClaim and Tyro.
For instructions on how to activate private patient claims, see Online Claiming: Patient claiming.

|
A5 Vouchers |
If ticked, Medicare DB4 vouchers will be printed in A5 size. |
|
If ticked, two copies of the Medicare DB4 voucher will be printed. To print just one copy, uncheck the box. |
|
|
Maximum No. of vouchers in a batch |
80 is the maximum number of vouchers that can be sent to Medicare in a single batch. If preferred, this can be set to a lower number. |
|
Default number of months to display when viewing all batches |
Specifies how many months are displayed in the Online Claiming screen when viewing all batches. By default, this has been set to 12 months. |
When a doctor or provider finalises a visit or practice staff are processing an account, indicate direct billing by:
- From the Patient record, click Finalise visit and select 'Direct bill' in the Account type drop-down list.
- From the Account details screen, set the Bill to field to 'Medicare Direct Bill' or 'DVA Direct Bill'.
Use the Store button, which makes the account immediately available to include in the next direct bill batch. Clicking Held will hold the account, and it will not be eligible for inclusion in a batch until stored.
Click Print if you wish to print the Bulk Bill Assignment of Benefit form and make the account immediately available to include in the next direct bill batch.
Hospital Services Claims
Any direct bill invoices marked as In hospital must include a hospital name and provider number. The hospital must be added as a contact in Bp Premier, and the hospital's provider number must be included in the contact record.
To add a hospital and provider number to an invoice, in the Account details screen tick In Hospital and select the hospital from the Hospital name/No: field.
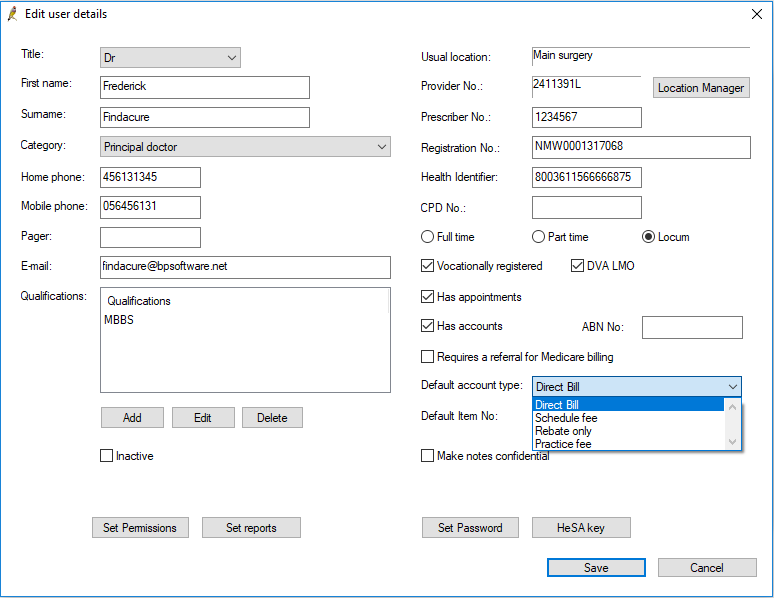
Change a provider's default account type to Direct Bill
You can change a provider's default account type to direct bill from Setup > Users > Edit > Default account type.
How often a practice should send direct bill batches will depend on the size and billing preferences of the practice. However, batches should be sent to Medicare at least once per day; busier practices may wish to send multiple batches in a day at regular times.
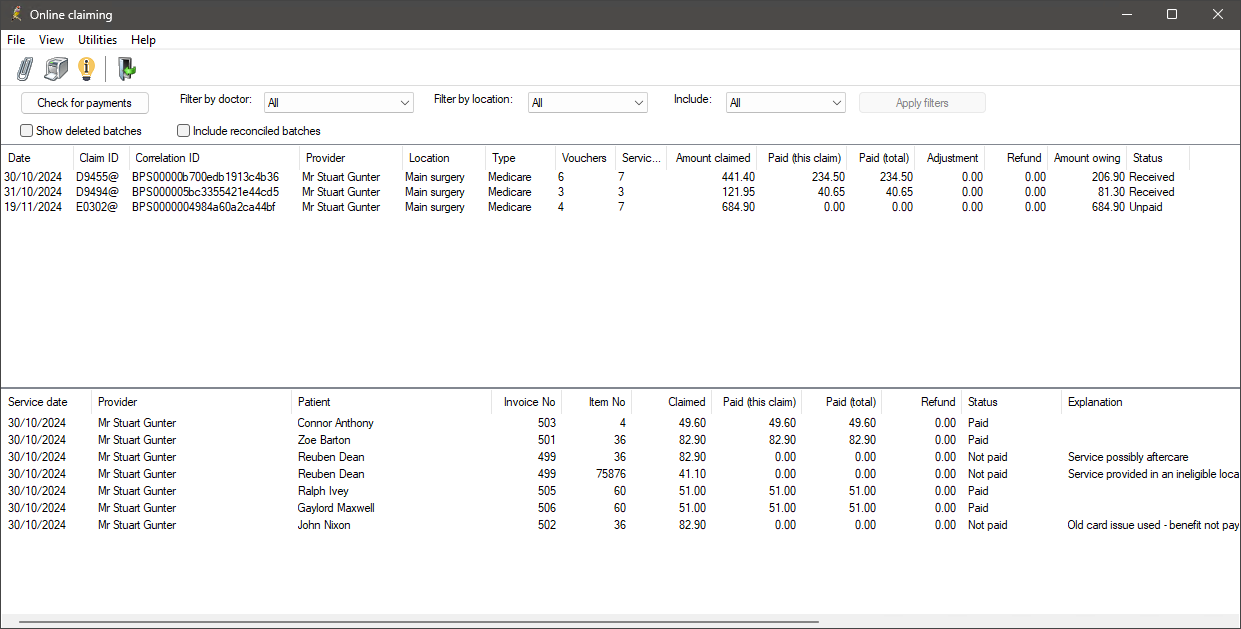
Direct bill batches are managed from the Online claiming screen. Select Management > Online claiming from the main screen. All of the following procedures start from the Online claiming screen.
- Click the
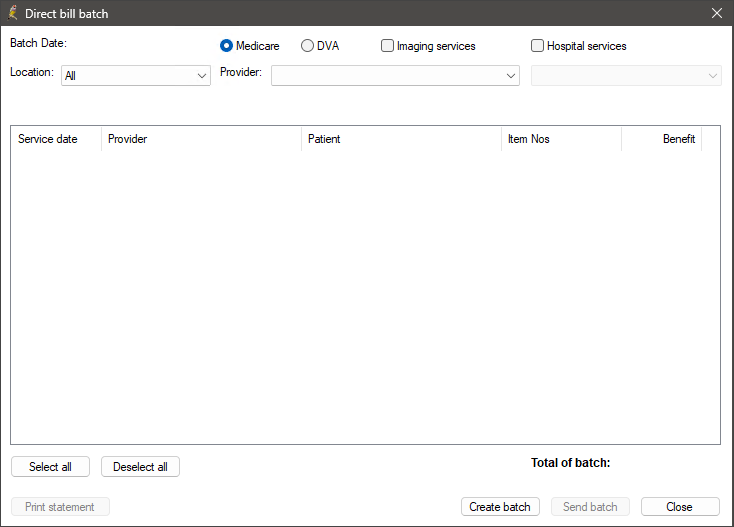
 icon or select File > New claim menu item to open the Direct bill batch screen. The screen will be empty to start.
 - Select the Location and Provider to create a batch for. Only services performed at that location by that provider will be included in the batch. Limiting batches by provider and location can make batches more manageable and assist with reconciliation.
- Select the type of batch to be created: Medicare or DVA.
- Select if the batch is for Hospital Services, Imaging Services, or both.
- Each hospital services batch must be made up of claims from a single hospital. If you are creating a batch for hospital services, a drop down menu listing all hospitals with vouchers to be processed will appear. Select the hospital you wish to create the batch for. DVA does not require this separation and this option will be unavailable when DVA is selected.
- Click Create batch. Bp Premier will generate a batch containing a maximum of 80 'vouchers' for the selected doctor that have not been previously sent to Medicare.
- Untick any vouchers that you do not want to include in the current batch. Unticked vouchers will be eligible for inclusion in subsequent batches.
- Click Send batch to transmit the batch to Medicare.
- To print a statement of the batch that has just been transmitted, click Print statement.
- Repeat steps 2–9 to send vouchers for other providers. If you do not want to send any more batches, click Close.
NOTE Medicare require that hospital in-patient services are batched separately. Use the Hospital services check box to generate hospital in-patient claims.
The hospital must be added as a contact with a provider number in Bp Premier, or you will receive an error when sending the batch. See Invoice and store for batching for more information.
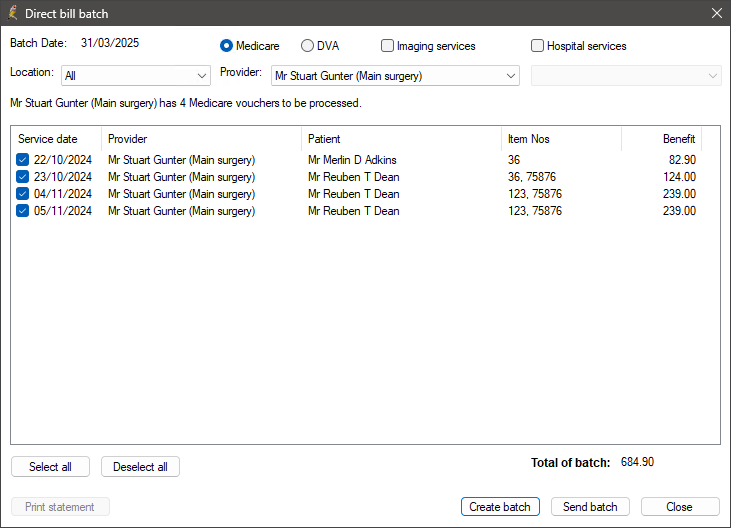
If transmission is successful, a voucher is marked as ‘Sent’ and excluded from future batches.
NOTE If there are any vouchers that cannot be sent (for example, because the demographic information is incomplete), a message will be displayed and the vouchers will not be included in the batch.
Approximately the next business day after lodgement, the claims should be processed and the payment reports available from a Check for Payments.
As with sending batches, how often a practice should check for payments from Medicare will depend on the size and billing preferences of the practice. But at least once per day, staff should check for payments, so that new batch payments are updated within the system and any unpaid claims can be reviewed and actioned.
- Click Check for payments from the Online Claiming screen. Bp Premier will connect to Medicare. This process may take a few minutes depending on how many unpaid batches are currently in the system.
- Tick Print items without explanation codes on processing reports if you want to show all services claimed on the report regardless of whether they had an error. Normally these are not shown.
- Click Save to save all payment and processing reports for the payment runs shown, update all batches and create any related payment records.
- If some batches still have a status of 'Received', you will need to reconcile those batches.
Depending on the claim's status with Services Australia, the following alerts may appear:
|
Alert |
Description |
|---|---|
|
REPORT_NOT_FOUND |
The claim information does not match Services Australia's records. Contact Services Australia for more information |
|
REPORT_NOT_READY |
The claim has not yet been finalised by Services Australia. Try again later. |
|
REPORT_NOT_AVAILABLE |
The claim was processed and has been rejected. Check the processing report for more information. |
Once all the payment information has been identified, the Online claim payments summary screen will appear showing returned payments and exceptions.
If you are unable to perform the check for payments, contact Medicare to ensure that the batch has been received.
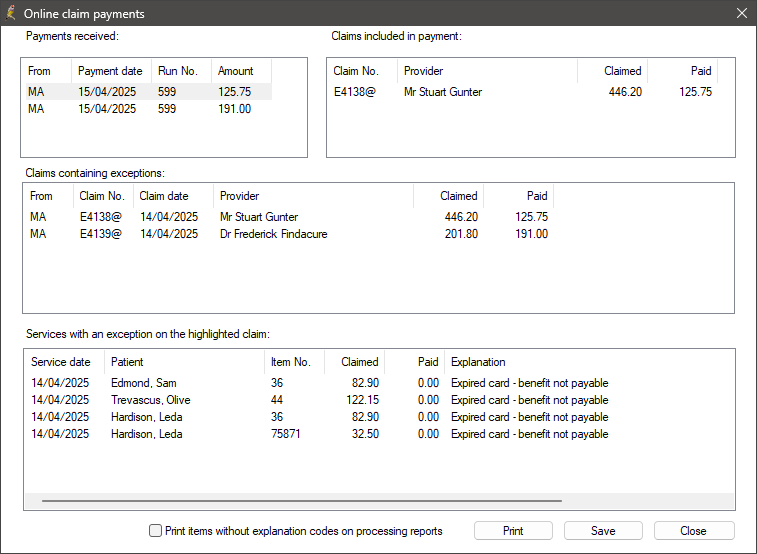
Online claim payments includes the following sections:
|
Payments received |
Lists all payment runs since the last check for payments. Select a payment run to view the claims included in that run. |
|
Claims included in payment |
Shows the claims within the selected payment run, and Claimed against Paid amounts. |
|
Claims containing exceptions |
Lists all claims in the selected payment run that contain exceptions or errors; that is, the amount paid for a claim is different to the amount claimed. Select a claim to view the services with exceptions in that claim. |
|
Services with an exception on the highlighted claim |
Shows the services that have an exception in the selected claim, and the Medicare Explanation for the exception. |
Depending on the number of batches included in this check for payments, this process may take a number of minutes. A message will appear on screen to indicate that the update is in process.
When you return to the Online Claiming screen, Bp Premier will update the status of batches and services from the payment runs you just saved:
|
Status type |
Bp Premier status after saving |
|---|---|
|
Batch Status
|
Unpaid – Batch was transmitted to Medicare / DVA but has not yet been processed. The batch will be included in a future check for payments. If the batch remains unpaid for more than a few days, contact Medicare to ensure that they received the batch transmission. |
|
Reconciled - Batch has been paid in full, or any errors have been rectified and resubmitted in another batch. The total amount claimed equals the total paid plus adjustment columns. Reconciled batches are removed from the default list of batches displayed in the Online claiming screen. To show the reconciled batches, tick Include reconciled batches, enter the Start date and End date, then press the Apply filters button. You can also filter on specific Doctors, Locations or Batch type |
|
|
Received – Batch may be unpaid or partly part but contains errors that have not been actioned. |
|
|
Service Status
|
Sent – Service was transmitted to Medicare but has not been processed. |
|
Not Paid – Service has been processed by Medicare but an error has occurred. The error is shown in the Note column and on the processing report. The service must be corrected before the batch is reconciled. |
|
|
Paid – Service has been paid in full. |
|
|
Resent - Service was rejected in this batch and has been actioned to be resent in another batch. |
|
|
Refunded - Service had been paid or partly paid but has been refunded. Comment field will show any user enter details on why this was done. |
Medicare processing and payments reports are available for processed batches.
Download a payment or processing report
If a payment report is not showing for a batch, Bp Premier can check for that report and download the report for you to view and print.
- Select the batch on the Online Claiming screen and select File > Get payment report or Get processing report. Bp Premier will retrieve the report.
- After the report is downloaded, select View > Payment reports or Processing reports.
Print payment or processing reports
You can print all reports, or single reports to aid reconciliation or banking.
- From the Online claiming screen, select View > Payment reports or View > Processing reports from the menu.
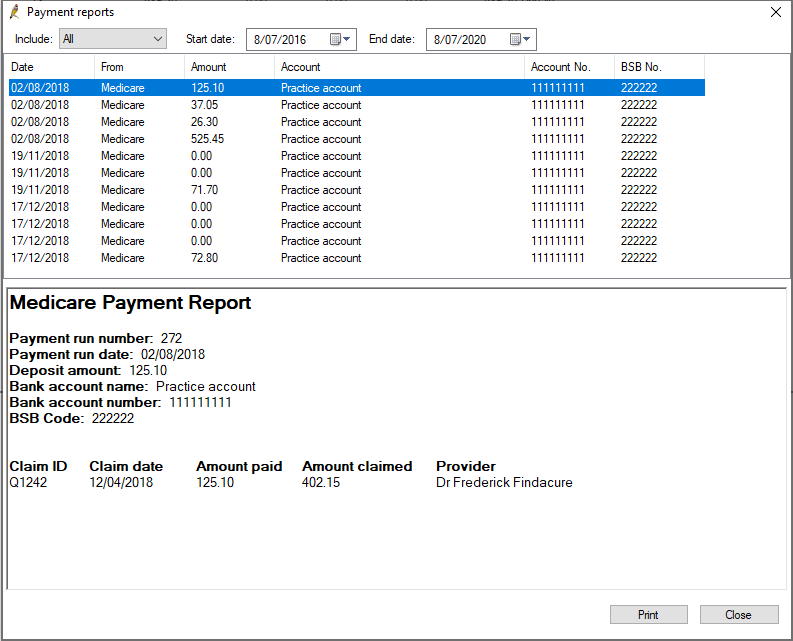
- The Payments reports screen shows one report for each deposit made by Medicare. Select a report in the top half to view the information in the bottom half. Double-click a report to view and print the payment report individually.
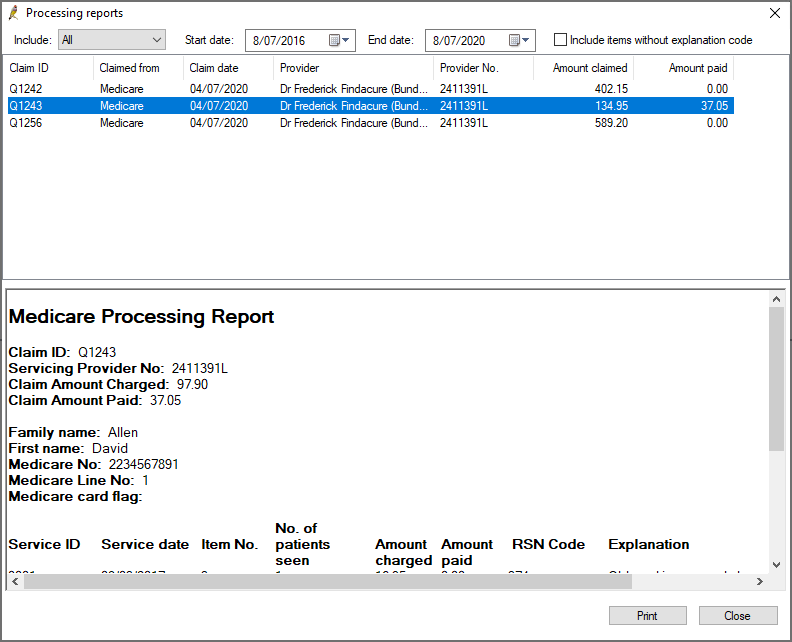
- The Processing reports screen lists each claim that has been processed that had errors. Double-click a report to view and print just that report.
- By default, the processing report shows only exceptions that have an explanation code. To include exceptions without an explanation code in the report, tick Include items without explanation code.
- Click Print to print the processing or payment reports displayed.
What are the payment and processing reports?
Medicare Australia processes claims and makes payments overnight for all claims that have been processed. There are two types of reports returned from Medicare Australia: Payment reports and Processing reports.
Payment reports can include the payments for multiple claims, so there will often only be a single payment report even if several claims have been submitted in the last 24 hours. There will be a payment report for each deposit into the practice’s bank account.
DVA and Medicare reports are separate, so a payment report will never include both DVA and Medicare payments. The payment report includes details of the bank account into which the payment was made, how much was paid and what claims were included in the payment.
Processing reports contain an exception list of all services within a single claim where the amount paid was not the same as the amount claimed, including a code indicating the reason for the difference. There will not be a processing report for a claim that has been paid in full.
What can I do with these reports?
The payment and processing reports provide information on individual claim processing and payments. The Online Claiming screen presents a 'current state' summary of claims in a batch. For reconciliation or banking, you may need to look at the processing or payment details of a single claim.
If you need to identify the source of a deposit from a bank statement, for example, you can use the payment report to match the date and account of a Medicare deposit to the payment on the bank statement.
If you need more information on why a claim was unpaid, you can use the processing report to view details of how the claim was processed by Medicare. The processing report contains information that you may need to supply to Medicare if you dispute the claim decision.
Once the check for payments has been completed, claims that have a difference between the amount claimed and the amount paid will have the status Received. You can reconcile batches with a received status from the Online Claim batch screen.
- Double-click on the claim you want to reconcile in the Online claiming screen. The Online Claim batch screen will open, showing all the exceptions in a claim, with the Explanation given by Medicare for the difference in payment.
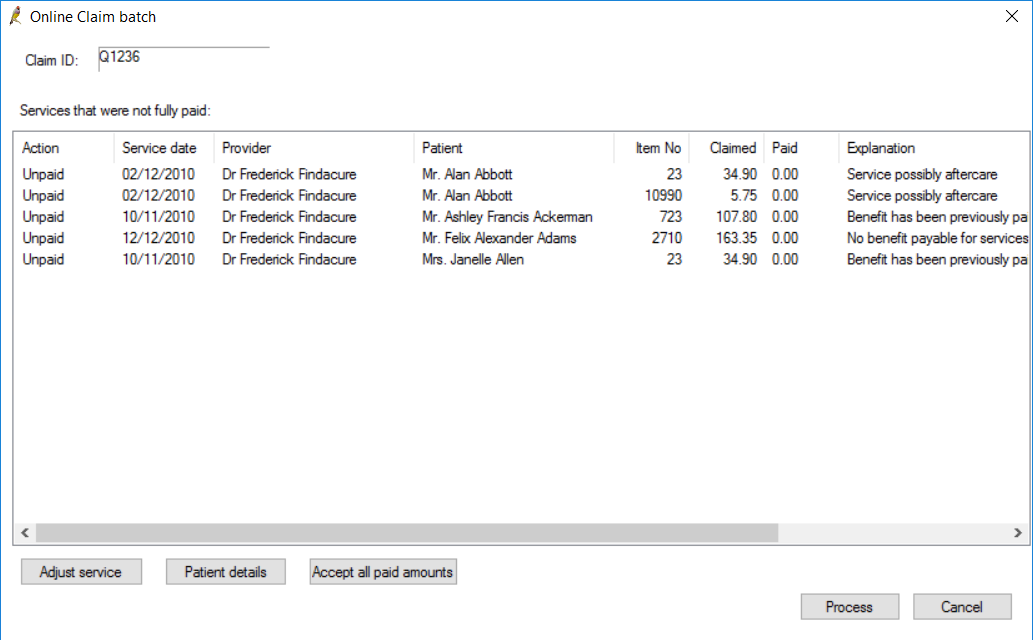
You have three options to reconcile unpaid services from this screen:
|
Button |
Description |
|---|---|
|
Accept all paid amounts |
Accept all amounts paid by Medicare and set the status of all services and the batch to 'Paid'. This option is the equivalent of selecting Accept fee of for all services. |
|
Patient details |
Opens the patient demographics screen so that patient details can be updated and Medicare/DVA numbers verified. |
|
Adjust service |
Adjusts the service using a number of options, such as accepting the amount paid, changing the service details, or changing the billing to recipient. |
Patient details
Fields in error in a patient's demographic, like an invalid or missing Medicare number, can cause a claim to be rejected. The Explanation field will provide more information on missing or invalid details.
- Select the service and click Patient details.
- Make changes to the patient's Medicare details and click the Medicare/DVA eligibility check button to validate the new settings.
- Click Save to return to the Online Claim batch screen. The Action column will change to ‘Resend’.
- Follow the instructions in the next panel Finalise Reconciliation.
Adjust service
- To correct issues other than patient demographics, select the service in error and click Adjust service. The Adjust billing screen will appear.
- Select one of the following radio buttons, depending on the error to reconcile:
- Follow the instructions in the next panel Finalise Reconciliation.
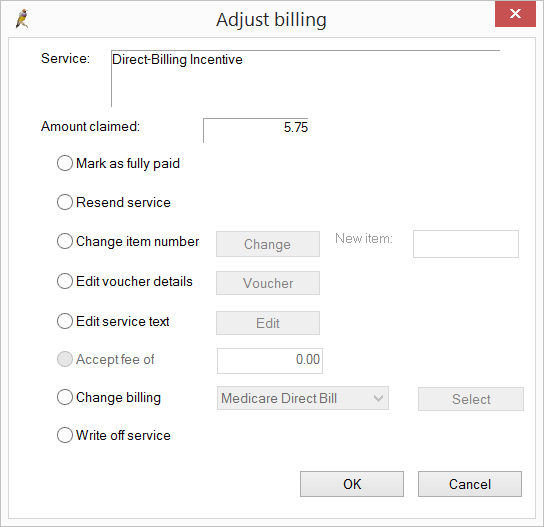
|
Field |
Description |
Action |
|---|---|---|
|
Mark as fully paid |
Do not use this option. No payment record will be created if this option is selected. |
Fully Paid |
|
Resend service |
Select only if Medicare has had an issue on their end and they have requested that you resend the item with no changes. The service will be included in the next batch created. |
Resend |
|
Change Item number |
Select if Medicare have rejected the original item number claimed for, and the provider wishes to substitute a different item number for the service. Click Change, select the new item number, enter any applicable Service text and click OK. |
Change Item |
|
Edit Voucher details |
Select if you want to add additional details to the invoice, such as No of patients, Notes, or Not normal aftercare. Click Save to update the details. |
Resend |
|
Edit Service Text |
Select if you want to change or add service text for an item, for example, if two of the same items have been claimed, and one item needs service text to clarify and resend. |
Resend |
|
Accept fee of |
Select if the item has been underpaid by Medicare because of Medicare rules, and you accept this payment. |
Accept |
|
Change billing |
Select if this service will not be paid by Medicare or DVA and you wish to change the billing type to another method, or you need to change a bulk bill from DVA to Medicare. If the billing is changed to private, the service will be removed from the current batch. |
Change Payer |
|
Write off |
Select to write off this service. Writing off removes the service from the batch. |
Write Off |
- As patient details are corrected or items are adjusted, the Action column in the Online Claim batch screen shows the action that Bp Premier will take when the user clicks Process.
- After all services in a batch have been adjusted or resent, click Process.
- The batch will automatically be marked as ‘Reconciled’ and removed from the list of Unpaid batches on the Online claiming screen. Tick the Show all batches tick box to view the batch details again.
Bp Premier will take the following actions per service based on the user's reconciliation selections. Unless a service changed the Billed to value, no other user actions are required.
|
Action |
Description |
|---|---|
|
Fully Paid |
Bp Premier considers the service paid in full. |
|
Accept |
Bp Premier considers the service paid in full. A 'service adjustment' record will be created to balance the underpayment in the billing history and reports. |
|
Resend |
The service will be available for inclusion in the next batch to be submitted to Medicare. |
|
Change Item |
The service will be available for inclusion in the next batch to be submitted to Medicare. |
|
Change Payer |
If changed to private billing, the service will not be available for inclusion in any batches. The account with an unpaid status will be viewable from the patient's Patient Billing History; the Billed to field will reflect the change from Medicare or DVA to the patient. The account must be paid by the new billing recipient, such as the patient, HOF, or WorkCover. If changed from DVA to Medicare bulk bill, the service will be eligible to include in the next batch. Any change of payer will result in the original invoice being cancelled, service adjustment records created, and a new invoice for the new Bill to value created. Fees may change for services changed from DVA to Medicare. |
|
Write Off |
Used only if the practice has determined it will not receive any money for this service from Medicare or the patient. Bp Premier will create a service adjustment to reflect the written-off amount. The Status will show Written off. |
- Select Management > Online claiming from the menu or press Ctrl+F9. The Online claiming screen will appear.
- Select the batch containing the service you need to refund. Right-click the service in the bottom half of the screen and select Refund/Adjust Payment. The Refund/Adjust Payment screen will appear.
- Select 'Refund entire payment to Medicare' from Select the type of adjustment.
- Select the Refund method by which your practice will refund the amount to Medicare: Direct Credit or Cheque.
- Enter any applicable Comments to explain why the refund is being made. The comments will show on the Online Claiming screen.
- Click OK to process the refund.
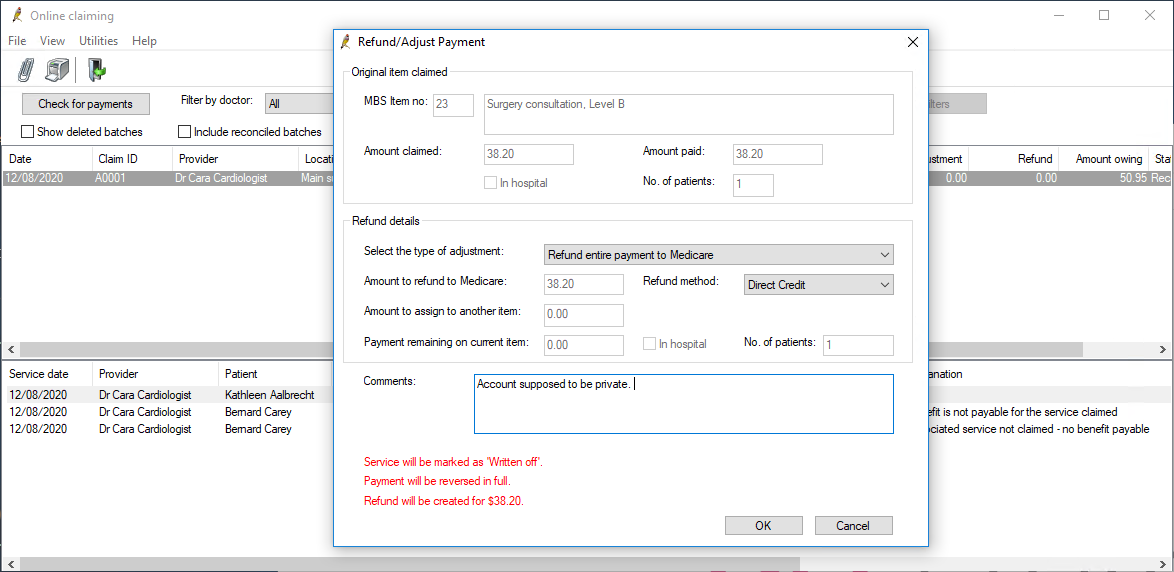
What do I do next?
Pay the refund amount back to Medicare by the method your practice normally uses (and indicated in step 4).
The service will be updated as 'Written off' in the billing history and adjustments will be created to reverse the payment and show the payment being refunded to Medicare. You do not need to manually adjust any payments to doctors. The refund to Medicare will be deducted automatically in all payments, services, and transactions reports.
If the service is being refunded because of an error such as a wrong item number, create a new account to process the refunded service correctly.
Partial refunds
Options for partial refunds include:
- Part refund to Medicare leaving remainder on current item. This option caters for situations where a site has been overpaid by Medicare, and is required to return part of the payment.
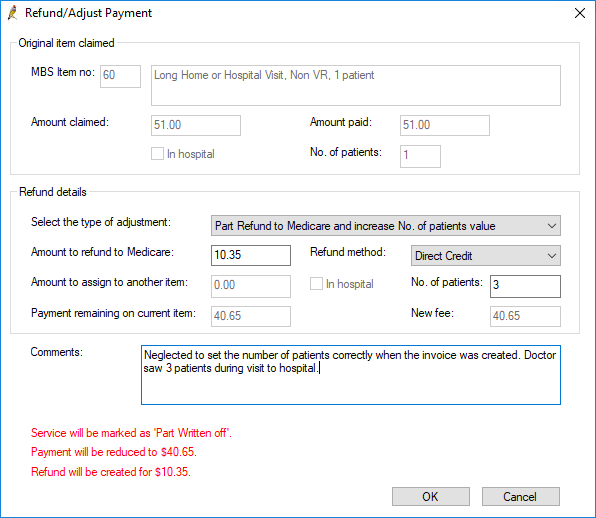
- Part refund to Medicare and increase No. of patients value. This option caters for situations where a site has been overpaid and Medicare asks for part of the payment back because the site has indicated the incorrect number of patients in the original claim.
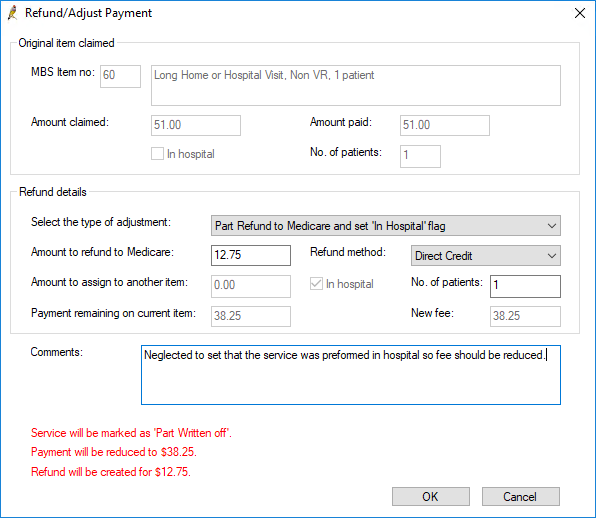
- Part refund to Medicare and set In Hospital flag. This option caters for situations where a site has been overpaid and Medicare asks for part of the payment back because the site has not ticked ‘In Hospital’ in the original claim.
Part refund to Medicare Leaving remainder on current item
- Select Management > Online claiming from the Bp Premier home screen or press Ctrl+F9. The Online claiming screen will appear.
- Select the batch containing the service you need to partially refund. Right-click the service in the bottom half of the screen and select Refund/Adjust Payment. The Refund/Adjust Payment screen will appear.
- Select Part refund to Medicare Leaving remainder on current item from Select the type of adjustment.
- Select the Refund method by which your practice will refund the amount to Medicare: Direct Credit or Cheque.
- Enter the Amount to refund to Medicare.
- Enter any applicable Comments to explain why the refund is being made. The comments will show on the Online Claiming screen.
- Click OK to process the refund.
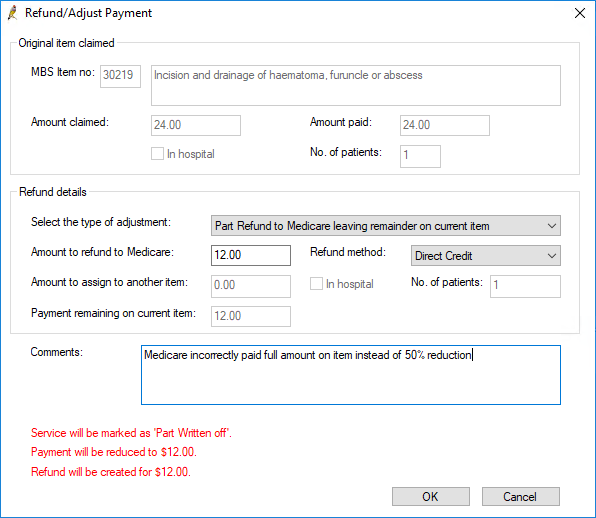
Part refund to Medicare and increase No. of patients value
- Select Management > Online claiming from the Bp Premier home screen or press Ctrl+F9. The Online claiming screen will appear.
- Select the batch containing the service you need to partially refund. Right-click the service in the bottom half of the screen and select Refund/Adjust Payment. The Refund/Adjust Payment screen will appear
- Select Part refund to Medicare and increase No. of patients value from Select the type of adjustment.
- Select the Refund method by which your practice will refund the amount to Medicare: Direct Credit or Cheque.
- Enter the correct No. of patients. The Amount to refund to Medicare will be automatically calculated.
- Enter any applicable Comments to explain why the refund is being made. The comments will show on the Online Claiming screen.
- Click OK to process the refund.
Part refund to Medicare and set In Hospital flag
- Select Management > Online claiming from the Bp Premier home screen or press Ctrl+F9. The Online claiming screen will appear.
- Select the batch containing the service you need to partially refund. Right-click the service in the bottom half of the screen and select Refund/Adjust Payment. The Refund/Adjust Payment screen will appear.
- Select Part refund to Medicare and set 'In Hospital' flag from Select the type of adjustment. The Amount to refund to Medicare will be automatically calculated.
- Select the Refund method by which your practice will refund the amount to Medicare: Direct Credit or Cheque.
- Enter any applicable Comments to explain why the refund is being made. The comments will show on the Online Claiming screen.
- Click OK to process the refund.
What do I do next?
Pay the refund amount back to Medicare by the method you have indicated in the Refund method field.
The service will be updated as 'Written off' or 'Part written off' in the billing history depending on if you created a part or full refund, and adjustments will be created to reverse or partially reverse the payment and show the payment being refunded to Medicare. You do not need to manually adjust any payments to doctors. The refund to Medicare will be deducted automatically in all payments, services, and transactions reports.
If the service is being refunded because of an error such as a wrong item number, create a new account to process the refunded service correctly.
See Medicare Refunds Frequently Asked Questions for more information.
This section provides some suggestions for troubleshooting issues with your connection to Medicare Web Services (MWS) and PRODA. If a submission has been declined, consult this list before calling Best Practice Software Support to see if you can resolve the problem.
NOTE NOTE Medicare certificates no longer need to be configured. The functionality provided by Medicare certificates has been replaced by Medicare Web Services.
|
Issue |
Solution |
|---|---|
|
|
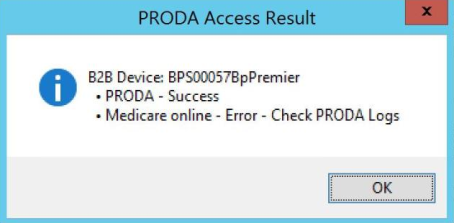
If you experience this error it means that either Medicare Web Services has not been set up at your practice, or your B2B device has expired. If you have not yet set up Medicare Web Services, follow the steps listed in Connect to Medicare Web Services to use Medicare Web Services functionality. If your B2B device has expired, you will need to re-register the device. Remove the device from Bp Premier and PRODA. Re-register your B2B device to continue using Medicare Web Services functionality.
|
|
|
When registering your B2B device, if you receive this message when you click Register or Check Access in Setup > Configuration > PRODA, it means that Medicare Online has not been linked as a service provider to your organisation in PRODA. Follow these instructions on the Services Australia website to Link Medicare Online to your organisation in PRODA. |
|
Issues with registering and setting up your organisation in PRODA. |
If you are having issues with registering and setting up your organisation in PRODA, you will need to call or email PRODA on 1800 700 199 or proda@servicesaustralia.gov.au. |
|
Error code 9007: The Location is not authorised to undertake the function on the date of transmission. The transmission has been rejected. Contact the Medicare eBusiness Service Centre for further assistance. |
Check that Medicare Online has been linked as a service provider to your organisation in PRODA. Follow these instructions on the Services Australia website to Link Medicare Online to your organisation in PRODA. If you continue to receive this error, call or email the Medicare eBusiness service centre on 1800 700 199 or ebusiness@servicesaustralia.gov.au. |
|
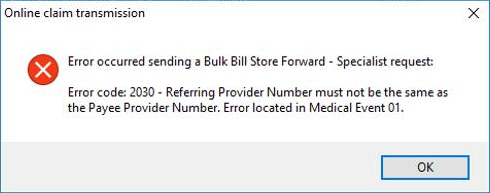
Error code 2030: Referring Provider Number must not be the same as the Payee Provider Number
|
Due to Medicare Web Services business logic, this is no longer allowed in Saffron SP3 and later. Remove payer allocation in Setup > Configuration. This is no longer required. |
|
When performing a check for payments: REPORT_NOT_FOUND |
The claim information does not match Services Australia's records. Contact Services Australia for more information |
|
When performing a check for payments: REPORT_NOT_READY |
The claim has not yet been finalised by Services Australia. Try again later. |
|
When performing a check for payments: REPORT_NOT_AVAILABLE |
The claim was processed and has been rejected. Check the processing report for more information. |
|
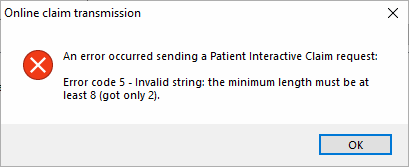
Error code 5 - Invalid string: the minimum length must be at least 8 (got only 2).
|
Ensure that the patient's home phone number is made up of eight numbers. If the patient has not provided a home phone number, leave this field blank. |
|
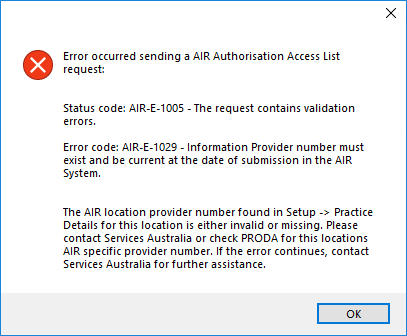
Error code: AIR-E-1029 - Information Provider number must exist and be current at the date of submission in the AIR system.
|
When attempting to use AIR functionality in Saffron SP3 and later, if a user does not have an individual provider number, and a location AIR provider number has not been supplied, this error message will appear. If staff members without provider numbers require access to AIR functionality, ensure a location provider number has been entered via Setup > Practice details > Practice locations > Edit. See Access Australian Immunisation Register information for more information. |
|
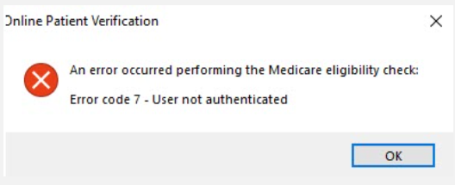
Error code 7 - User not authenticated.
|
This error could be a sign that Medicare Web Services is experiencing an outage or that the B2B device isn't functioning properly. The error may appear in a number of areas in the software that uses Medicare Web Services, including AIR, online claiming, patient claiming, Medicare verification, etc. If the error message is persistent, the B2B Device will need to be removed from Bp Premier and PRODA and then recreated. |
This section describes how to resolve batches that have remained 'unpaid' after several days.
If the practice has not registered correctly with Medicare, an entire batch may remain 'unpaid' indefinitely. Batches may also remain unpaid if an error occurred during sending that was not received by the Bp Premier user. In these cases, Medicare may request that batches be resent.
The most common reason for an unpaid batch is that a Doctor has not yet registered his or her provider number with Medicare at your practice, especially if they are new.
You will need the user permission Resend batches to perform this.
Resend a whole unpaid batch
NOTE Always check for payments to see the most recent updates before resending a batch. You should only resend a batch if advised by Medicare.
The following limits to resending a batch apply:
- You can only resend batches that have a status of 'unpaid'.
- DVA and Medicare services must be dated within the last two years.
To resend a batch:
- From the main screen of Bp Premier, select Management > Online Claiming. The Online Claiming screen will appear.
- Click Check for payments in the top left. Bp Premier will update sent batches with the latest payment information.
- Select the unpaid batch in the top half of the screen that you want to resend.
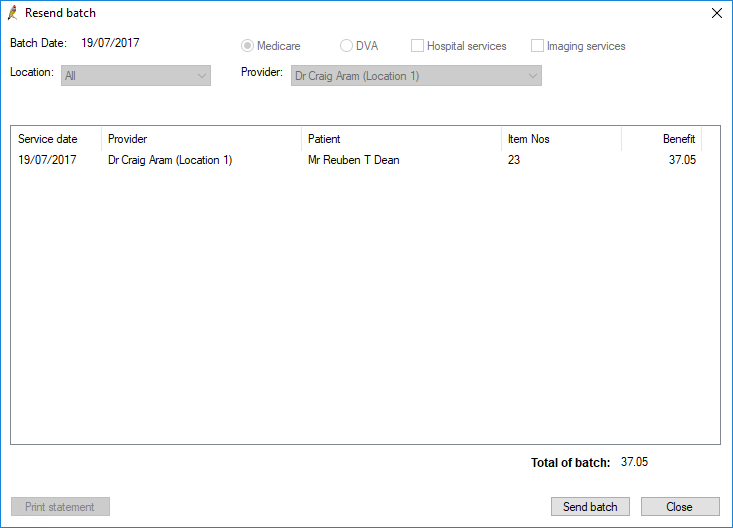
- Select File > Resend batch. The Resend batch screen will open, showing the services in the batch.
- Confirm that you have selected the correct batch and click Send batch. Bp Premier will resend the batch to Medicare and update the Online Claiming screen.
- Run Check for payments again the next day to see if the batch has been successfully processed.
Troubleshooting a whole unpaid batch
If your practice sees that a batch has remained unpaid for an unreasonable period, check your Medicare setup for the following.
|
Reason |
Explanation |
|---|---|
|
Minor ID has not been registered with Medicare |
Before being able to submit claims to Medicare, you will need to have your minor (location) ID registered to identify who the claims are coming from. If you have not registered these details with Medicare, they will not receive any claims from you. |
|
Provider numbers have not been registered with Medicare |
Before being able to submit claims to Medicare, you will need to register the provider numbers of all doctors who will be providing claims. If you have not registered these details with Medicare, they will not receive any claims from you. |
|
Practice has moved location |
If the practice has moved location, or added another practice location, you will need to contact Medicare to receive new provider numbers and site certificates. New Medicare certificates will need to be imported into Bp Premier, and new provider numbers updated, before you can claim at your new location. |
|
Certificates registered under an old practice name |
If the practice changes their name, Medicare will issue new site certificates. These will need to be imported into Best Practice before you can claim with the new practice name. |
|
Payer allocations incorrectly set |
If a doctor's payments are being paid into a different provider's bank account, ensure these details are accurately reflected in Best Practice. To set payer allocation details, from the main menu select Setup > Configuration > Payer Allocation. |
|
Transmission Errors |
Due to errors in the transmission (an Internet connection drop out, for example), Medicare may not receive the batch and will require the batch to be resent. |
|
Incorrect bank details |
If incorrect bank details have been recorded with Medicare, the batch may remain unpaid until the issue is resolved. Contact Medicare to correct the details before resending the batch. |
|
Manual direct bill batch |
If a batch has been created through the Manual Direct Bill Batches screen, the batch will not be transmitted electronically. A report is printed when a batch is created this way. The report is intended to be mailed to Medicare for payment. This will only apply if a batch has not been transmitted through online patient claiming, but manually created and mailed to Medicare. For most practices, this will be rare. |
If any Medicare batches remain unpaid in Bp Premier for an extended period (e.g., more than two business days), the practice must contact Medicare with the Batch Number and Correlation ID of the unpaid claim to determine whether the claim has been received.
Medicare can provide the practice with information regarding the batch's status, including whether it has been paid, is still processing, or has encountered an issue.
Medicare may advise the practice that the batch has been fully paid manually outside of the regular online claiming workflow and remittance advice has been sent to the practice, or further instructions may be given regarding whether the practice is required to resend the batch for payment.
Record a manual payment for fully paid batch outside of online claiming
Only after receiving remittance advice from Medicare should the following steps be performed for batches that have been fully paid manually outside of the online claiming workflow but still have an 'unpaid' status in the online claiming window.
Release the services from the batch:
- Select Management > Online Claiming or press Ctrl+F9 to open the Online Claiming screen.
- Locate the batch number for the claim still marked as 'unpaid'. Click to highlight the affected batch and then select File > Print Statement.
- Once the statement has been printed, ensure you still have the affected batch highlighted and then select File > Delete batch. A confirmation alert will be displayed. Click Yes.
- Close the Online Claiming window.
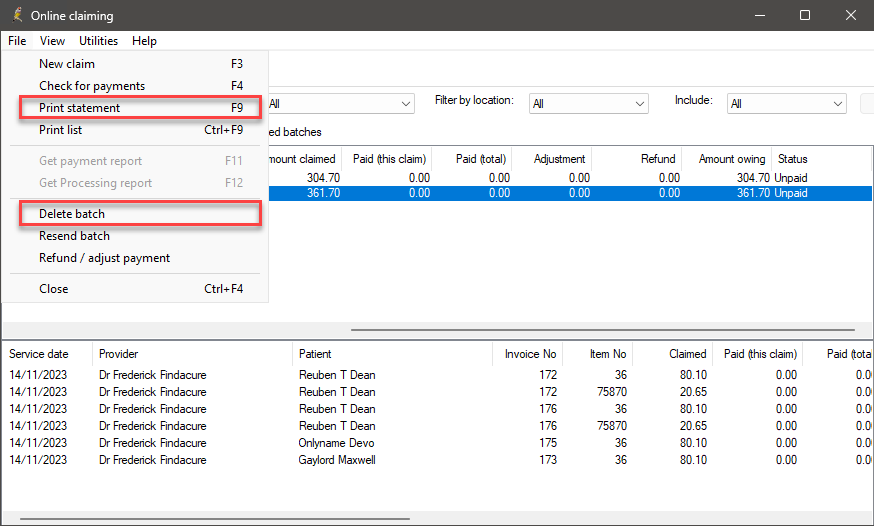
NOTE When a batch is deleted, the services included within that batch will be released and available to re-batch in the Manual Direct Bill Claiming window.
Create a manual direct bill claim batch:
- Select Management > Manual Direct Bill Batches. The Direct Bill Batches screen will open.
- Select File > New Batch to open the Direct Bill Batch screen.
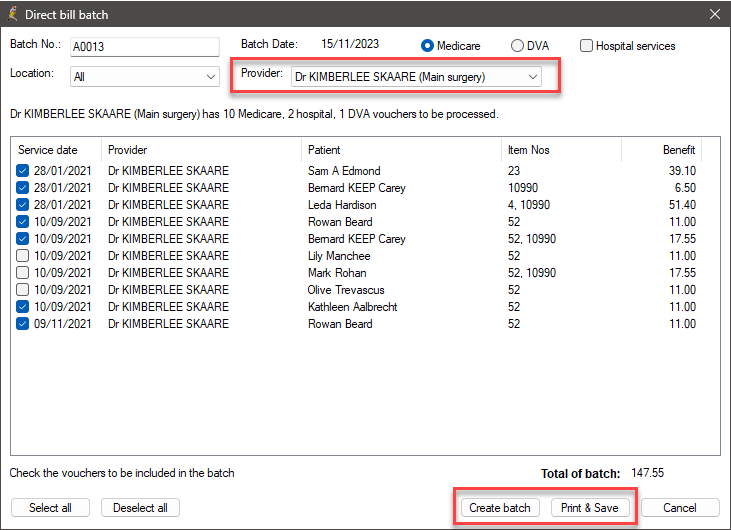
- Select the Provider and click Create batch.
- Select only the services for which Medicare has paid, as shown on the remittance advice supplied by Medicare. The printed statement can used as a guide to determine which services were originally included in the batch.
- Click Print & Save. You will return to the Direct Bill Batches screen.
- Double-click the batch you just created to open the Reconcile Direct Bill Batch screen.
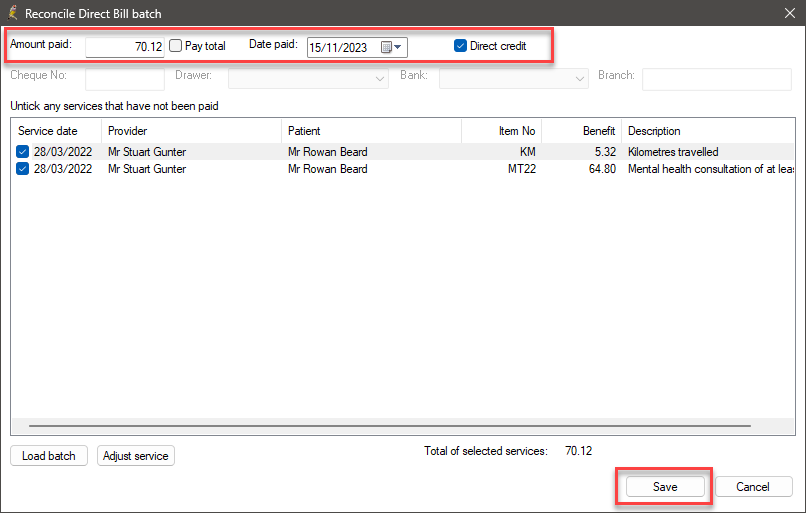
Record the Medicare payment against the batch:
- In the Amount Paid field, enter the amount paid by Medicare. You may need to accept the fee if Medicare has paid less than the amount claimed.
- Enter the date Medicare paid the claim into the Date paid field. Tick Direct credit and click Save.
- Select Management > Patient Billing History or press Shift+F6 to open the Billing History for the patient. Tick Show payments/deposits. The invoice should now be updated to 'Paid'.
Bp Premier offers a 'legacy' option to manually create batches of claims for mailing to Medicare, and reconcile processed batches. Online patient claiming removes the need to manually create and mail batches. However, in rare circumstances, such as a long term loss of internet connection, it may be necessary to manually batch and submit claims.
One example of manually creating a batch is to record a payment that Medicare has made manually, which will not be picked up by Bp Premier automatically as part of online patient claiming. See Record a payment made manually by Medicare for more information.
A report is printed when a batch is created this way. The report is intended to be mailed to Medicare for processing and payment.
NOTE Do not modify the default batch number unless directed by Bp Premier Support. If an existing batch number is reused, Bp Premier will create duplicate batches and may cause issues running a check for payments.
- Select Management > Manual direct bill batches from the main screen of Best Practice. The Direct bill batches screen will be displayed.
- Click the
 icon or select File New batch. The Direct bill batch screen will be displayed.
 - Select the Provider from the drop down list. Any Medicare, Hospital, and DVA vouchers for the selected provider that have not yet been batched will be displayed.
- Click either Medicare or DVA at the top to display the list of items to be batched of that type.
- Tick the Hospital services check box to also include Hospital services vouchers.
- Click Create batch and the list of services that have not yet been batched will be generated. The check box adjacent to each service will be ticked. The batch number automatically increments each time a new batch is created.
- Check the list. For any services you do not wish to include in the batch, untick the service. The Total of batch at the bottom of the screen will adjust.
- When you have selected all the services to be included in this batch, click Print & Save to print and save the batch.
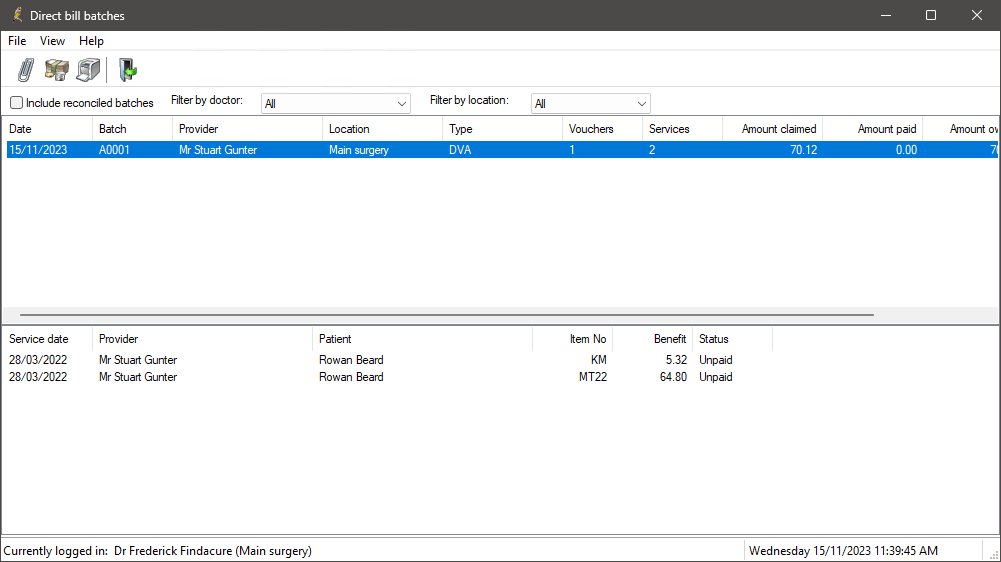
The top section shows any batches that have been entered but not reconciled. By default, the last batch entered is selected and the services that make up the batch are shown in the bottom section.
Depending on the services chosen, either the report Claim for Assigned Benefits for Services rendered to Non-hospital Patients or the report DVA Claim for Treatment Services will be printed. The new batch will be displayed in the Direct Bill batches screen.
Delete a manual batch
You can delete a manually created batch until the batch has been fully reconciled.
- From the Direct bill batch screen, select the batch you wish to delete and select File > Delete Batch.
- You will be prompted to confirm you want to delete the batch. Click Yes. The batch will be removed from the list.
After a batch has been deleted, the vouchers and services which made up the batch can be selected again to create a new batch.
Reconcile a Manual Batch
- From the Direct bill batch screen, select the batch to reconcile and click the
 icon or select File > Reconcile batch. The Reconcile Direct Bill batch screen will appear.
 - Type in the amount received in the Amount paid field.
- Set the Date paid to the appropriate date, and indicate the payment method (for example, tick Direct credit if the payment was paid directly into the practice’s bank account).
- Confirm that the Amount paid equals the Total of selected services and click Save. You will return to the Direct bill batches screen and the Amount owing will be adjusted to reflect the amount paid.

If Medicare have contacted you and specified an exception in the batch, click Adjust Service from the Reconcile Direct Bill batch screen to address the exception and resend in a new batch.
If you click Cancel from the Reconcile Direct Bill batch screen, any changes made such as written off items or adjusted services will not take effect.
Last updated: 31 March 2025.

