Read this article to learn how to set up and use Physitrack and what to do with the clients who already exist in Physitrack.
On this page
Before you start
- The video call option is NOT available for Fully Hosted clients. The RDP connection used to connect to our server does not allow the streaming of video or audio. The Video call option can be used from the Physitrack website by opening it in a browser on your local computer.
- Physitrack only allows each user to be logged in once. Logging into Physitrack via BpAllied will log the user out of any other browser login, and vice versa.
- It is recommended that all new clients be added to Physitrack via their client record in Bp Allied so that the client can be successfully matched. Clients need to have their date of birth entered otherwise the default year of 1960 is entered.
- Please follow the free Physitrack Certification Program to get up to speed with Physitrack. More support is available at Physitrack help for other questions.
Set up physitrack integration
For each Practitioner that wants to connect to Physitrack
- Go into System > Options > User Administration.
- Navigate to the relevant Practitioner.
- Click Enable Physitrack Integration.
- Click + to create a Physitrack API key.
-
Click
 to copy the API key.
 - Click Apply.
- Navigate to your browser.
- Log in to Physitrack.
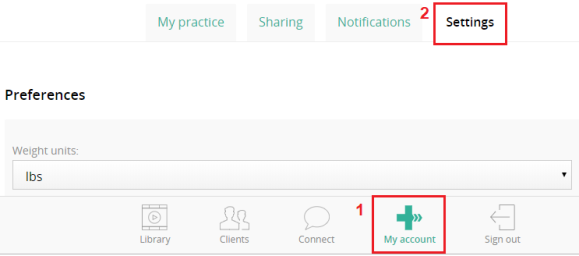
- Navigate to My account > Settings.
- Under Integration choose BpAllied from the Synchronise my client data from drop-down.
- Paste your copied API key into the API key field.
- Click Save Changes.
- Navigate back to BpAllied > Options > User Administration.
-
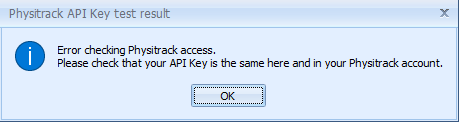
In the Physitrack API key field click
 to check your connection.
 - If you get the following message, log out of Bp Allied and back in again. Re-test your connection.
![]()
Do not use Internet Explorer for your browser. It will not display the Integration settings required.
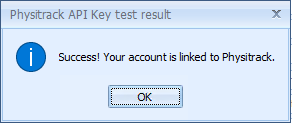
The following message displays when the connection is correctly created.
Existing Physitrack Clients
Clients that already exist in Physitrack can not be matched to a Bp Allied client. It is recommended that these clients be renamed as Inactive in Physitrack and added from Bp Allied.
Viewing Physitrack within the client record
Once your connection has been created viewing Physitrack within Bp Allied is done via a client record. The Physitrack website will display within the Physitrack tab in the Client's record. It will display the Client's information as it appears in Physitrack. Once in this view, it works as if you are using Physitrack from within the website. If the Client is not in your Physitrack database, they will be automatically added.
- Open the relevant client.
- Click on the Physitrack tab and click the Physitrack button (or Physitrack from the toolbar).
- The Client's information displays in Physitrack.
Saving to the client record
Once a program has been assigned to a Client, it can be saved to the Client Record in Bp Allied as part of the print process.
- Within the client record, click View Program.
- Click Print.
- Select options as required.
- Click Create printable PDF.
- Move the mouse to the top of the screen to display the tool bar.
- Click the Download button.
- The Save Options dialogue will display.
- By default this will save to the Documents tab in the Client Record.
- Update the File Name as required.
- Click OK.
- Close the PDF.
- Click Cancel to close the Print program screen.
- Click Display Client, to reload the client and view the newly saved document in the Documents tab.

PDF is the only output option.

Selecting Save file on your computer will allow it to be downloaded to the local computer.
Confirmation of the saved file will be displayed.
Logging in from within Bp Allied
If your account is logged in elsewhere, then the following window will display within Bp Allied.
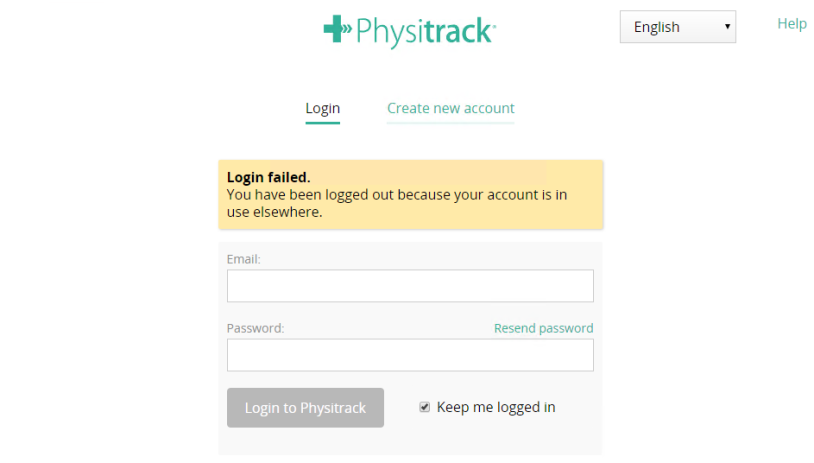
Log in as you would via the browser.
Logging out in the browser and clicking on Physitrack within Bp Allied will automatically log your account in again.


 AU
AU 