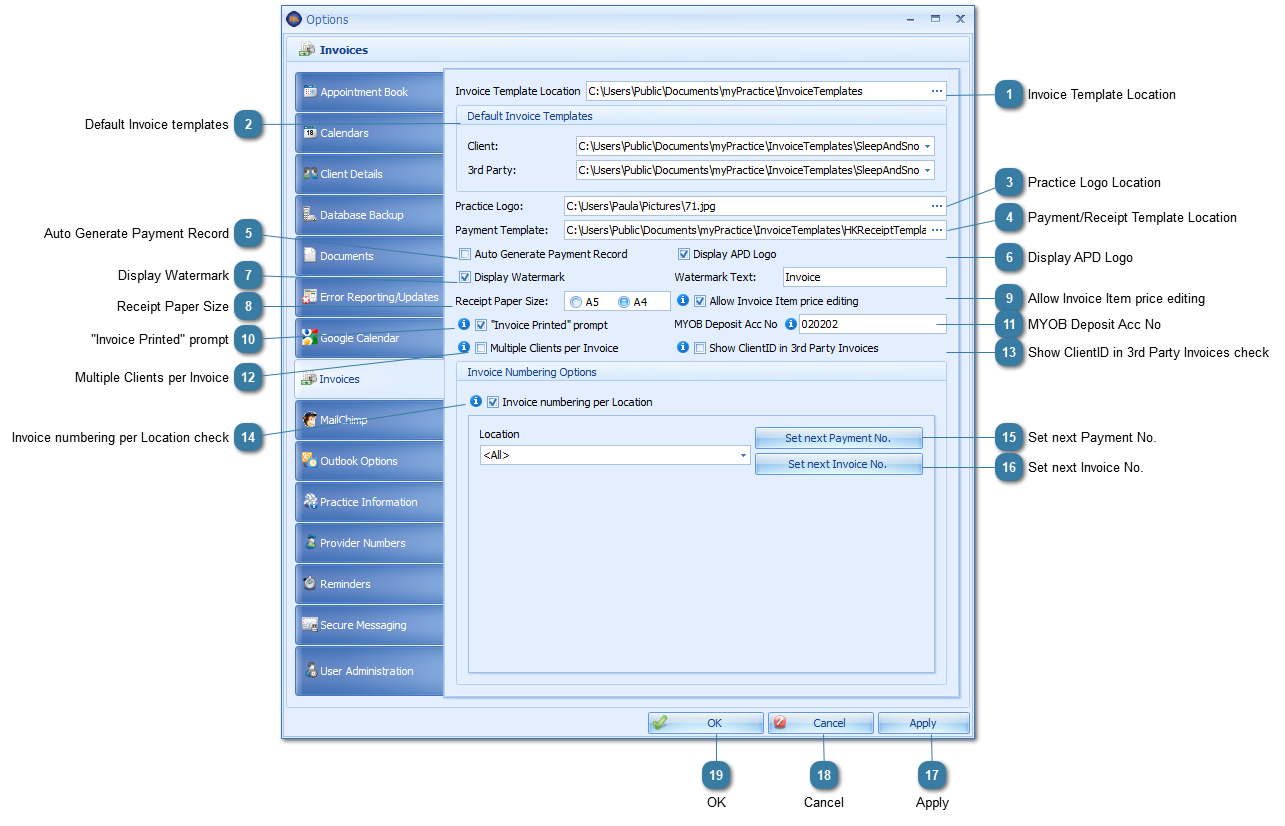
This section sets up the defaults used by the Invoices module of myPractice. Click here for details on how Invoice Templates can be customised.  Invoice Template LocationThis is the location of the Invoice Templates. By default this is a "public" folder so that the templates are available for all users of the computer. This is set for each computer.
|
 Default Invoice templatesThe default templates for both Client and 3rd Party invoices can be set here. These options are set for each user on each computer.
|
 Practice Logo LocationSpecifiying a logo graphic file in here allows the graphic file to be inserted into a default myPractice Invoice Template that includes a logo space. These files are denoted with Logo as opposed to "noLogo" in the file name.
-
The logo file format should be either a .jpg or a .png file.
|
 Payment/Receipt Template LocationThe default payment template can be specified here. It is usually located in the same folder as the invoice templates.
|
 Auto Generate Payment RecordIf this is ticked then each time an invoice is created a corresponding payment record is created. This is particularily useful in a practice where clients pay at the completion of a session. However, if clients generally pay on invoice, for example, if a third party is often invoiced, then having the Auto Generate Payment Record option unticked would be more appropriate.
|
 Display APD LogoThis displays the Accredited Practicing Dietitian logo on an invoice.
|
 Display WatermarkThis is used to display greyscale background text on an invoice. In this case, the text used in Invoice.
|
 Receipt Paper SizeThe size of the paper that the receipt (or payment) template is printed on. The default template is setup for A5 paper.
|
 Allow Invoice Item price editingThis allows the price of an item to be changed after it has been added to an invoice. It can be handy to allow this option if things like disbursements are invoiced for as these will be a different value each time they are charged for.
|
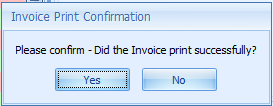
 "Invoice Printed" promptIf ticked then you are prompted to confirm whether the invoice printed correctly. If unticked then no prompt is displayed.
|
 MYOB Deposit Acc NoUsed to enable the export of payment information for import into MYOB.
|
 Multiple Clients per InvoiceIf this is ticked then more than one client can be added to a Third Party invoice.
|
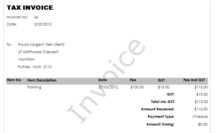
 Show ClientID in 3rd Party Invoices checkIf this is used then the Client ID field is entered into a Third party invoice rather than the clients name. This is done at the time the invoice is created so no changes need to be made to the Invoice templates. See above that the Client ID number 278279_MP is displayed in the Invoice rather than the Clients name.
|
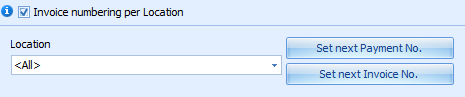
 Invoice numbering per Location checkFor practices with multiple locations Invoice and Payment numbering can be set for each location. This enables the identification of location by a specific series of invoice numbers e.g. Sydney starts at 10000, Brisbane starts at 20000 and Melbourne starts at 30000. This is an organisational wide setting and requires a myPractice Administrator password to set the numbers.
|
 Set next Payment No.Click to set the Next number in the Payment numbering series for the selected location
Enter the Administrator Name and Password
Enter the next number
Click Ok
|
 Set next Invoice No.Click to set the Next number in the Invoice numbering series for the selected location
Enter the Administrator Name and Password
Enter the next number
Click Ok
|
 ApplyClick Apply to save the changes and keep the options window open.
|
 CancelClick Cancel to disregard changes and close the options window.
|
 OKClick OK to save changes and to close the options window.
|
|