User Administration

The User Administration is where Users (Practitioners) are created for use in Bp Allied. Creating a User creates both a login name and related password as well as a Calendar for use in the appointment book. The information below covers the entry of information into the User Details tab. Click on the links to fill in information in the Permissions or Banking tabs.
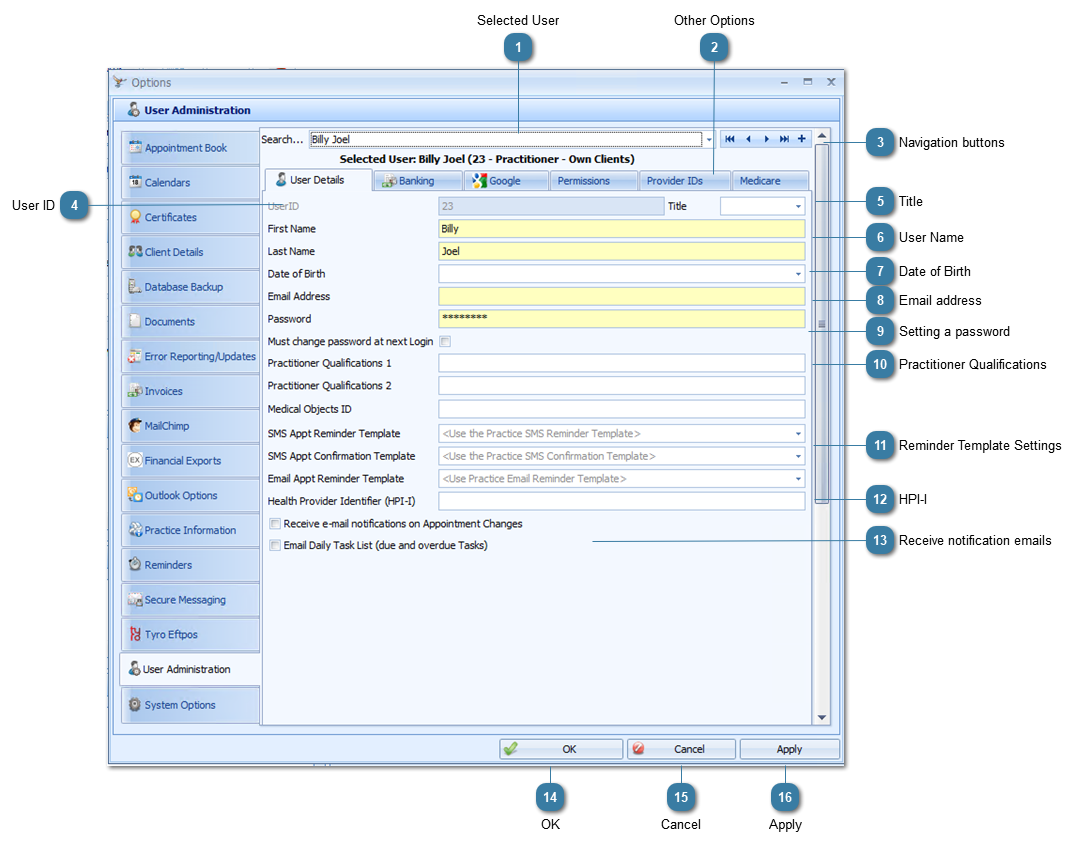

User Administration
1

Selected User

1. Selected User
Use the search or navigation buttons to find the required user.
By default, this screen will always open on the user that is currently logged in. The selected user is identified by their bolded User name at the top of the screen. Their UserID is the number in brackets followed by their Role Permissions.
2

Other Options

2. Other Options
Permissions - This is only available to Bp Allied Administrators. This tab will not be displayed for a general user.
 
Banking - The details included in this tab can be merged into Invoice Templates
 
Google calendar - Click here to add or update Google Calendar settings for a User.
 
Provider ID's - these are now managed individually based on the user because of the introductions of Medicare Online Claiming
 
Medicare - this section is used if the practitioner has a separate Medicare Online Claiming certificate and does not use the business one.
3

Navigation buttons

3. Navigation buttons
Click the + to Add a new user
This is only displayed for a Bp Allied Administrator. A general user will only be able to see their own User Information details.
 
Use the arrow keys to move forwards and backwards between users.
The double arrows move to either the first or the last record.
4

User ID

4. User ID
This unique ID is automatically assigned when a new User is created. This is used to manage any customised Client Details forms.
5

Title

5. Title
Practitioners title. Titles can be added to the in the Titles table in Data Maintenance.
6

User Name

6. User Name
The First and Last Names are the only required fields apart from setting the password. These make up the user name for the user.
7

Date of Birth

7. Date of Birth
Date of Birth for a user can be entered here.
8

Email address

8. Email address
The email address for the user. This can be used as a merge field on an Invoice or Letter template.
9

Setting a password

9. Setting a password
Set the password for the user and indicate whether they must change their password at the next login.
This can also be used by a general User to change their own password details.
10

Practitioner Qualifications

10. Practitioner Qualifications
If a User is a Practitioner then their qualifications can be entered in here. This can be used as a merge field on an Invoice or Letter template.
11

Reminder Template Settings

11. Reminder Template Settings
Email and SMS Reminder and Confirmation templates can be customised for a specific Practitioner. The relevant template can be specified here.
Reminder templates are edited from within Data Maintenance > Reminder Templates.
12

HPI-I

12. HPI-I
This functionality is not currently available.
The specific identifier for the practitioner in the Health Identifier database. This is used by My Health Record to enable the sharing and viewing of health summaries.
13

Receive notification emails

13. Receive notification emails
When an appointment gets added or changed for a Client the assigned Practitioner can receive an email notifying of the addition or change.
 
They can also receive a daily tasks list of due or overdue tasks. This option is only available if a practice has the Bp Allied Scheduler installed or is using our hosting service.
14

OK

14. OK
Click OK to save changes and to close the options window.
15

Cancel

15. Cancel
Click Cancel to disregard changes and close the options window.
16

Apply

16. Apply
Click Apply to save the changes and keep the options window open.