Setting up EFTPos integration using a Tyro Terminal
Bp Allied offers integrated EFTPOS and Credit Card transactions via a TYRO Terminal.
What is Integrated EFTPOS?
This function allows you to transmit payment amounts directly from the Bp Allied payment screen to the Tyro terminal. No re-entering of payment amounts into the EFTPOS terminal is required by front desk staff. Patients can pay using their EFTPOS, debit or credit card.
Requirements:
-
-
.NET version 2.0 is required for the Tyro Terminal Adapter software
-
-
A Tyro Terminal - please contact
Tyro to organise a terminal
-
They will supply you with a Merchant ID and a Terminal ID
-
-
Your Tyro HealthPoint terminal will operate over your practice broadband internet connection. To prepare your network for your new terminal we ask that you, or your IT person, read Tyro's information on
Connectivity.
• Tyro Terminal Adapter Software
-
This software needs to be installed and configured on each workstation that you wish to access the Tyro terminal from Bp Allied
-
Once installed it can be found in the Control Panel on your computer
-
Download and run the setup for the Tyro Terminal Adapter from: https://integrationdownloads.tyro.com/TyroTerminalAdapter/Current/Setup(TyroTerminalAdapter).exe
-
Details of the
Merchant ID and
Terminal ID as provided by Tyro.
• An available internet connection - this can be broadband or a mobile connection
Tyro contacts:
Tyro Support - 1300 966 639
Pairing the Tyro Terminal with your PC
This process has to be repeated on each PC that you want to link to the Tyro terminal.
NOTE: Liaise with your IT technician or with a Tyro representative for advice before installing this software. Any issues or queries with regard to the install of this software need to be directed to
Tryo as this software belongs to Tyro and not to Bp Allied but we include this here as a guide.
1. Plug your Tyro HealthPoint terminal into a power source using the power adapter, and into your practice network via the blue Ethernet cable. These items are packaged with your terminal. Please refer to the
Tyro Quick Set Up Guide if necessary. Please note: there are no physical cable connections required between your Bp Allied workstation(s) and the Tyro HealthPoint terminal.
2 If this is the first time you are setting up Tyro, call Tyro Support on 1300 966 639 to activate the terminal. They can also help you through this install and configuration if need be.
On your PC:
3: Log on with as a user who had Windows Administrator rights (otherwise the software will not install)
4: Install the Tyro terminal adapter software that was downloaded above.
On the Tyro terminal:
5: Select Menu > Settings > Terminal Info . A terminal receipt will be printed, showing the Merchant ID and Terminal ID information .
On the PC:
6: In File Explorer go to the folder C:\Program Files\Tyro\TyroTerminal Adapter (32bit machines) or C:\Program Files (x86)\Tyro\TyroTerminal Adapter (64bit machines)
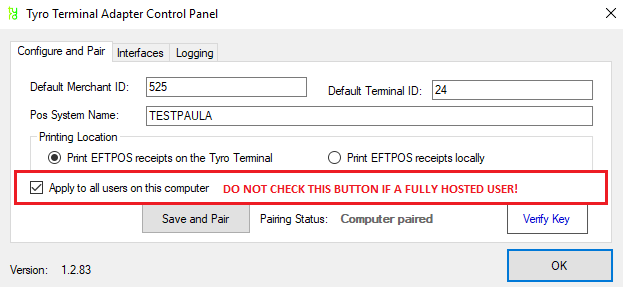
7: Double click on the file Configuration.exe to load the Tyro Terminal Adapter configuration software
8: The Pos System Name will be filled in automatically with the name of the PC you are currently using
9. Enter the Merchant ID and Terminal ID information identified above

Do not click the “Apply to all users on this computer” option if you are using Bp Allied Live Fully Hosted option as it will un-pair all other terminals using Bp Allied on this server.
On the Tyro terminal:
10: Select Menu > Settings > Integrated EFTPOS > Authorise POS
11: Enter the Password provided by Tyro and press OK
On the PC:
12: Click Save and Pair
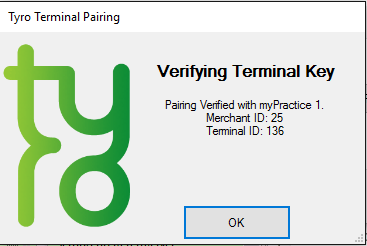
13: If the pairing is successful it will return to the pairing screen then
a: Click on the ‘ Verify Key ’ button – this should show the Merchant ID and Terminal ID details.
OR
14: If the pairing was unsuccessful or timed out
a: Repeat the process from number 12 above again to finalise the pairing.
b: If this is still no sucessful, please contact Tyro Support - 1300 966 639
If Bp Allied is open, it will need to be
configured and restarted before the integration will work. Bp Allied
can manage mulitple merchant ID's. A separate Merchant ID can be set up in Bp Allied for any individual practitioner. The merchant ID must be obtained from Tyro. This is set up in Options > User Administration > Banking.
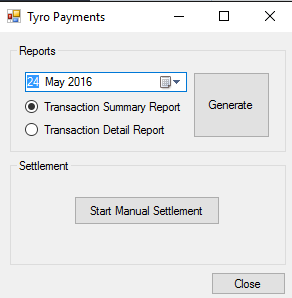
Tyro Reports
Some reporting is available from the EFTPOS teminal. There is also an interface on your computer to deliver these reports.
It can be found in Start > Programs / All Apps > Tyro