
Bp Premier allows third-party integrations with the Bp Premier database. Integration examples include appointment booking software, video conferencing and referral creation. See the Bp Partner Network for approved Bp Premier integrators and the services they provide.
IMPORTANT The Standalone Integration Management Window is included in Bp Premier version Spectra Sp1 R3 or later. Users on versions Orchid up to Spectra SP1 Revision 2 of Bp Premier will need to download the standalone utility. This standalone utility will not function on versions earlier than Orchid.
To allow a third-party to integrate with your database, you must:
- Have a license key entered into Bp Premier.
- Follow the setup information provided by the integrator.
- Approve a third-party integration in Bp Premier configuration.
In this article:
Enhancements to Setup Third Party Integrations
All Third Party Integrations and Partners will be making changes to the way they connect to your Bp Premier database, using Halo Connect, by 31st December, 2025. In Spectra SP1 R3, we’ve made important improvements to how third-party integrations are managed in Bp Premier. These enhancements are designed to strengthen data security, improve transparency, and make it easier for your practice to control access to your data.
Currently, most partners will have two entries in the Setup third-party integrations window from within Bp Premier.
-
One integration for the legacy method,
-
One for the Halo integration, labelled ('via Halo Connect').

While the integrations not integrated via Halo Connect are still configured, it's important to contact your integrated partners to transition to the new Halo Connect pathway as soon as possible to ensure uninterrupted operation.
NOTE During your transition to the Halo Connect pathway, enable both the legacy and halo integration to minimise any disruptions. The legacy integration will be removed automatically once the integrated partner has fully transitioned to Halo.

Standalone Integration Management Window
The Setup Third Party Integrations window has been transitioned to a standalone utility. This change allows practices to manage third-party integrations more efficiently and with greater visibility.
Introduction of Secure Pairing Codes for Bp Partners
To support secure data access, most third-party integrations will now require a Pairing Code to be enabled. When a Bp Partner requires a pairing code, a prompt will appear, allowing a secure code to be generated. Pairing codes are:
- Automatically generated in a secure format
- Unique to your practice
- Visible and manageable through the Setup Third-Party Integrations screen.
Existing integrations that do not require pairing codes will continue to function without interruption.
Improved Integration Controls
The Setup third party integrations screen now includes enhanced prompts and safeguards when enabling or disabling partners:
- Confirmation prompts are displayed before applying changes
- Disabling a partner immediately revokes access and updates system permissions
- Existing pairing codes can be manually closed or regenerated when required.
These updates provide practices with improved visibility and tighter control over third-party data access.
Setup a new third party integration in Spectra SP1 Revision 3 or later
- In Spectra SP1 R3 or later, the Setup Third Party Integrations utility can be accessed using one of the following methods:
- From the main screen of Bp Premier, go to Setup > Configuration, then select Database from the left-hand menu. Click Setup third party integrations.
- Navigate to C:\Program Files\Best Practice Software\BPS\BPSupport, then double-click BP.ThirdPartyIntegrations.exe to launch the utility.
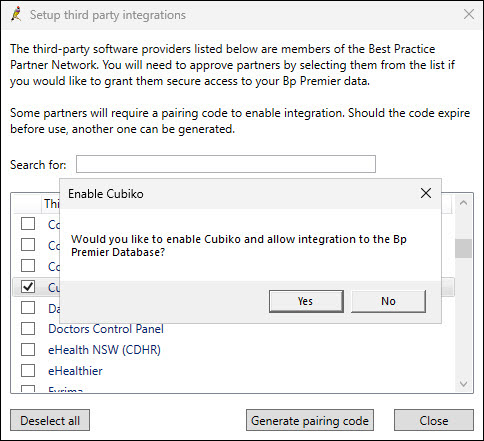
- Use the Search for text box to find the third-party provider.
- Check the box next to the third-party provider.
- Bp Premier will prompt you to confirm that you want to allow the integration to the Bp Premier database; click Yes.
- Click Save. If the third-party provider does not require a pairing code, the Setup Third Party Integration screen will close.
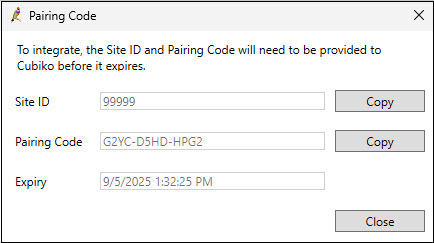
- The practice Site ID, Pairing Code, and Expiry Date will be generated automatically. Click Copy next to the Site ID and Pairing Code fields to copy the values to your clipboard. Provide this information to the third-party provider as instructed.
- Click Close, then Save, to exit the Setup third-party integration screen.
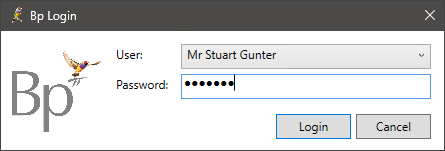
When launching the Setup Third-Party Integration Utility from the file path, users will be prompted to enter their login details.
Only users with Permissions to access the Configuration will be able to proceed. See User Permissions for more information.
The steps required to complete the integration process are identical regardless of how the utility is accessed.
If the third-party provider requires a pairing code, the Pairing Code screen will appear.
NOTE The Pairing Code screen takes approximately 3-5 seconds to load. This is a known issue and will be addressed in a future update.
TIP The Pairing Code is valid for 7 days from the time it is generated. If thePairing Code expires before the third-party provider completes the connection, a new code may need to be generated.
Generate a new pairing code
- From the main screen of Bp Premier, select Setup > Configuration. The Configuration window appears.
- Click Database from the left hand menu and then the Setup third party integrations button. The Setup third party integrations window appears.
- Use the Search for text box to find the third-party provider.
- Click to highlight the third-party provider, then select Generate Pairing Code.
- Bp Premier will prompt you to confirm that you want to allow the integration to the Bp Premier database; click Yes.
- A new Pairing Code is automatically generated when the Pairing Code screen is opened.
- Click Copy next to the Site ID and Pairing Code fields to copy the values to your clipboard. Provide this information to the third-party provider as instructed.
- Click Close, then Save, to exit the Setup third-party integration screen.
TIP The Pairing Code is valid for 7 days from the time it is created.
Disable a third party integration in Spectra SP1 Revision 3 or later
When disabling a third-party integration, the provider's access is immediately revoked, and the permissions are updated accordingly.
- From the main screen of Bp Premier, select Setup > Configuration. The Configuration window appears.
- Click Database from the left hand menu and then the Setup third party integrations button. The Setup third party integrations window appears.
- Use the Search for text box to find the third-party provider.
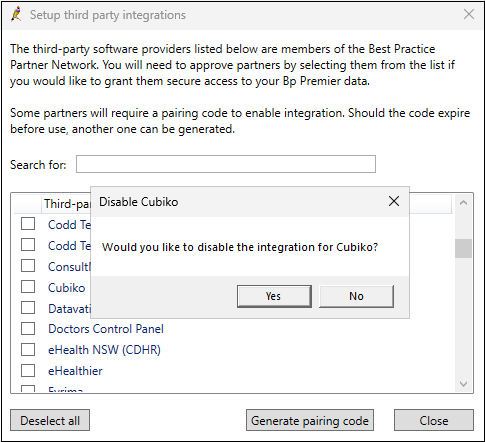
- Uncheck the box next to the third-party provider.
- Bp Premier will ask you to confirm that you want to disable the integration; click Yes.
- Click Save to exit the Setup third-party integration screen.
Setup third-party integrations in Spectra SP1 Revision 2 and below
IMPORTANT The Standalone Integration Management Window is included in Bp Premier version Spectra Sp1 R3 or later. Users on versions Orchid up to Spectra SP1 Revision 2 of Bp Premier will need to download the standalone utility. This standalone utility will not function on versions earlier than Orchid.
- Navigate to C:\Program Files\Best Practice Software\BPS\, then double-click BP.ThirdPartyIntegrations.exe to launch the utility.
- Use the Search for text box to find the third-party provider.
- Check the box next to the third-party provider.
- Bp Premier will prompt you to confirm that you want to allow the integration to the Bp Premier database; click Yes.
- Click Save. If the third-party provider does not require a pairing code, the Setup Third Party Integration screen will close.
- The practice Site ID, Pairing Code, and Expiry Date will be generated automatically. Click Copy next to the Site ID and Pairing Code fields to copy the values to your clipboard. Provide this information to the third-party provider as instructed.
- Click Close, then Save, to exit the Setup third-party integration screen.
When launching the Setup Third-Party Integration Utility from the file path, users will be prompted to enter their login details.
Only users with Permissions to access the Configuration will be able to proceed. See User Permissions for more information.
If the third-party provider requires a pairing code, the Pairing Code screen will appear.
NOTE The Pairing Code screen takes approximately 3-5 seconds to load. This is a known issue and will be addressed in a future update.
TIP The Pairing Code is valid for 7 days from the time it is generated. If thePairing Code expires before the third-party provider completes the connection, a new code may need to be generated.
Generate a new pairing code
- From the main screen of Bp Premier, select Setup > Configuration. The Configuration window appears.
- Click Database from the left hand menu and then the Setup third party integrations button. The Setup third party integrations window appears.
- Use the Search for text box to find the third-party provider.
- Click to highlight the third-party provider, then select Generate Pairing Code.
- Bp Premier will prompt you to confirm that you want to allow the integration to the Bp Premier database; click Yes.
- A new Pairing Code is automatically generated when the Pairing Code screen is opened.
- Click Copy next to the Site ID and Pairing Code fields to copy the values to your clipboard. Provide this information to the third-party provider as instructed.
- Click Close, then Save, to exit the Setup third-party integration screen.
TIP The Pairing Code is valid for 7 days from the time it is created.
Disable a third party integration in Spectra SP1 Revision 2 or earlier
When disabling a third-party integration, the provider's access is immediately revoked, and the permissions are updated accordingly.
- Navigate to C:\Program Files\Best Practice Software\BPS\BPSupport, then double-click BP.ThirdPartyIntegrations.exe to launch the utility.
- Use the Search for text box to find the third-party provider.
- Uncheck the box next to the third-party provider.
- Bp Premier will ask you to confirm that you want to disable the integration; click Yes.
- Click Close to exit the Setup third-party integration screen.
Last updated: 18 December 2025.


 AU
AU 