Bp VIP.Net Support Guidance
Update your NASH Certificate for eRx Script Exchange
Affects: All users of Bp VIP.net and eRx Script Exchange.
In this article:
Issue Description
eRx Script Exchange has advised they will be enabling certificate validation on 06 August 2024 and any Practices using an expired NASH certificate will be unable to electronically transmit prescriptions to eRx Script Exchange. Practices must ensure an up-to-date NASH certificate has been configured for eRx Script Exchange.
The NASH certificate is used for the following services:
- My Health Record
- Health Identifier (HI) Service
- eRx Script Exchange
Resolution Prerequisites
To continue sending electronic scripts via eRx Script Exchange after 06 August 2024, eRx Script Exchange must be configured to use the latest NASH certificate.
Before you Begin
- The NASH certificate should be downloaded from HPOS prior to completing these steps and saved to a location on the database server.
- The NASH certificate passphrase will be required.
- Only one NASH certificate / thumbprint should be used with eRx Script Exchange, regardless of user locations.
- If your database has multiple locations, and you have been issued location specific NASH certificate, please choose one certificate to be used for eRx Script Exchange.
- The new NASH certificate should not be installed into the eRx Setup utility (against any of the users) until Step Two and Step Three are completed.
Resolution
- Download the file eRxConfigurationPatch_1.exe to a known location. Your browser may alert that the file type presents a security risk. You can safely download this file.
- Move the exe file to the folder C:\Program Files (x86)\eRx on the Bp Premier server. .
- Double-click the exe file to start the application and extract to the following location
- Click Yes to All when prompted.


Continue with the manual NASH certificate update steps below.
- Search for MMC in the Windows Start menu and click Open.
- Click File, then Add/Remove Snap-in.
- Click Certificates > Add > Computer account > Next > Finish and then click OK.
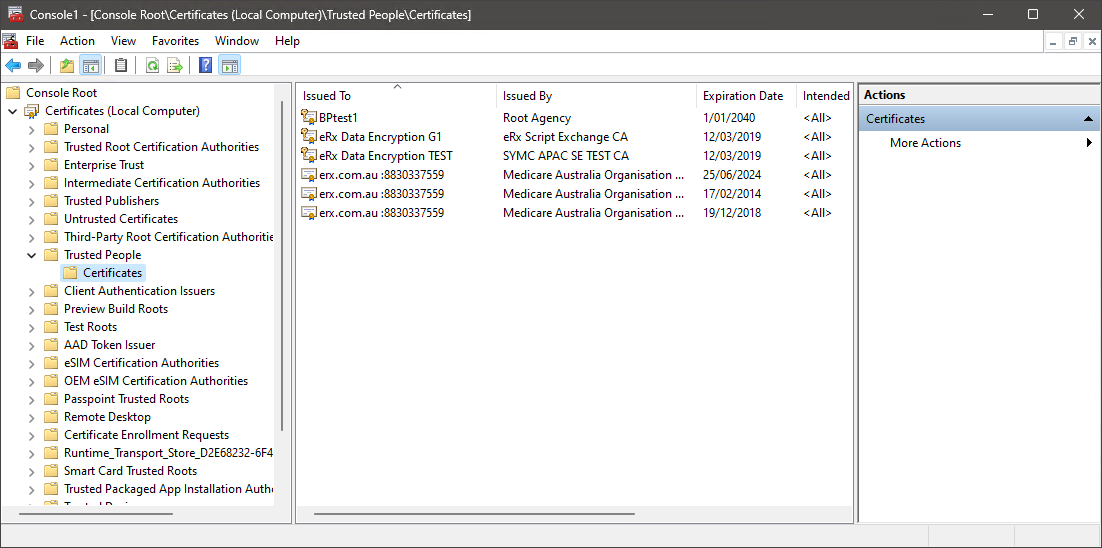
- Expand Certificates (Local Computer) > Trusted People > Certificates.
- To install the new NASH certificate, right-click the Certificates folder under Trusted People.
- Click All Tasks and Import.
- The Certificate Import Wizard will open, click Next.
- Click Browse... and navigate to the location of your NASH certificate > select the NASH certificate and click Open.
- Click Next.
- Enter the NASH certificate passphrase into the Password field.
- Tick Mark this key as exportable…
- Click Next > Next > Finish.
- Complete steps 6 – 13 to install the old NASH certificate if it isn’t already present.
NOTE You may need to change the file type drop down to complete this step.
IMPORTANT Step Two cannot be completed unless the old NASH certificate (the cert currently used for eRx) and new NASH certificates are installed under Local Computer (Trusted People)
For further instructions on installing NASH certificates see the Bp VIP.net Knowledge Base article Install a NASH certificate.
- Open the File Explorer and navigate to C:\Program Files (x86)\eRx.
- Right click on eRx configuration and click Run as administrator.
- At Step 3. Select Certificate to use for eRx ensure the new NASH certificate is highlighted and that the old NASH certificate is also listed.
- Tick Update certificate on eRx gateway and click Next.
- A new window should appear with progress bar.
- If an error occurs, please contact Bp Support for further troubleshooting. We may need to request eRx manually update the thumbprint on their end.
- If upload is successful, continue with Step Four.
NOTE The file size for this executable should be 72KB. If the file size is smaller, please contact Bp Support.
On your local desktop, locate:
- eRx Standard Adapter installer file (eRx.StandardAdapter.Installer_ReleaseProd.msi)
- eRx Adapter Certificate Updater executable file (eRxAdapterCertUpdater.exe)
- Right-click and run the Adapter Service Installer as an Administrative user. The eRx Adapter Setup Wizard will open.
- Click Next to begin the Wizard Installation.
- Click Yes to allow this app to make changes to your device.
- The eRx Configuration window will open. Select the Prescriber radio button in Step 1.
- Click the Select certificates from the Windows Certificate Store radio button in Step 2.
- Select Install a new certificate. The Certificate Import screen will open.
- Click Browse and locate the NASH PKI fac_sign.p12 certificate file.
- Enter the certificate password and click Import.
- Click Next when all configuration settings have been completed.
- The Adapter Service Test window will open and run through adapter tests. Wait for a success message for:
- Save adapter configuration.
- Start adapter service.
- Test adapter service ping.


IMPORTANT Under Step 3. Select Certificate to use for eRx, the eRx Data Encryption G1 certificate will be highlighted by default. This indicates that the encryption certificate has been installed correctly. If the certificate is not there, an issue with the installation has occurred.


NOTE To locate the certificate, you may need to change the Files of type to All files.
eRx Script Exchange is now configured to use the most recent NASH certificate.
If the manual resolution was not successful, follow the instructions in the next section Troubleshooting certificate update failure.
Troubleshooting certificate update failure
If NASH certificate update fails after following the above steps, you will need to gather some information from your Bp VIP.net server to forward by email to Best Practice Software Support for review and resolution directly with eRx.
Submitting this information by email removes the need for Bp Support to gather this information from your practice and reduces resolution time.
To take screenshots, search for 'snipping tool' in desktop search to open the Windows Snipping Tool.
1. eRx adapter log
In a Windows file explorer on the Bp VIP.net server, browse to C:\eRx and copy the file erxadaper.log to a temporary location ready for insertion into an email.
2. NASH thumbprint and subject
- Log into the Bp VIP.net Server as a Windows Administrator.
- Search for MMC in the Windows Start menu and click Open.The Management Console will appear.
- From the left hand panel, browser to Trusted People > Certificates. Use Bp VIP.Net Support Guidance as a guide.
- Double-click the NASH certificate that you installed in previous steps. The NASH certificate will show general.HPIOno.id.electronichealth.net.au in the Issued By column.
- Select the Details tab.
- Highlight the Subject row and expand the screen to show the Value column. Take a screenshot of the Subject Value.
- Highlight the Thumbprint row and take a screenshot of the full Value column.
- Save the screenshots to the temporary folder.
- Exit Management Console.


Email all screenshots to Best Practice Software Support.
Best Practice Software will forward the details on to eRx, who will update user setup details at the eRx end. Once this is complete, the practice will need to import the new NASH certificate for each user in Erx Setup utility. See the Bp VIP.net Knowledge Base article Add a New Provider to eRx (AU) for further instructions.
Last updated 24 June 2024
   |
|
|
|
|
|
This material is classified as commercial-in-confidence. Unauthorised distribution of this information may constitute a breach of our Code of Conduct, and may infringe our intellectual property rights. This information is collected and managed in accordance with our Privacy Policy, available on our website. © Copyright 2026 |
|
 AU
AU 