These instructions describe how to set up Bp VIP.net for Eclair pathology e-ordering, and request Eclair e-orders from the medical desktop for New Zealand users.
Before you begin
Before you can set up Bp VIP.net for Eclair:
- Contact the pathology providers your practice will use to obtain the correct URL address that the lab uses for Eclair e-ordering.
- Supply the pathology provider with details of all the providers who will be creating e-orders. The pathology lab will register the providers and generate a unique code for each provider.
Set up Bp VIP.net for Eclair
Set up providers and users
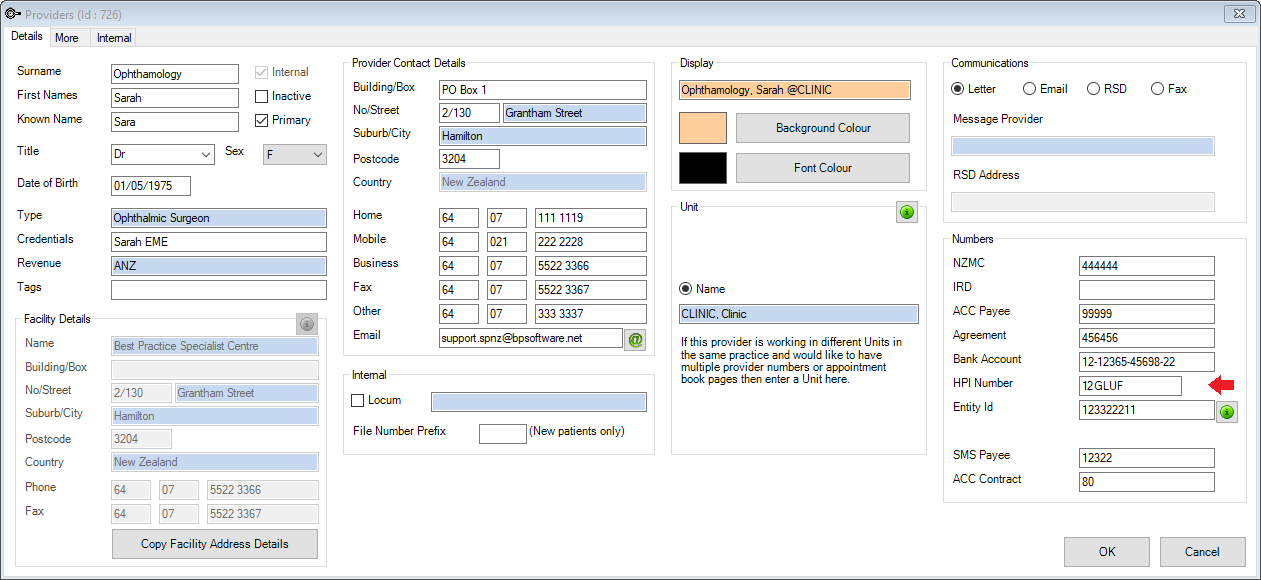
- From the main Bp VIP.net window, select Setup > Providers > This Clinic.
- Select the provider you want to add to Eclair ordering and click Modify.
- On the Details tab, in the Numbers section, confirm that the HPI Number for the provider is recorded.
- Click OK to exit the provider details, and select Setup > Security > Maintain Users.
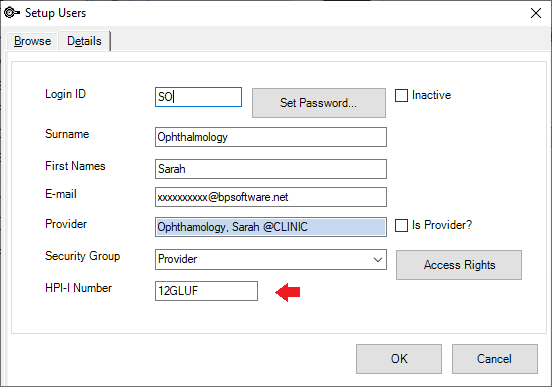
- Select the provider's user record and click Modify.
- Enter their HPI-I Number and click OK.
Set up the main facility
Your Facility HPI number also needs to be registered with the pathology provider.
- From Bp VIP.net, press F2 and search for the main internal Facility record. Load the facility into the snapshot.
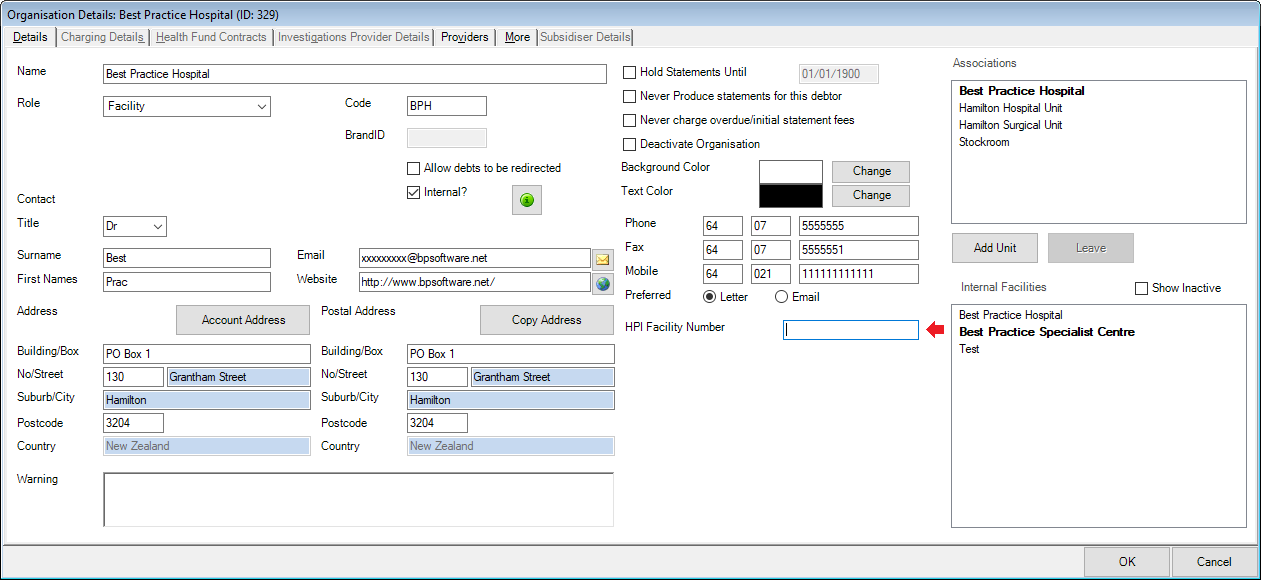
- Click F3 to display the Organisation Details window.
- Enter the HPI Facility number and click OK.
Create the Eclair pathology organisation
There must be a Pathology Organisation set up for Eclair.
- Press F2 and tick New Organisation.
- Click Search. From the Search Results window, click New to open a blank Organisation Details window.
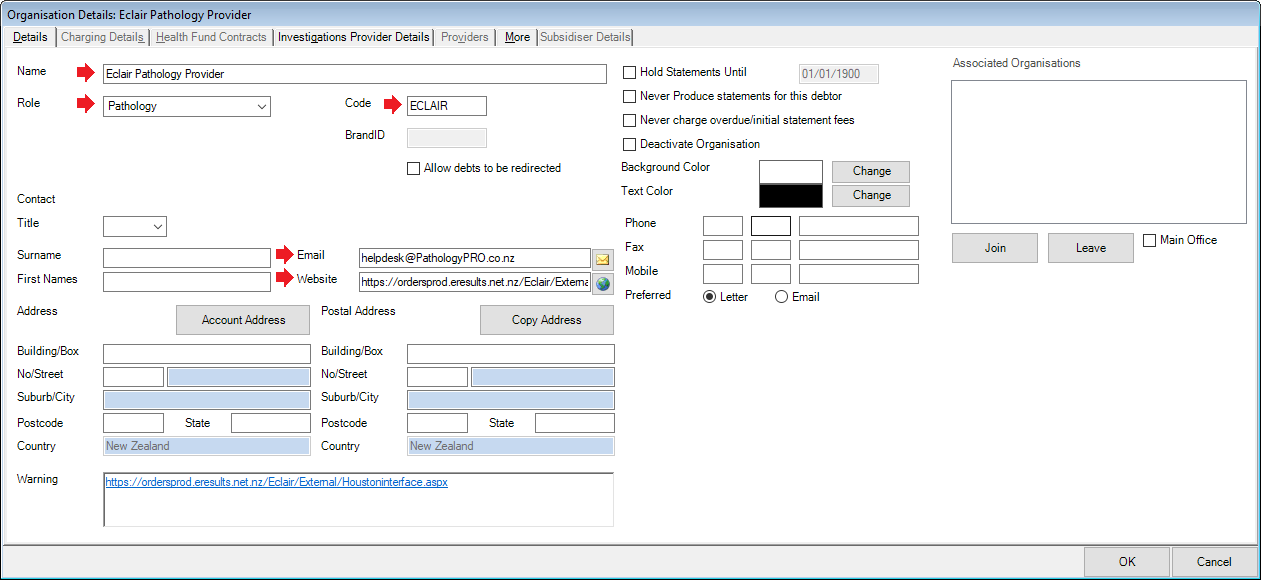
- The Name must start with the text 'Eclair'.
- Select a Role of 'Pathology' and enter a Code of 'ECLAIR'.
- Enter the lab's Email address.
- In the Website field, enter the URL address used for Eclair eOrdering by the laboratory.
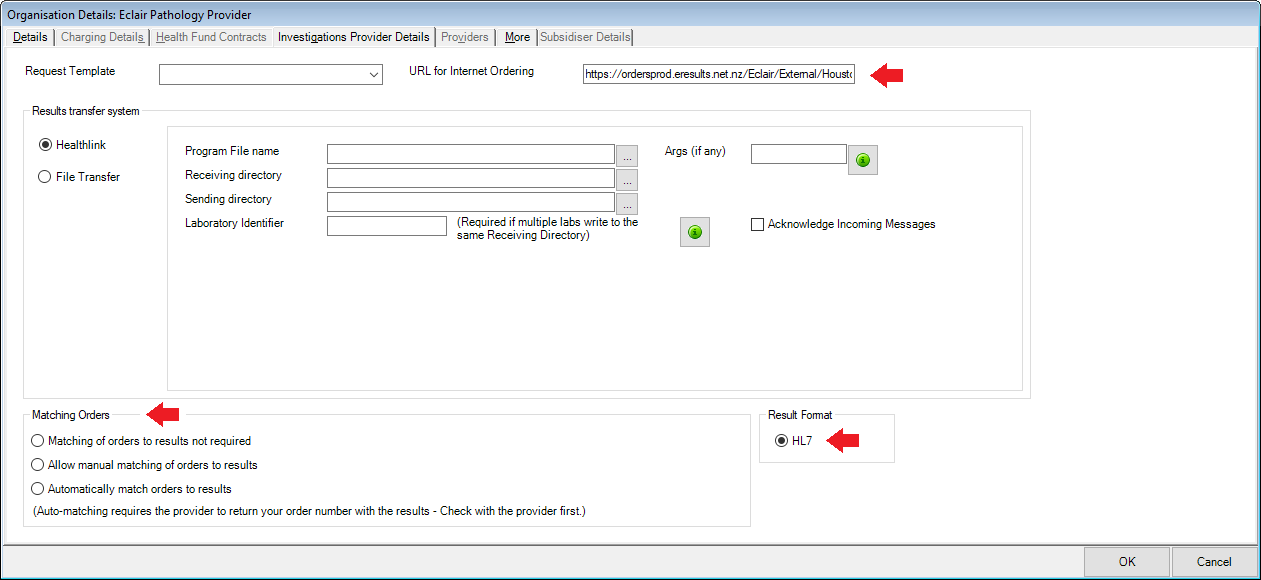
- Select the Investigations Provider Details tab. Enter the pathology provider's URL for Eclair eOrdering into the URL for Internet Ordering field.
- Select a Results transfer system of HealthLink and tick a Result Format of HL7.
- Select the appropriate Matching Orders option for your practice. The pathology provider can assist with the correct selection.
- Click OK. Configuration of Bp VIP.net for Eclair is complete.
Create a Pathology eOrder
- Search for the patient and open the Medical Desktop (F11 ) screen.
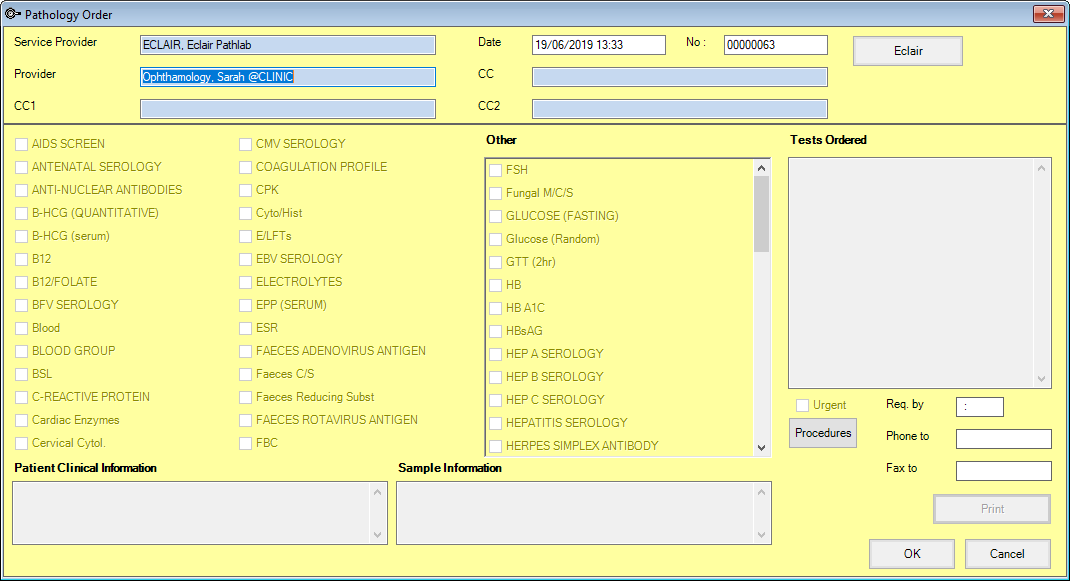
- Click Order Pathology. The Pathology Order window will open.
- Select the Eclair pathology lab you created in the Service Provider field.
- The Provider field should default to the logged-in user.
- Select any CC Providers if necessary.
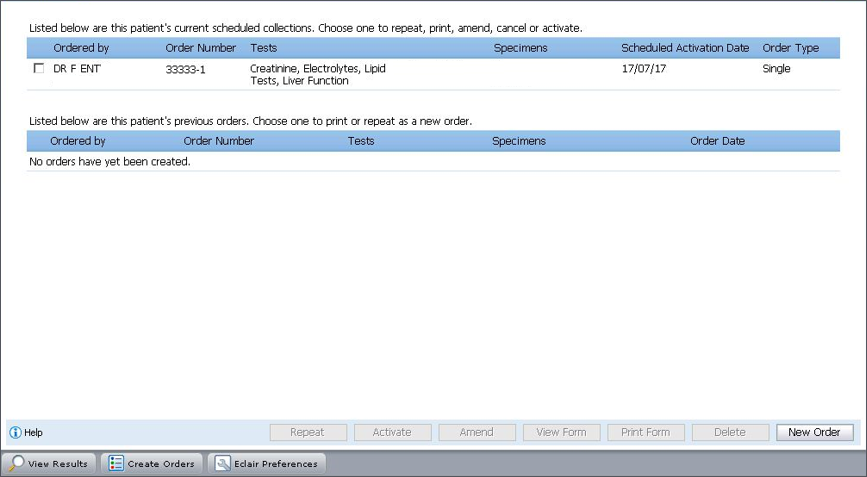
- Click the Eclair button. The Eclair screen will display any previous orders.
- Click New Order on the bottom right. The Order Details window will open.
- Complete the blue mandatory fields first, then complete the other clinical fields on the left side of the screen.
- On the right side, select the tests you want to order.
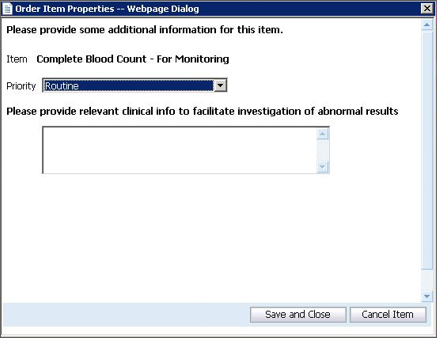
- Selecting some tests may prompt for additional information.
- Complete the extra details and click Save and Close to return to the order form.
- When the order form has been completed, click Next.
- Review the order and click Place Order.
TIP Investigation Orders can also be created by selecting the Medical > Investigation Orders from the main screen and clicking New.
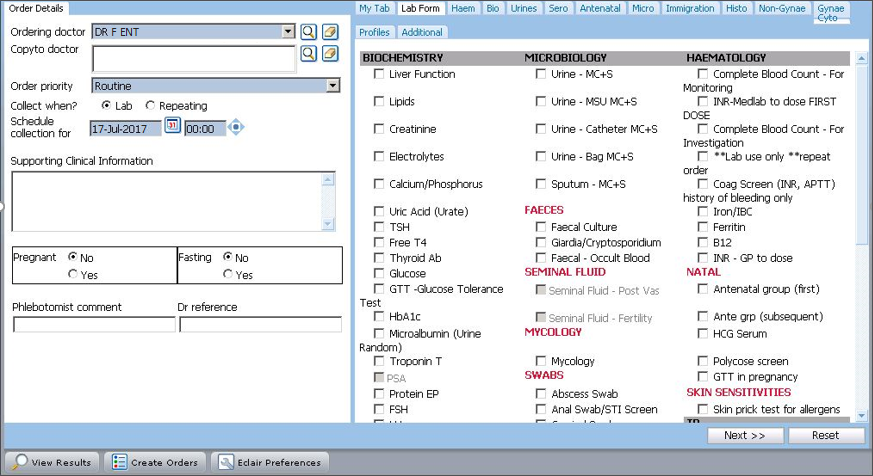
IMPORTANT Tick the box next to the required test. A blue arrow button next to a text indicates that there are previous results in the system for this test. Click on the blue arrow to display the five most recent results for that test.
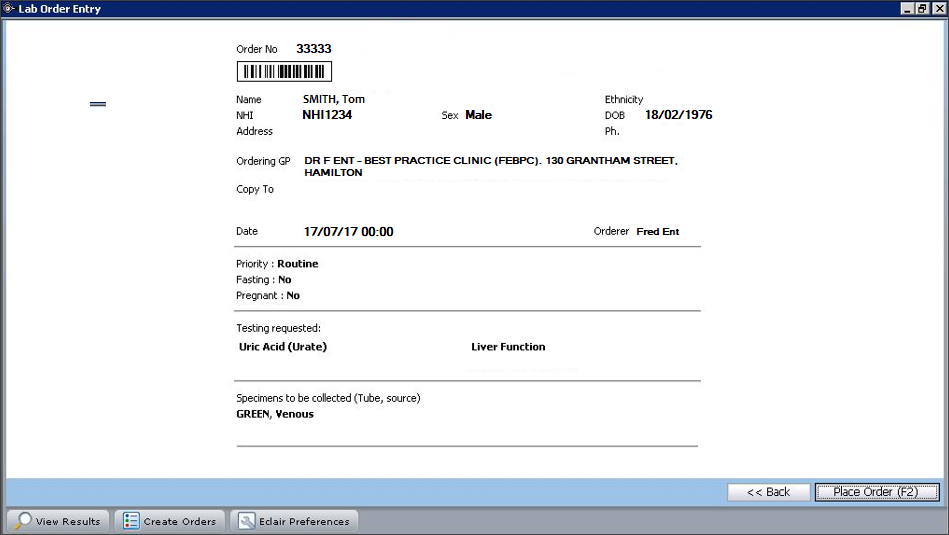
A record of the request will show in the patient's Actions list in Medical Desktop, and is also available by selecting Medical > Investigation Order.
Print the Form
Printing out the pathology request form from Bp VIP.net does not automatically submit the order to Eclair and include the request on the front page of the order history. You must click Place Order to send the e-order through to the pathology lab. However, the patient must still present at the pathology provider with a printed copy of the form. The technician will scan the form to ensure the correct patient is matched with the correct order.
From the Eclair screen that shows existing and historical orders, select the order to print and click Print Form from the row of buttons along the bottom.
How do I get my results?
The results will import into Bp VIP.net through HealthLink.
Create a repeating order
- From medical desktop, click Order Pathology and complete the Provider fields. Click the Eclair button.
- Fill out the left side of the Eclair form as for a regular order.
- Select the Repeating option for Collect When?.
- Select the tests to order and click Next. A new form will open.
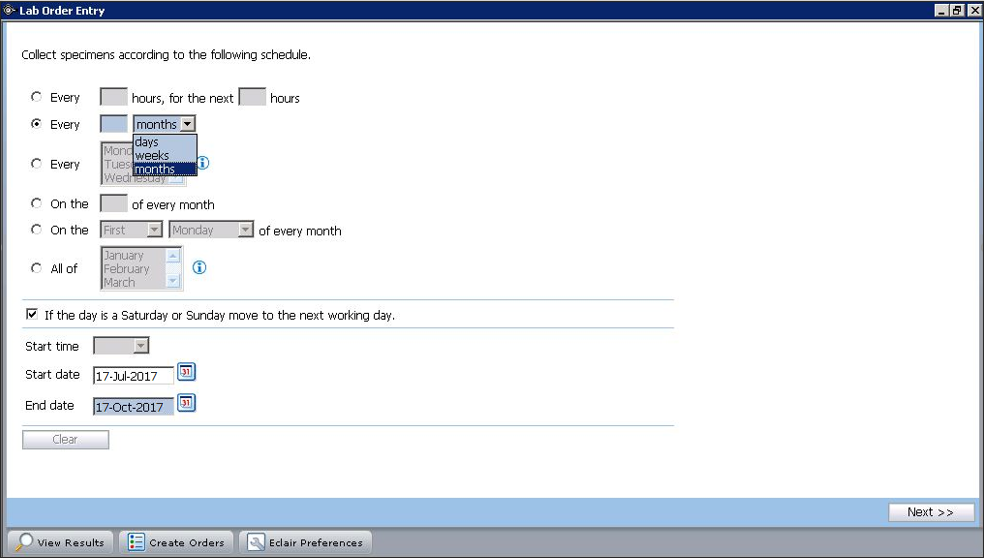
- Set the schedule for the repeating order and click Next to proceed to the review window.
- Review your order details and click Place Order.
Modify an Order
If you are amending an Eclair order, only add or subtract tests for the same type of test, e.g. blood tests. If you are adding a different type of test, such as urine test, this test will not be seen in the resubmitted order. Best Practice Software advise to create a separate order for new tests of a different type.
New tests are added onto the existing order number and bar code. New test types will not be picked up when the patient has their printed form scanned at the pathology provider.
If you have amended a form, when you click Place Order a copy will not be reprinted. Manually click the Print Form button from the main order screen in Eclair to print a new copy.
- Select Medical > Investigation Orders, select the order to change, and click Modify.
- Click the Eclair button.
- Select the order that requires amending and click Amend.
- Once completed, continue and click Place Order when completed.
IMPORTANT If an order is displayed in the bottom part of the main order screen, the test has already been collected or received by the lab and cannot be amended in Eclair Orders. Contact the lab directly to discuss the amendments to the test.
Delete an order
- Click Medical > Investigation Orders, select the order, and click Modify.
- Click the Eclair button.
- Select the order that requires deletion and click Delete.
- Complete the reason for deletion.
Last modified: July 2020