Synergy is a software application that acts as a proxy between VIP and some eye machines. Synergy is not supplied or maintained by Best Practice Software. For more information on installing Synergy, contact Synergy Support. The instructions below assume that Synergy has been successfully installed on your practice network.
How does the Synergy integration work?
Bp VIP.net communicates with Synergy in two ways:
- Bp VIP.net creates HL7 ADT and ORM type messages and delivers the messages to a nominated folder. The message files contain patient demographics and patient appointment booking data. Bp VIP.net Services polls the Bp VIP.net database periodically to determine if there are messages to create.
- From the Medical Desktop, Bp VIP.net can launch the Synergy Web application for the current patient.
NOTE Because the Synergy interface relies on Bp VIP.net Services to poll the database, Bp VIP.net Services must be running for data to be transferred from Bp VIP.net to Synergy. Contact Best Practice Software Specialist Product Support if you need more information on installing and starting Bp VIP.net Services.
Before you begin
You will need to know the following information before you can set up your practice's Synergy interface:
- Arrange Synergy integration licence with Best Practice Software and obtain Synergy setup zip files.
- Obtain the Transfer Folder URL from Synergy. This URL is the Synergy gateway used by the interface.
- Obtain the patient matching method your interface will use from Synergy. There are a number of different ways to match patients between the two systems. Synergy Support can assist in selecting the correct method for your practice.
Set up the Synergy interfaces
Install interfaces
- If you haven't already, contact Best Practice Software Specialist Product Support and obtain the two installation files for Synergy integration:
- Synergy Launch Web.zip
- Synergy ORM Worklist.zip
- Create a folder on the Bp VIP.net server machine or an accessible location on the practice network, and copy the zip files to that folder.
- Log in to Bp VIP.net as a Bp VIP.net Administrator.
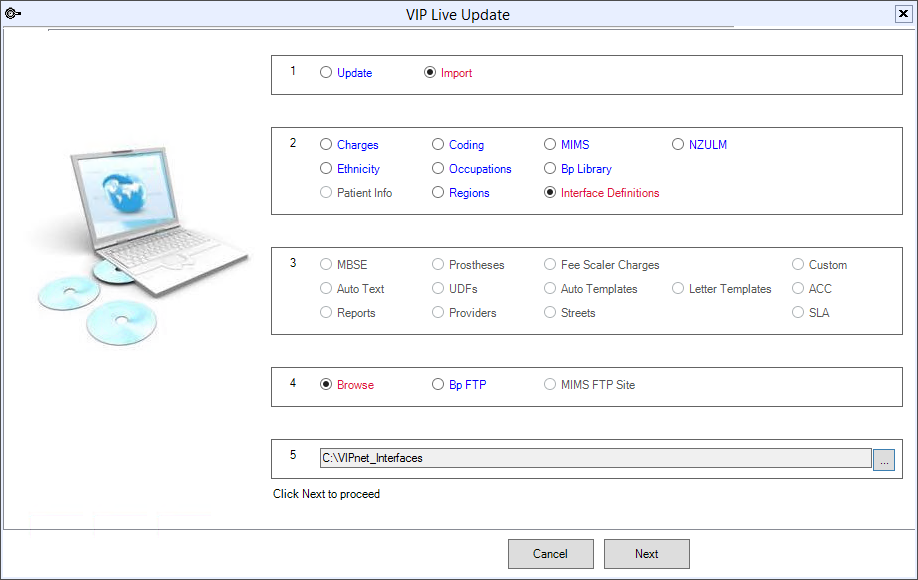
- Select File > Utilities > Live Update to open the VIP Live Update screen.
- In the VIP Live Update screen:
- Section 1 — Select Import.
- Section 2 — Select Interface Definitions.
- Section 4 — Select Browse.
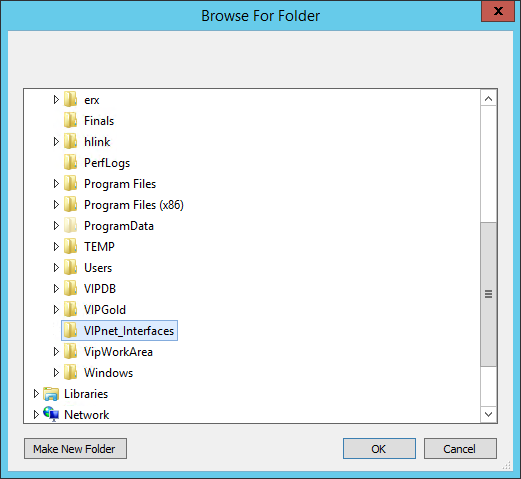
- Click the ellipsis button ... at the end of Section 5. Browse to the folder you created in step 2 and click OK.
- Section 5 will be updated with the selected folder.
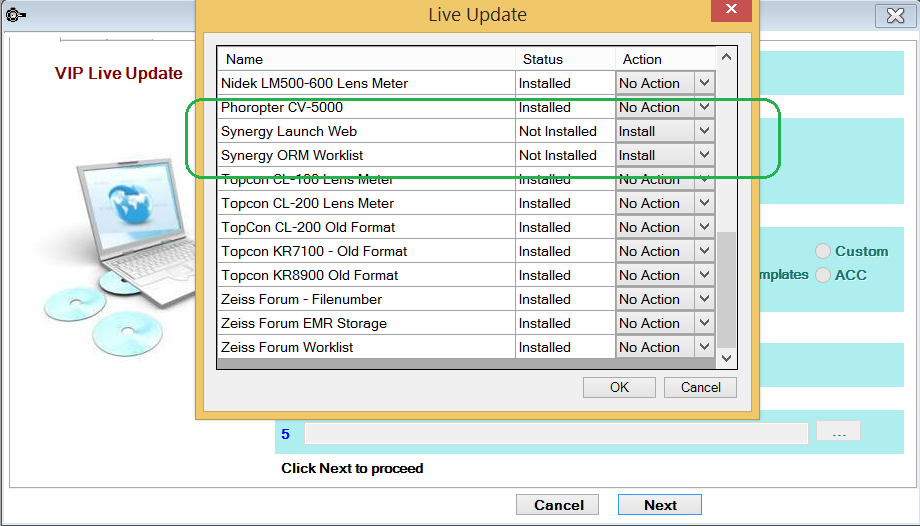
- Click Next. In the Live Update screen, select 'Install' in the Action column for the two interfaces:
- Synergy Launch Web
- Synergy ORM Worklist.
In the following example, there are a number of interfaces to select from. The two Synergy interface files have not been installed and have their Action set to Install.
- Click OK. Bp VIP.net will install the interfaces.
- In Windows, create a folder on the hard disk of the Bp VIP.net server machine called 'Synergy' (such as 'C:\Synergy') and share the folder to all users. The Synergy folder will contain the data transfer files from Bp VIP.net to Synergy.
NOTE You must make the Synergy folder you created in step 8 available to all users, or Bp VIP.net will not be able to access this folder to transfer data. Your IT support can assist with folder permissions in Windows.
Set up interfaces
Synergy Launch Web
- In Bp VIP.net, select Setup > Medical > External Interfaces. Click New in the Maintain External Interfaces screen.
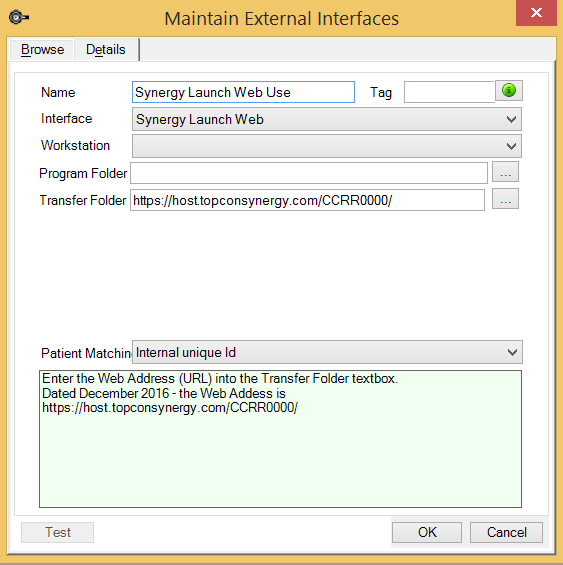
- Enter a Name of 'Synergy Launch Web Use'.
- Select the Interface 'Synergy Launch Web'.
- Enter the Transfer Folder URL supplied to you by Synergy.
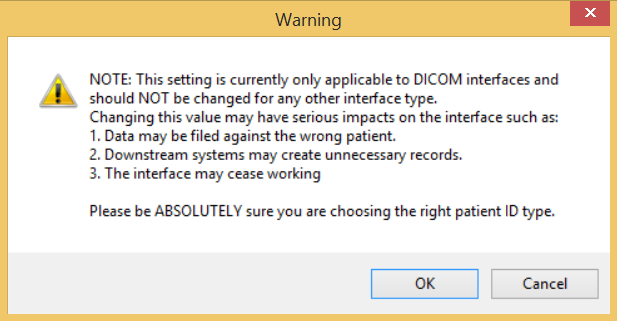
- Select the Patient Matching that your Synergy installation requires. Bp VIP.net will display a warning.
- Click OK. The example below shows a Patient Matching selection of 'Internal unique id'.
- Click OK.
IMPORTANT The most recent known URL used by Synergy, shown in the example, is 'https://host.topconsynergy.com/CCRR0000/'. You must confirm the transfer folder URL with Synergy, as the URL is subject to change.
Synergy ORM Worklist
- Click New again in the Maintain External Interfaces screen.
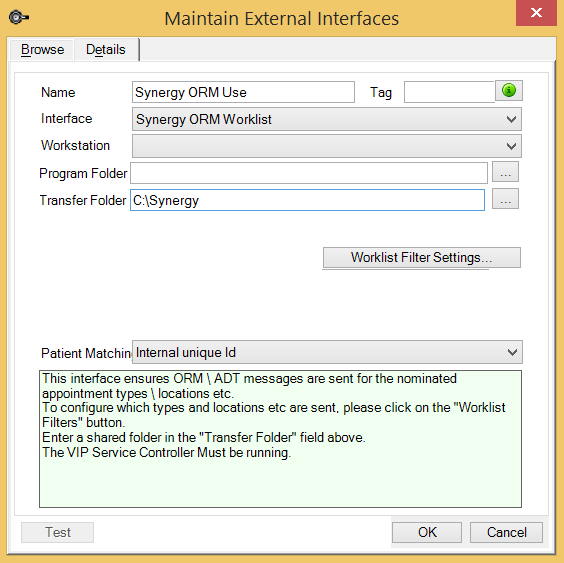
- Enter a Name of 'Synergy ORM Use'.
- Select the Interface 'Synergy ORM Worklist'.
- In the Transfer Folder field, click the ellipsis button ... and browse to the 'Synergy' folder that you created in step 8 of Install interfaces. Click OK.
- Select the Patient Matching that your Synergy installation requires. Bp VIP.net will display a warning.
- Click OK to close the Warning popup. The example below shows a Patient Matching selection of 'Internal unique id'.
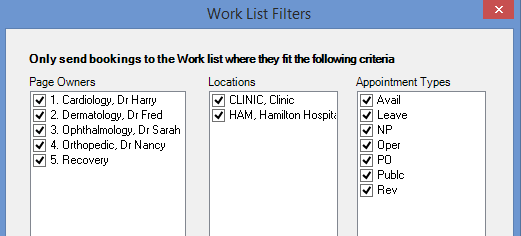
- Click Worklist Filter Settings. The Work List Filters screen will appear.
- Select the Page Owners, Locations, and Appointment Types that you want transferred to Synergy when new records are created or changes are made.
- Click OK to return to the Maintain External Interfaces screen. Click OK to save the interface.
In the example below, the folder is 'C:\Synergy'.
IMPORTANT The Patient Matching selection for the Launch Web interface and the ORM Worklist interface definitions must be the same.
In the example below, all options have been ticked, which means any new patients or appointments, or any updates to patients or appointments will be transferred to Synergy. If you did not select the Page Owner 1. 'Dr Harry Cardiology', for example, appointments booked for this provider would not be transferred to Synergy.
Synergy interface setup is complete.
Access Synergy from Medical Desktop
A Bp VIP.net operator requires a username and password defined in Synergy to access Synergy from Medical Desktop.
- Press F11 to open the Medical Desktop.
- Click the Links button and select Synergy Launch Web.
- Log in to the Synergy user interface using your Synergy login details. The Synergy application will open showing patient details for the patient in the Bp VIP.net snapshot.

NOTE Bp VIP.netwill insert the Links button into the Medical Desktop when you import the Synergy interfaces from VIP Live Update.
The next time the same Bp VIP.net operator logs in to Synergy from Medical Desktop, Synergy will automatically log the operator in.
How does Bp VIP.net transfer data to Synergy?
If a new patient is created, or changes are made to the following fields, Bp VIP.net will create or update the corresponding patient record in Synergy:
- NHI Number
- First name
- Surname
- DOB
- Sex
- Address
If any appointments associated with the selected Work List Filters are created or updated, Bp VIP.net will create or update the corresponding appointment book information in Synergy.
Bp VIP.net Services will look to see if Synergy (and other interfaces) has been installed, and if so, polls the database about every two minutes for new or updated records. If any changes or new records are created, the interface will export the data to Synergy. If the interface is scanning or exporting, the poll timer stalls and restarts when the process is finished.
When importing, the ORM Worklist will scan the patient details and appointment details database tables, and collect a maximum of 100 records at a time. The records will be delivered to the defined 'Synergy' folder ready for export to Synergy. Duplicate records are checked for.
When you install the Synergy interface for the first time, the process may take some time to transfer existing data, depending on the number of patients and appointments you have stored, for example.
Last modified: July 2020