The Windows service VIPServices.net must be running for SMS replies to the Appointment Book to be received, and for interfaces with a third party device to function. VIPServices ensures that messages are sent and received from and to Bp VIP.net from a third party such as SMS or Zeiss Forum.
VIPServices is installed automatically with Bp VIP.net, and Best Practice Software Deployment or your IT services provider will have set up VIPServices as part of installing Bp VIP.net at your practice. However, some additional steps are required to complete VIPServices setup that you may need to confirm or run again as part of troubleshooting.
On this page
Known Issue after a program upgrade
The configuration file for VIPServices is 'C:\Program Files (x86)\Houston Medical\VIP.net\VipServices.Net.exe.config'. A known issue affects some Bp VIP.net practices where the configuration file is renamed after a program upgrade or database update, which causes VIPServices to stop. See Check the config file after an update to resolve this issue.
Starting and stopping VIPServices
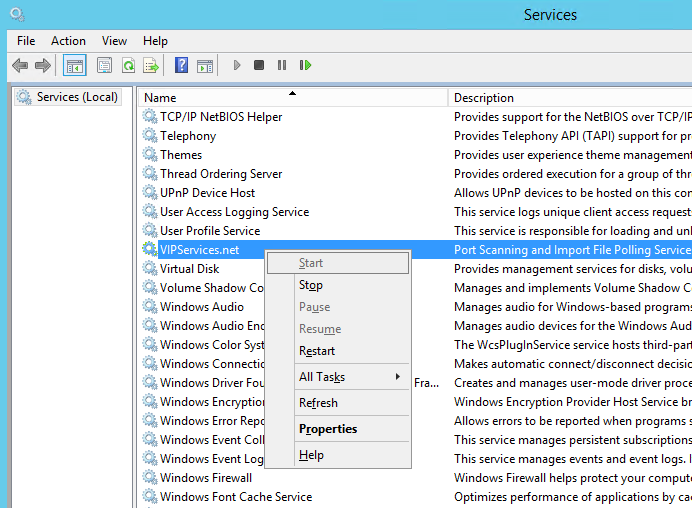
You must be logged into Bp VIP.net as a Windows Administrator to start and stop VIPServices within Bp VIP.net. You can also log in to Windows Services on the Server, search for 'VIPservices.net' and start and stop the service from the Services app.

The path to the Windows Services app is different depending on your Windows version. Search for 'services' from Windows desktop search.
Set up the folder for the log file
VIPServices requires a folder structure to be set up to house the log file.
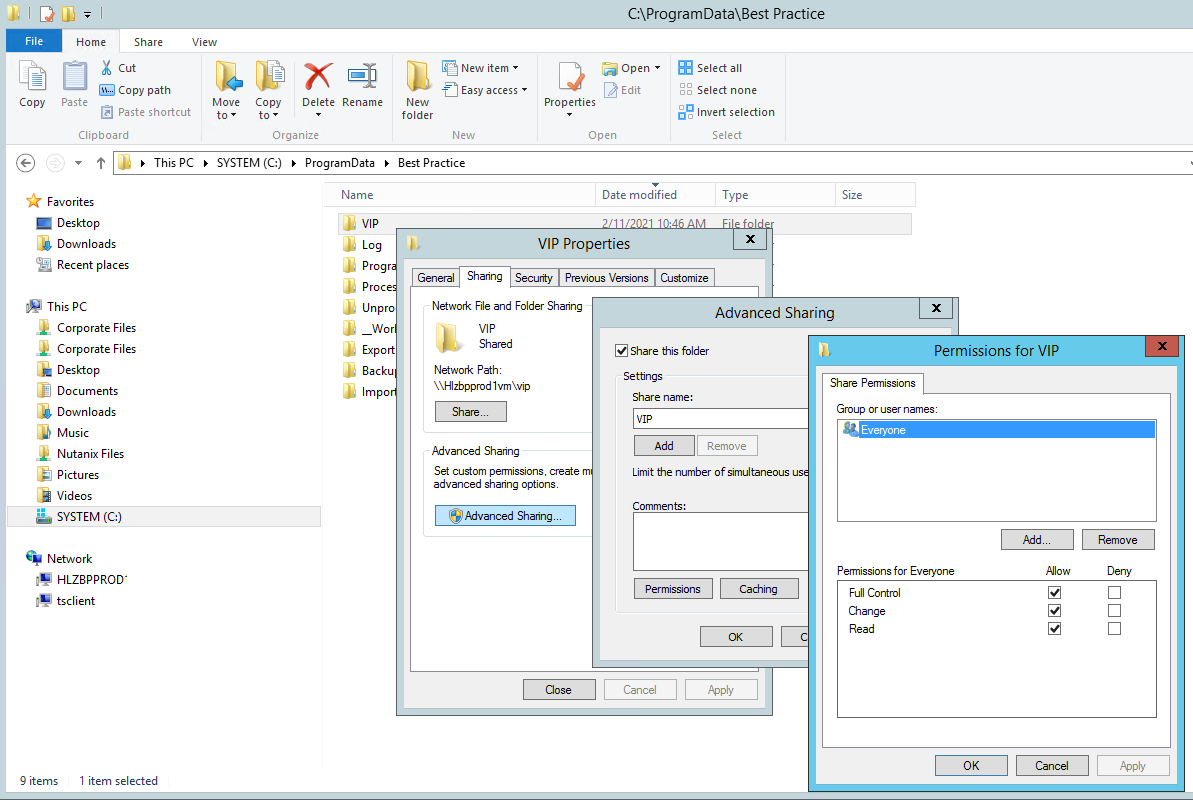
- Open the hidden folder C:\ProgramData and create a new folder called ‘Best Practice’. You may need to tick View > Hidden Items in File Explorer to see the ProgramData folder.
- Under the new Best Practice folder, create a folder called ‘VIP’. Right-click VIP folder and share the folder with ‘everyone’.


- Click OK, OK, and Close to save changes to folder properties.
- On the Windows desktop, right-click on the Bp VIP.net icon and select Run as Administrator.
- Click File > Utilities > VIP Service Controller. The VIP Service Controller screen will appear.
- Click Install Service. A notification will display when VIPServices in installed.
- Click Start Service if this option is still enabled after installing the service. Check whether the service is running successfully by clicking ‘Show Log’.
If VIPServices does not start, or no log file appears, follow the steps in the following sections to resolve.
Assign a user with sysadmin rights to VIPServices
VIPServices should only be run on a single user, preferably on the Bp VIP.net server.
This step sets up a SQL user through the Microsoft database utility SQL Server Management Studio (SSMS) that can be assigned to VIPServices. The user profile is assigned 'sysadmin' rights for VIPServices to poll as intended.
If you see a message similar to the example below, 'Login failed for User', the SQL Server Role for the Login specified should be updated to include 'sysadmin'.
Polling not started ! (re-trying again in one minute)
System.Data.SqlClient.SqlException (0x80131904): Cannot open database "demo_AUSBP" requested by the login. The login failed.
Login failed for user 'NT AUTHORITY\SYSTEM'.
- Download and install Microsoft SQL Server Management Studio on the Bp VIP.net server if it is not already installed.
- Start SSMS and connect to the Bp VIP.net database with a valid username and password.
- Open Security > Logins, right-click the login you want to update, and select Properties.
- Select Server Roles and tick sysadmin.
- Click OK and close SSMS.
- Restart VIPServices and confirm that a new log has been created by starting the service.

Assign an administrator login to VIPServices
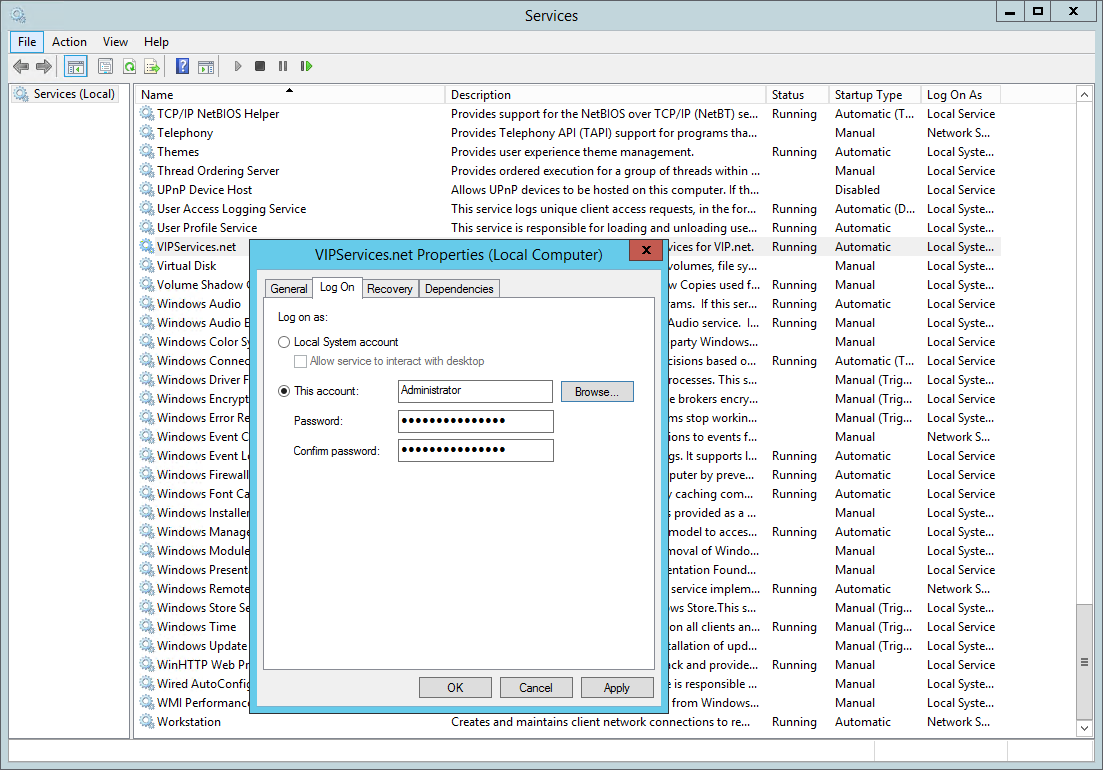
A System or Domain Administrator Windows login account must be assigned to VIPServices.net, rather than a regular user account. The login account's password should not change often over time.
- From Windows desktop search, search for 'services'. Open the Services app.
- Scroll down to find VIPServices.net.
- Right-click and select Properties. Select the Log on tab.
- Select this account and browser for an administrator account. Enter and confirm the account password and click OK to save changes.

Grant access to all users to the VIP.Net folder
Granting access to all users allows messages from Bp Comms and third-party integrations to be downloaded into this folder with no permissions issues.
- Open a Windows File Explorer and browse to C:\Program Files (x86)\Houston Medical.
- Right click on the VIP.net folder and open Properties.
- Open the Security tab.
- Choose the 'Users' group (see the screen shot below) from the Group or user names list.
- Update Permissions for Users and tick Allow for all permissions.
- Click OK to save.

Check the config file after an upgrade
After running a Bp VIP.net program upgrade, inspect the VIPServices configuration file, and rename the file if needed.
- In a Windows File Explorer, browse to C:\Program Files (x86)\Houston Medical\VIP.net.
- Open the file VipServices.Net.exe.config in a basic text editor such as Notepad.
- Check the values for 'Server Name' and 'Database' still match the practices's SQL Server name and Database name. If they are different, update the entries to match, save the file, and close.
If the the file VipServices.Net.exe.config cannot be found, look for a file named with 'Stephen-PC', such as Stephen-PC.config. If this file exists, the VIPServices configuration file has been renamed in the upgrade. Rename the file back to VipServices.Net.exe.config.
If you do not have the ‘rights’ to save the file:
- Click Save As and save using the same name into your Documents folder.
- Rename the original config file in the VIP.net folder with a number.
- Copy the new config file from the Documents folder into the VIP.net folder and delete the old config file.
- Ensure the extension says CONFIG. In File Explorer, click View, select File name extensions and name the extension of the file to .config.
- Restart VIPServices and check that the log file appears and the service is running.
VIPServices setup is complete.

Restarting VIPServices
After running program updates for Bp VIP.net, it is it recommended to restart VIP Services. A restart may also need to be performed when troubleshooting SMS messaging and Medicare Web Services.
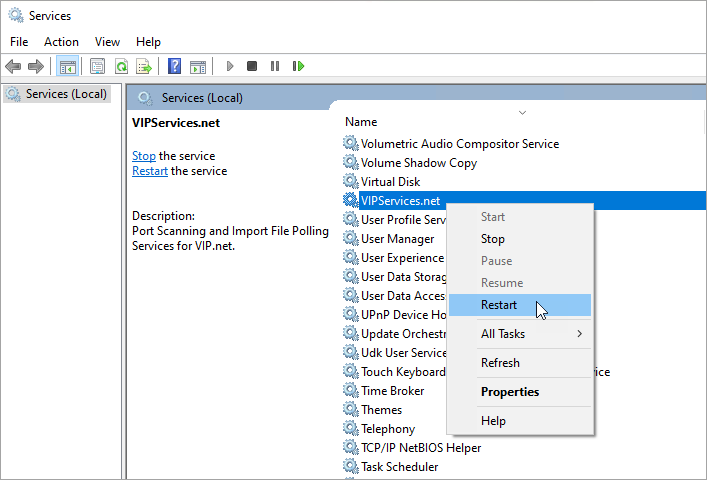
- From Windows desktop search, search for 'services'. Open the Services app.
- Scroll down to find VIPServices.net.
- Right-click VIPServices.net and select Restart. The restart may take a few minutes to process.

Last modified: 4 November 2022