This article shows how to redirect a invoice to a insurer, and pay a redirected invoice for New Zealand practices.
Redirecting an Invoice to an Insurer
- Select the patient from the Appointment Book and click the F5 button. The Consultation window is displayed.
- The Provider and their Revenue account will populate from the Appointment Book.
- The Fee Scaler should display Private.
- The Subsidiser can be left, as this will only impact the invoice if a ‘Subsidised’ item code is billed.
-
 indicates if the patient has any credit on their account.
 - Enter the billing item in the code field.
- Press the Tab key on the keyboard.
- Enter the name of the insurer in the Less Redirection to: field.
- Enter the amount for redirection in the box beside the Less Redirection to: field.
- Press the Tab key on the keyboard.
- The balance to be paid by the patient is displayed below the redirected debt.
- Click OK to save, Pay (F6) to save and receipt payment; or Print Invoice to save and print or Email Invoice to email a PDF of the invoice and save the invoice.
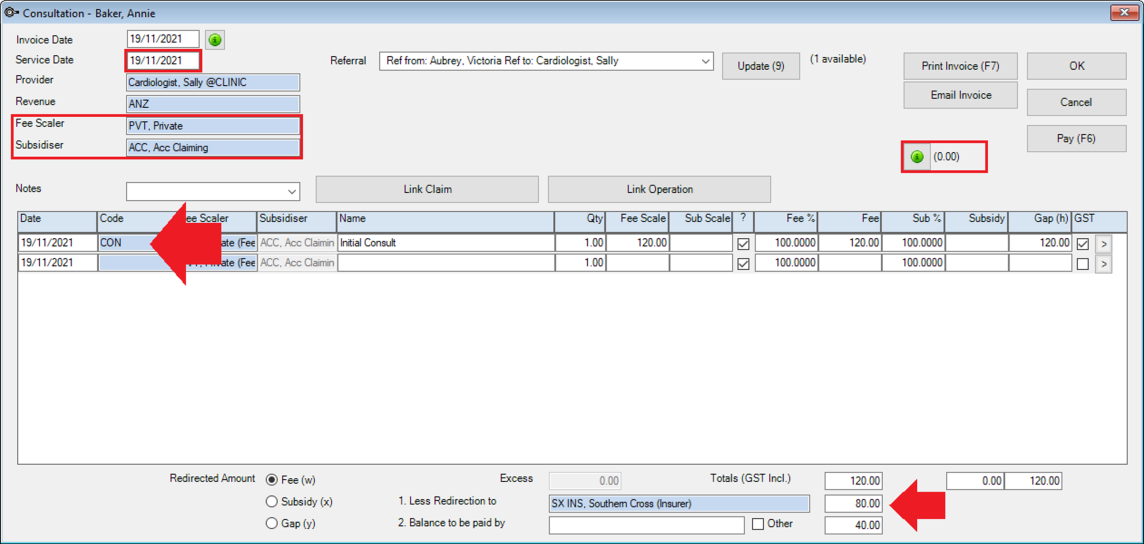
The Invoice and Service date will populate from the selected appointment date.
IMPORTANT If you are billing retrospectively for another day, the Invoice date will display the Appointment date until you save the invoice. The Transaction screen will indicate a difference between the Invoice Date and the Service Date.
The item row will populate with the Name, Fee Scale, Fee Subsidy (if any), and Gap.
NOTE GST on the item row will always be ticked, indicating that GST is included in the item.
If the Insurer has been set up to bill for a percentage, the fee will automatically work out and leave a gap for the patient.
If the Insurer has been set up to manually bill, the user will need to manually type in the amount to be redirected.
Look at Insurer Setup to ensure your insurers are set up correctly on Bp VIP.net.
Receipting a Redirected Payment
A payment for an account redirected to the Insurer can be receipted in Bp VIP.net.
- Search and select the required patient and click F8.
- The Transaction screen is displayed.
- Select the Redirection Credit – Transferred to… line.
- Press Tab on the keyboard.
- The screen changes to the Redirected organisations Transaction screen.
- Click F6.
- Click the Tag button or the Spacebar.
- Check the Date of payment.
- Enter the payment Type in and the payment credit into the Account Credit field.
- Click OK to save; Print to save and print the receipt; or Email to save and email a PDF of the receipt to the account holder.
- Less Discount: apply a set discounted amount or a % to the debit.
- Less Credit on Hold (available credit will display in brackets): apply any credit on the patient account to the debit.
- Tag: Tag multiple invoices for payment.
- Tag All: Tag all outstanding invoices for payment.

![]()
The correct Transferred from … line is selected.
The payment screen is displayed for the Insurer/Redirector.
The Debit Transferred from line is selected.
NOTE When the invoice tagged for payment is selected, the details of the invoice show in the tagged section and the Total to be Paid will display the debit.
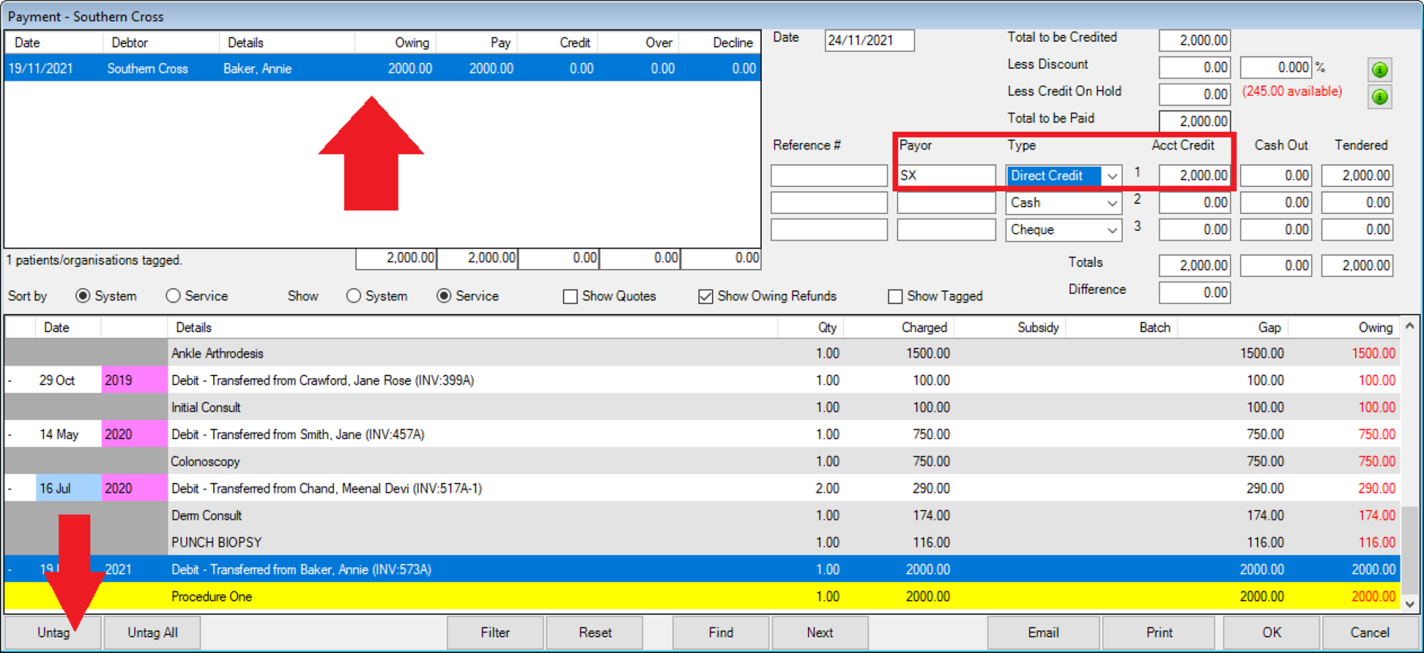
The following features can also be used:.
IMPORTANT A reference for the payment can be added to the Reference # column. This must be a unique reference such as a cheque number. If two accounts have the same information recorded in the Reference field within the same banking period, both payments will be batched into one payment on the Banking Summary Report.
Last modified: 24 November 2021