Your practice may store patient photos, for patient identification purposes, for example.
Adding a photo to a patient's medical notes (F11) is not recommended. You can only store an image for a single consultation note, so you would need to reattach the image at each consultation. The Patient Details screen (F3) is a better place to store a photo, either into the NZNumbers or AUSNumber UDFs, or on an additional custom tab.
NOTE If you decide to store the patient photo in the Numbers panel, the photo will be visible when you open Patient Details without needing to click on another tab. If you decide to create a new ‘Patient Details More’ page, you cannot create a new 'More' page if one is already in use.
The following example shows how to create a custom UDF tab for the Patient details screen. If you decide to house patient photos in NZNumbers or AUSNumbers, the process is the same, just select the 'Numbers' Type in step 3 below. You will need to resize and potentially rearrange the 'Numbers' UDF canvas to accommodate the photo.
Create the User-defined form
- Create a folder in a common location in which all patient photos can be stored, and give the folder a descriptive name. All Bp VIP.net users will need access to this folder. Your IT services can assist with a suitable network location and access permissions in Windows. Ideally the folder should be in the same location as Bp VIP.net data and external patient images.
- Go to Setup > User Defined Forms.
- Click New to create a new tab. (Or select 'NZ / AUSNumbers' if you want to extend these UDF tabs.)
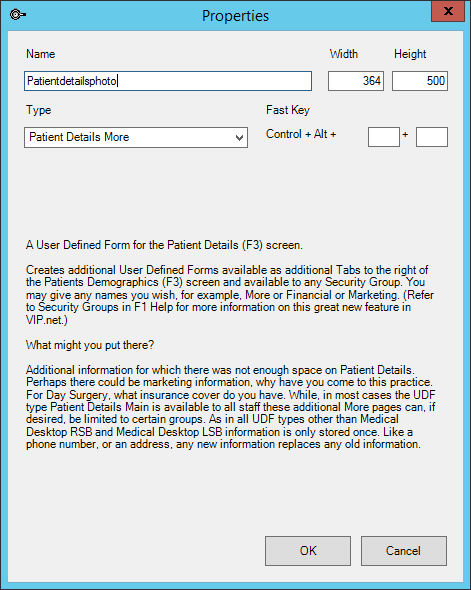
- Select a Type of 'Patient Details More'. This will add the UDF as a tab to the Patient Details screen.
- Make sure the height and width are enough to display the photo with some extra room. Click OK. The UDF Form Designer will open at a blank canvas.
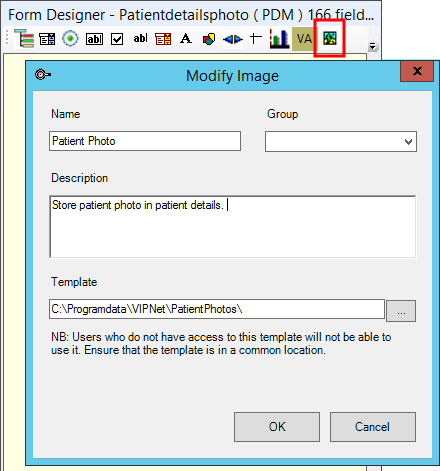
- Click the Image icon at the right end of the toolbar. The Modify Image screen will appear.
- Enter a meaningful Name and Description.
- In Template, browse or copy the common location you created in step 1. Select the folder, do not select an image. Click OK.
- Position the image field on the UDF and resize as needed.
- Save the UDF.
NOTE Access to the patient photos folder to users outside of your practice staff should be restricted according to your practice's guidelines for sensitive data.


Save the patient photo to patient details
- Save the patient photo into the common folder with a filename that easily identifies the photo, such as the patient's file number.
- Focus on the patient in the snapshot and open the Patient details screen (F3).
- Right-click on the image place holder and select Import image.
- Select the patient photo you copied across in step 1 and click Open.
- Save the patient details.
The patient photo is now stored for reference in patient details.
Storing in Medical Desktop
If you are determined to have the Image in the F11 screen, the photo will still need to be stored in a common location and can be imported into the Image strip.
- Open the patient's Medical desktop.
- Tick Show images.
- Click Import.
- Browse to the common location and select the image.
- Click Open.
- Save and close Medical Desktop.
Last updated 28 May 2021