The Client Import function can be used to import the inital set of Clients into Bp Allied in bulk.

This function is not available for Bp Allied Live Fully hosted customers or customers outside of Australia. We can carry out this initial import for you.
If you require the importing of other information such as previous appointments, invoices or client notes please call or
email the support team to discuss this and to obtain a quote.
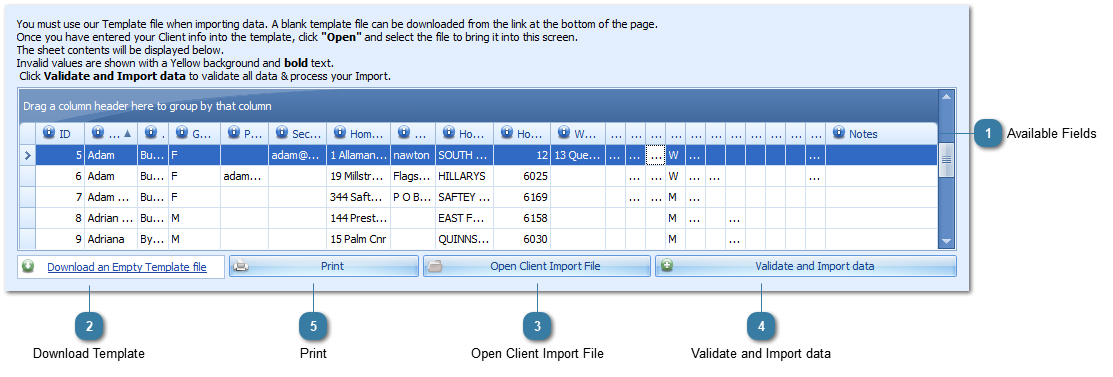
 Available FieldsThese are the fields that can be imported. They must be in this order to import correctly. The template (discussed below) is used to do this.
|
|
 Download TemplateClick here to download an excel spreadsheet that includes all of the fields available for import in the order that the import requires.
There are some fields that need to be explained:
-
The only 'compulsory' fields are the FirstName and LastName -
The phone numbers can be in any format – with or without the area code, but can only include numbers and spaces. -
Primary Phone (H/W/M) - this field is not a phone number field. It is used to define which phone number is a client's main or primary phone number. It is expecting either H for Home, W for Work or M for Mobile as the values in this field. If the PrimaryPhone is not filled in, we default to the 'Mobile' number as 'Primary' (if it is present), then the 'Home' number
-
Email address fields must contain a valid email address with no additional comments – they will be rejected if extra info is added -
Addresses MUST have a Suburb and Postcode to be able to be imported -
The Notes field and Phone ' Comments' fields can contain any info you desire – no limit (well.. the theoretical limit is 2 million char...but lets not test that out?) -
Please DO NOT delete or rename any columns. Bp Allied will reject the import if the columns don't match.
|
|
 Open Client Import FileOnce the data is in the correct format then
Click Open Client Import File
Select the file from it's directory location
|
|
 Validate and Import dataClick Validate and Import data to start the import process
All the data needs to pass all of the validation processes to be able to be imported
The most common issues are:
-
Characters other than numbers and spaces in Phone Numbers -
Spaces in or at the end of an email address -
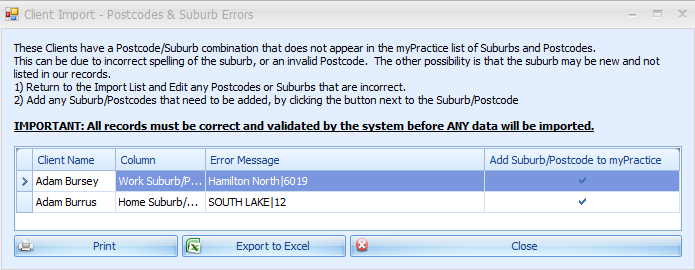
No recognised Suburb or Postcode for an address. Missing ones can be added by clicking the tick, if they are correct. (see the image below)
Print or Export the errors to Excel
Update the data in the Client Import Data Template
Save the changes
Re-open the Template into the Client Import function
Re-validate the data and fix the next lot of errors.
It may take several iterations of this process to get all your client data clean enough to import.
|
|
 PrintPrint
|
|