Set the options for the default display of the Appointment Book.
 Show Appointment Book on StartupThis loads the appointment book and selects the current day when Bp Allied is started.
|
 Show Calendar ButtonsClick to show the calendar buttons at the bottom of the Appointment Book. Untick to remove these.
|
 Allow entry/editing of prior AppAllows entries for past dates to be entered into the appointment book retrospectively. By default this is switched off to prevent accidental appointment bookings being recorded to the incorrect date.
|
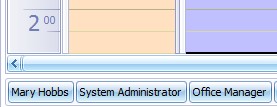
 Show Calendar Navigation BarsThe buttons allow navigation through the calendar.
-
They DO NOT show if there are appointments that day. -
If there are no appointments then the navigation bars display the words "previous appointment" to move to the most recent past appointment, or "Next Appointment" to move to the next appointment booked in the calendar.
|
 Allow conflicting AppointmentsThis allows appointments to be created in the same timeslot, that is, double-booking. This option is turned off by default.
|
 Show "All Day" Appts in Time cellsIf ticked then an All Day appointment will block out all time cells rather than just display at the top of the Day column in the Appointment Book.
|
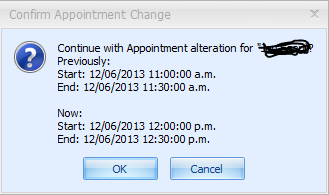
 Confirmation DialogTick this to display the confirmation message when changing appointment details.
|
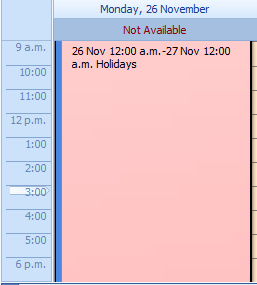
 Show HolidaysThis needs to be checked to show Holidays in the Appointment Book. To get the holidays to show they need to be imported into Bp Allied from the Outlook Holiday File (OUTLOOK.HOL). Please see instructions on how to do this here. |
 Use Colours for Consultation TypesIf this is checked the Appointment Book will display the Appointment in the colour defined for the Consultation Type. If unchecked the Location colour will be displayed. Consultation Colours can be set in Data Maintenance > Products and Services. -
Using this option can slow down the appointment book load/refresh time
|
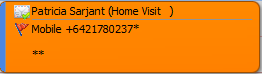
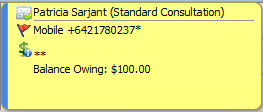
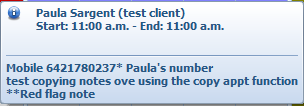
 Show appointment notesWhen checked the Appointment Notes entered in the Appointment Edit/Add screen will be visible in the Appointment Book.
-
This also enables a Red Flag note to be included in the notes displayed when hovering over an apppointment. This is prefixed by **. -
Using this option can slow down the appointment book load/refresh time
|
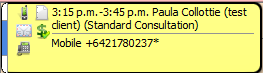
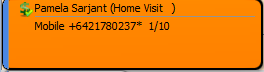
 Show Client Phone no'sWhen checked each appointment will also display the phone numbers of the client.
-
Using this option can slow down the appointment book load/refresh time
|
 Show Icons-
Using this option can slow down the appointment book load/refresh time
|
 Show Outstanding balanceThis shows the balance owing on any unpaid invoices (prior to "today's" appointment, unless it has already been invoiced)
-
Using this option can slow down the appointment book load/refresh time
|
 Show Referral countThis displays the total number of appointments available and the number of appointments used for the current referral. In this example, this is the first of ten appointments available to the client.
-
Using this option can slow down the appointment book load/refresh time
|
 Practice HoursSet your work hours which will be displayed within the Appointment Book by selecting your Start Time and End Time. Any appointments made outside of these times will alert the person making the appointment that it is outside your normal work hours.
|
 Only Display Practice HrsWhen checked will displayed the configured work hours if checked or unchecked will display a 24hour calendar.
|
 Include Saturday or SundayIf your work week includes Saturday (or Sunday, or both) then selecting this will include Saturday or Sunday in the Work Week View when selected in the Appointment Book.
|
 Default Appointment DurationWhen you make an appointment it will always show as the duration you set here, by default, unless manually changed or set for specific Consultation Types within System > Data Maintenance > Products and Services. |
 Time Ruler IntervalSet the default blocks of time you wish your appointment book to display.
|
 Time Ruler - Show Minutes checkIf ticked, this will display the time ruler blocks set within the Time Ruler on the Appointment Book
|
 New Appointment Default StatusAny appointment created will automatically be created with the status as selected here. In this example Busy is selected by default.
|
 Cancelled Appointment ColourChoose the colour you wish displayed in the appointment book for all cancelled appointments.
|
 Play sound on PopupIf checked a sound will be displayed when you receive a pop up message. This sound can be changed by browsing for your own .wav file from the location field.
|
 Apply buttonClick Apply to save the changes and keep the options window open.
|
 Cancel buttonClick Cancel to disregard changes and close the options window.
|
 OK buttonClick OK to save changes and to close the options window.
|
|
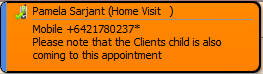
 (displayed on hovering over appt in Appt Book screen)