This article explains how to use the waiting list in the Bp Omni appointment book.
The waiting list holds patients who would like to be seen for an earlier appointment if a cancellation occurs. Patients can be added to the waiting list with or without an existing appointment.
In this article:
Add a patient to the waiting list when creating an appointment
- Select Appointments > New appointment, or double-click a timeslot in the appointment book. The New appointment modal will appear.
- Click Waiting List. The screen will change to show the waiting list options.
- Select the Priority of the appointment on a scale of 1 to 3. One is the highest priority, and three is selected by default.
- Add the date that the appointment should expire from the waiting list.
- Tick Any provider if the patient or client is willing to see providers other than the provider selected in Appointment details.
- Fill out all relevant appointment details. See Book, Edit, Cancel or Reschedule an Appointment for more information.
- Click Save.

Add a patient with an existing appointment to the waiting list
- In the appointment book, right or left-click the appointment for the patient you wish to add to the waiting list and click Edit or Edit appointment.
- Follow steps 2 - 5 in the above section on adding a patient to the waiting list when creating an appointment.
- Click Save.
Left-clicking an appointment will display the Appointment information screen, while right-clicking an appointment will provide a list of quick actions. You can edit the appointment via either method.
Add a patient to the waiting list without an appointment
- From the appointment book, select Waiting List. The Waiting list screen will appear.
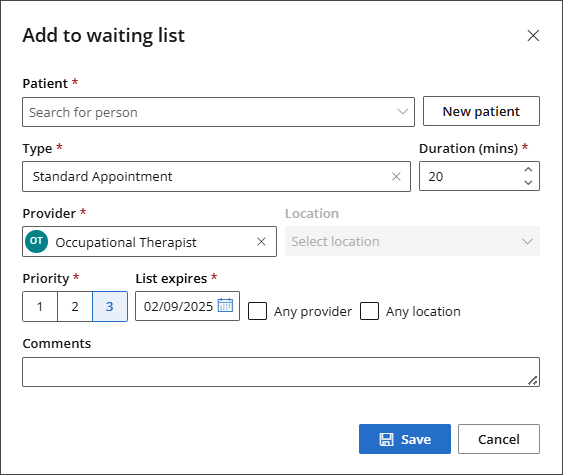
- Click Add to waiting list. The Add to Waiting List screen will appear.
- If the appointment is for an existing patient or client, use the Patient or Client field to search for them.
- If the appointment is for a new patient or client, click New patient or New client to enter their details, then click Save.
- Select an appointment Type.
- Select the patient or client's preferred provider.
- Select the Priority of the appointment on a scale of 1 to 3, with one being the highest priority.
- Add the date that the appointment should expire from the waiting list.
- Tick Any provider if the patient or client is willing to see providers other than the selected provider.
- Tick Any location if the patient or client is willing to see providers at other locations.
- Add any Comments if applicable. Comments will appear when the appointment is clicked in the appointment book.
- Click Save.


The appointment type will determine the appointment duration. However, the appointment duration can be changed if required.
TIP Appointment types can be added or edited via the Settings menu. See Set Up the Appointment Book for more information.
Fill a cancelled appointment with a patient in the waiting list
- Cancel the existing appointment. If there are patients in the Waiting list whose appointment length will fit the appointment slot and are willing to see the provider, the Replace appointment from waiting list screen will appear.
- Select the patient that you wish to replace the cancelled appointment with from the waiting list and click Save. The new appointment screen will appear.
- Edit the appointment details if required and click Save appointment.
If you have already cancelled the appointment and have a free appointment slot:
- Double click the appointment slot. The New appointment screen will appear.
- Click Add patient from waiting list. The Add patient from waiting list screen will appear.
- Select the patient you wish to fill the appointment slot with and click Save. The New appointment screen will appear.
- Edit the appointment details if required and click Save appointment.
Last updated: 02 September 2025.