This article explains how to configure your appointment book in Bp Omni, including appointment types, cancellation reasons, practice opening hours and exceptions.
NOTE This process should be completed by the practice owner.
In this article:
Set practice standard opening hours
Setting your practice standard opening hours will determine the hours in the appointment book that you can book appointments in.
Working hours for individual providers can be configured through the user profile. See Add a New User for more information.
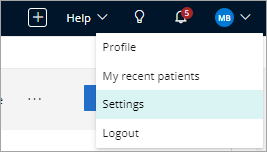
- Click your profile icon in the top-right corner of the screen and select Settings.
- From the list of options on the left of the screen, click Practice & locations.
- Scroll down and select Opening hours. The opening hours screen will appear.
- The standard opening hours for the practice are set to 8 am to 5 pm weekdays by default. If your practice opening hours differ throughout the week, click in Day(s) and uncheck any days that have different opening hours to your regular opening hours.
- Enter the Start time and End time for the opening hours roster. If your regular start or end time is on a quarter hour, you can type the time into the fields.
- Click Add opening hours to create another row.
- When you are finished adding opening hours, click Save or Cancel to exit without saving.

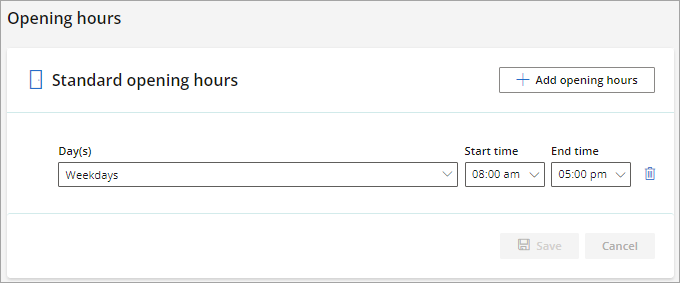
IMPORTANT Bp Omni will not warn the user when opening hours schedules overlap. Take care when creating to avoid duplication.
Set exceptions
Exceptions are one-off instances during which the practice is closed, for example, public holidays. Exceptions can cover a part day, multiple part days, a full day, or multiple full days.
Exceptions for individual providers can be configured through the user profile.
See Add a New User for more information.
- Select your name in the top-right corner of the screen and select Settings.
- From the list of options on the left of the screen, click Practice & locations.
- Scroll to the bottom of the screen and click Exceptions. The Exceptions screen will appear.
- Click Add an exception. A new row will appear.

Whole day and whole multiple day closures
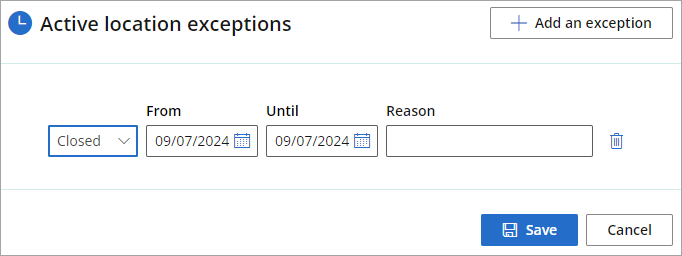
- Set the leftmost field to Closed.
- Set From and Until to cover the duration of the closure. If the practice is only closed for one day, set both From and Until to the same date.
- Add a reason for the closure and click Save.
Part day closures and part day closures over multiple days
- Set the leftmost field to Open.
- Set the From and Until fields to cover the days during which the practice will be closed for part of the day. If the part day closure is only for one day, set both From and Until to the same date.
- Set the Start time and End time to reflect the time that the practice will be open. If the start time or end time is on a quarter hour, you can type this into the field.
- Add a reason for the closure and click Save.

Add closures via the appointment book
You can also add closures directly from the appointment book. You can only add single part day or full day closures via the appointment book.
- Select the spanner icon in the top-left corner of the appointment book.
- Select the Date you wish to add a closure for.
- If you wish to add a part-day closure, select Open from and enter the hours that the practice will be open in the fields provided.
- Enter a Reason for the closure and click Save.
![]()
The opening hours screen will appear.

If you wish to add a full day closure, select Closed all day.
Update or delete location exceptions
See Previous location exceptions made below the Active location exceptions.
- Edit the Start or End time.
- Click the trash can icon to delete an exception.

Add and edit appointment types
- Select your name in the top-right corner of the screen and select Settings.
- From the list of options on the left, select Config > Appointment types. The Appointment types screen will appear.
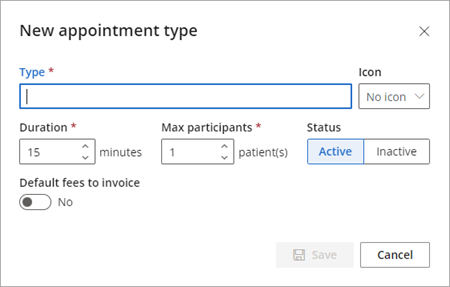
- Click Add appointment type. The New appointment type screen will appear.
- Add the new appointment type name to the Type field and select an icon from the available options if desired.
- Select a Duration for the appointment type.
- Enter the maximum number of patients bookable to the new appointment type. See Creating a group appointment for more information.
- Set the appointment type status to Active or Inactive. Inactive appointment types cannot be selected when creating an appointment.
- If desired, toggle Default fees to invoice to Yes and search for a fee to invoice by default for the appointment type.
- Click Save. The new appointment will appear in the Appointment type list.
- To edit an appointment type, click on its name in the list of appointment types.

Create and edit cancellation reasons
- Select your name in the top-right corner of the screen and select Settings.
- From the list of options on the left of the screen, click Practice & locations.
- Toggle on the switch to enable Capture appointment cancellation reason from the Preferences card.
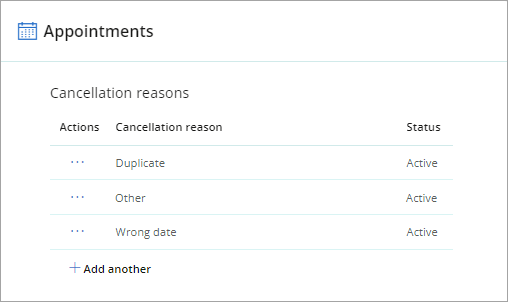
- Scroll down until you reach Cancellation reasons in the Appointments card.
- Click Add another to add a cancellation reason. The Add cancellation reason screen will appear.
- Provide a Name for the cancellation reason and set the appointment type status to Active or Inactive. Inactive cancellation reasons cannot be selected when cancelling an appointment.
- Click Save.
- To edit or delete a cancellation reason, click on the ellipsis next to the cancellation reason and select Edit or Delete.


Manage multiple locations in the appointment book
- To show multiple locations, use the location picker in the top-left of the appointment book to check the appropriate boxes.
- The appointment book will display the corresponding colours next to the day on which the selected provider works at that location.
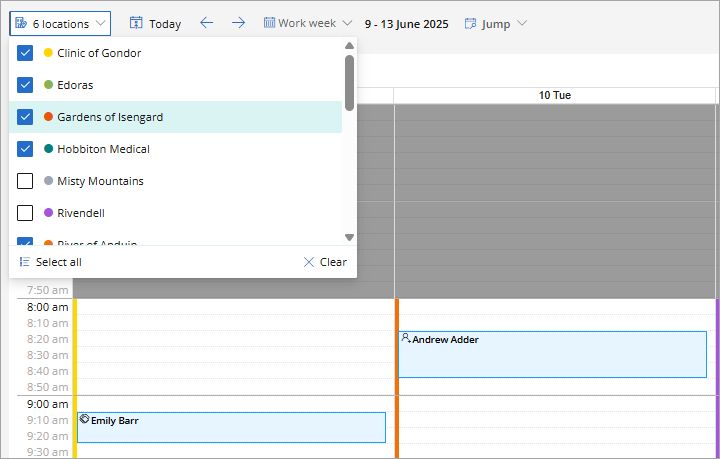
If you have not selected a location, the appointment book show that the selected provider is working at another location on that day, and block out their booking slots.

Creating new appointments for different locations
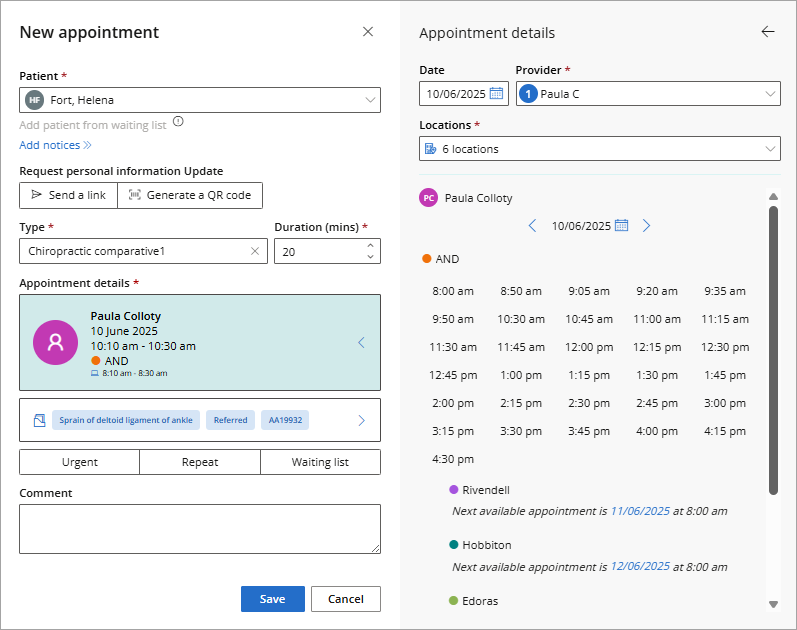
- Double click the appointment book to create a new appointment. The New appointment modal will appear
- Select Appointment details to show more booking options. By default, the location which you double clicked on will be selected for the booking.
- Next available appointments at all other checked locations will appear, giving you a quick overview of what's available and where.
- Click Save when you are finished modifying the appointment details to book the appointment.
Automatically link appointments to a condition
- Click your profile icon in the top-right corner of the screen and select Settings.
- From the list of options on the left of the screen, click Practice & locations.
- Scroll down until you reach Preferences.
- Set the Auto-link to condition switch to Enabled to automatically link new appointments to the patient's active condition if only one exists.


Last updated: 16 October 2024.