This article explains how to add a new user and edit user profiles in Bp Omni.
In this article:
IMPORTANT For users with multiple locations, providers will need to have their working hours set up for each location they work at.
Create a new user
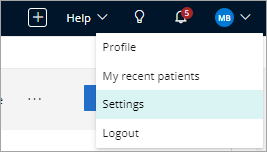
- Click your profile icon in the top-right corner of the screen and select Settings.
- Check that there is an available license for the new user in the Licenses in use section. See Licence Management for more information.
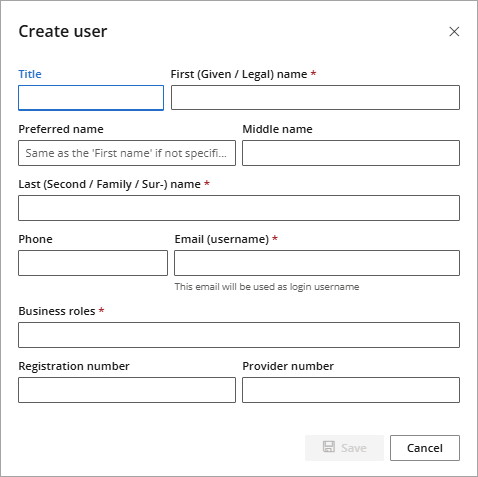
- Click Create user. The Create user modal will appear.
- Enter the user's details. The user's First name, Last name,Email and Business Roles are mandatory.
- Select the user's Roles from the options provided. Roles are used for security purposes, and determine which areas of Bp Omni the user has access to. For example, users with a clinical role will have access to patient records. A user can be assigned multiple roles.
- Click Save. The user will appear in the Users list with the status Pending sign up.
- Accept the invitation.
- Create a password.
- Set up multi-factor authentication.
The Users screen will appear.
NOTE The email address entered must be unique to the user, as it will be required for sign in.

The user will receive an email with a link inviting them to sign up to Bp Omni.
To activate the user account, the user must:
Setting a quick access PIN
The first time a new user signs into Bp Omni, they will be asked to create a six-character PIN. The PIN can be any six characters, including special characters.
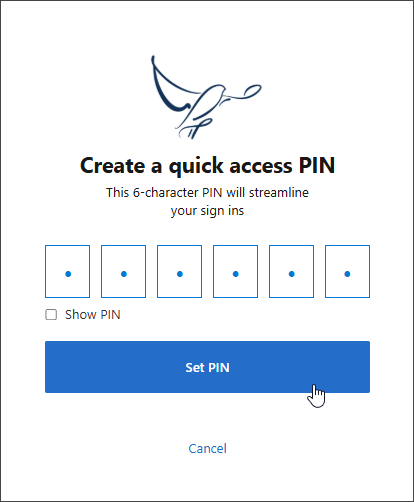
When using Bp Omni, for security purposes the screen will lock after 15 minutes of inactivity. The PIN is required to unlock the screen.
See Account Security for more information.
Change a password or edit MFA methods
Users can change their password or edit multi-factor authentication methods when signing into Bp Omni from the Access and sign in card in the user settings.

Multi-factor authentication methods include the user's SMS mobile number and email address.
When signing in to Bp Omni the user will be sent an authentication code to the listed SMS number or email address to enter and verify.

Set up a new provider
Complete the steps outlined below if the user you have added is a provider or use the bookmarks to jump to a topic.
Personal information
- Select the newly created user from the Users list.
- In the Personal information section, fill in any further details not added when the provider was first created.
- To include an electronic Signature for the provider, please click on Browse Files. Select the image file and click Open.
- Select the most appropriate term for the provider's customers: Patients or Clients.
- Click Save.

Online booking profile
Enter the details as per the fields on screen if the provider is using Online bookings.
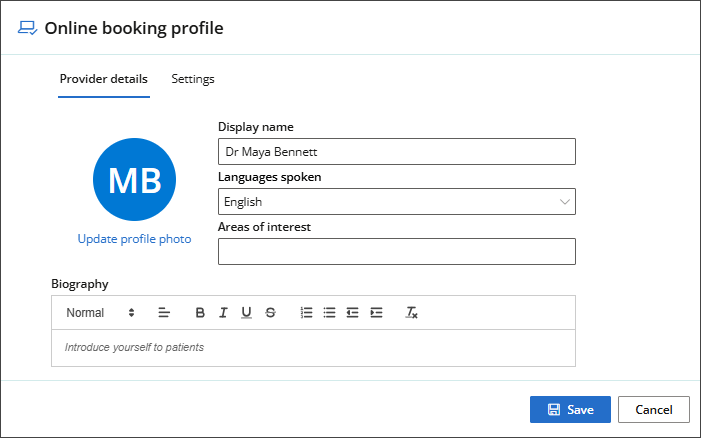
- Enter the Provider's Details, including the Display name, Languages spoken and Areas of interest.
- Use the built-in text editor to write or copy and paste a Biography for the provider.
- Click Save.
- From the Online booking profile, select the Settings tab.
- Confirm the practice Location where appointments will be available online.
- Select the Appointment types that can be booked online from the available list.
- In Online Availability, select how the appointment types should appear:
- Show & book: Displays the appointment type online and allows patients to book the appointment directly online.
- Show & call: Displays the appointment type online but requires patients to call the practice to book.
- Don’t show: Hides the appointment type from online booking.
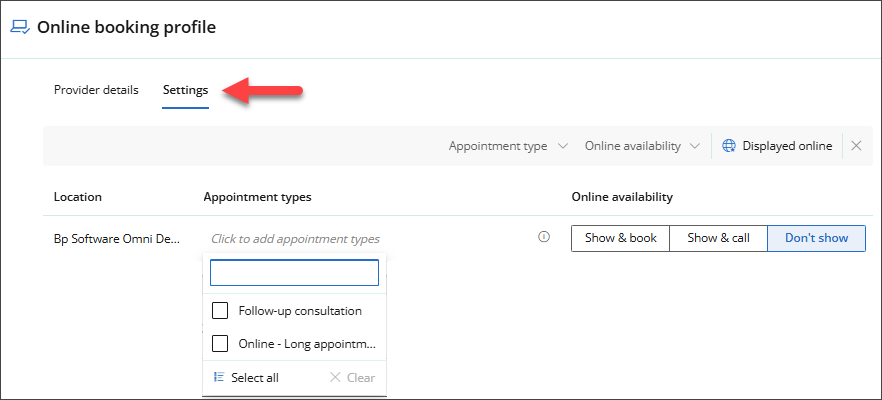
See the Configure Online Booking article for more information.
Professional credentials
- Enter the provider's HPI CPN.
- Tick the Use as default for ACC queries checkbox to enable the setting for the HPI CPN if required.
- Type in the provider's Qualification
- Click Save.

User role & security permissions
To configure a user's business role and security permissions, you must first log in as a user with the Business role of Owner or Practice Manager.
Select the business role applicable for the provider type if not set correctly on initial creation and click Save.

See Configure Business Roles and Security Permissions for more information.
ACC Contracts
The ACC contracts card will only appear in the user settings after assigning the user a provider type business role.
Select the applicable contract type for the provider's speciality and click Save.

NOTE A hand therapist business role can only be added when the user has also been assigned a physiotherapy or occupational therapist business role. See Configure Business Roles and Security Permissions for more information.
Clinical settings
Click Clinical settings.

The Clinical settings page will appear.
Tree view
Located on the right side of the clinical record, the Tree view provides access to information about the current encounter.
- In the Clinical Settings screen, go to Tree View.
- Select which tab of the patient tree should be open by default from the dropdown selection.
- Select a display option for past consult information.
- Click Save.

Consultation
- Select a Workflow for consultation to load automatically when opening the Clinical record.
- Choose a Format of consultation notes from the dropdown selection.
- Choose a Default docked tab to display.
- Use the switch to indicate if a Reason for discarding consultation notes & services is required or not required.
- Click Save.

Patient summary page
- Under Patient Summary page, deselect any panels that you do not wish to appear in the patient or client summary section of the clinical record and drag the panels into the order you want them to appear in.
- Choose if you would like to see the last notes made by other providers in the clinical record or not with the Only ever show my own last notes checkbox.
- Click Save.
- Return to the user profile by clicking the user's name in the breadcrumbs at the top of the page.

Appointment book
In the User profile, scroll down to the Appointment book section and toggle Show user on appointment book to Show.

Add working hours
- From Users, select a user to add working hours
- Scroll down the page to Appointment book
- Select Working hours. The Working hours screen will appear
- Click Add working hours. A set of fields for entering working hours will appear
- If you have multiple locations, choose a location to set these working hours for
- Enter the date to commence taking bookings from in Start schedule. If you know the last date that bookings should be taken for, enter the date in End schedule, otherwise leave this field set to Never
- Set the Start time and End time to reflect the provider's regular working hours. If the provider's regular start or end time is on a quarter hour, you can type this into the fields.

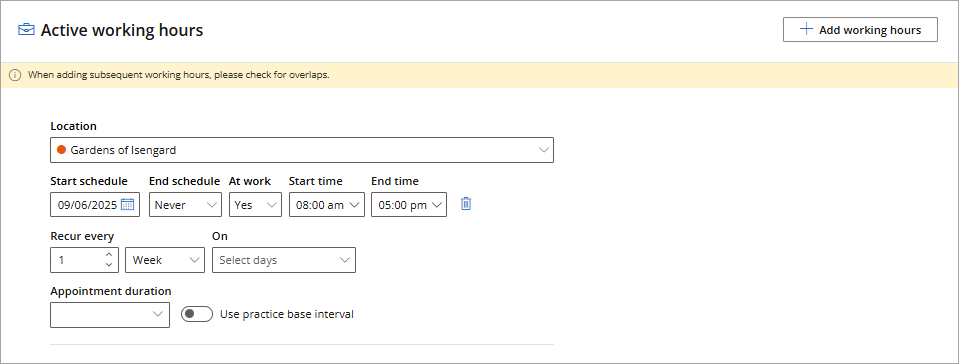
NOTE You do not need to enter lunch breaks or periods of time that the provider does not wish to see patients or clients. This can be accommodated for in Reserves.
If the provider's working hours differ throughout the week, whether by location or by day, click the On field and uncheck any days that have different opening hours to the regular opening hours you have entered.
To add additional working hours
- Click Add working hours. A new set of fields will appear.
- In the new set of fields, click in the On field and check the day or days that you want to add different hours for.
- Select the opening and closing hours for the day or days from Start time and End time.
- If the provider's work hours will stay the same week to week, leave Recur every set to 1. Otherwise, set Recur every to reflect the time that the opening hours you have entered applies to
- Add as many sets of fields as required to reflect the provider's working hours, and click Save.
Add exceptions
Exceptions are one-off instances during which the provider is not at the practice, for example, sick days, or periods of leave. Exceptions can cover a part day, multiple part days, a full day, or multiple full days.
- In the user profile, scroll to the bottom of the screen and click Exceptions. The Exceptions screen will appear.
- Click Add an exception. A new row will appear.

Part day exceptions and part day exceptions over multiple days
- Set At work to Yes.
- Set From and Until to cover the days during which the provider will be unavailable for part of the day. If the part day unavailability only covers one day, set both From and Until to the same date.
- Set the Start time and End time to reflect the time that the provider will be available for bookings that day. If the start time or end time is on a quarter hour, you can type this into the field.
- Add a reason for the exception and click Save.
Whole day and multiple day closures
- Set At work to No.
- Set From and Until to cover the days that the provider will be unavailable for. If the provider is only unavailable for one day, set both From and Until to the same date.
- Add a reason for the exception and click Save.
Add reserves
A reserve is a period of time during which the provider is not available for bookings, such as a lunch break, or time scheduled for administrative tasks. Reserved time displays as grey in the appointment book, and cannot be selected to book an appointment.
- In the user profile, scroll to the bottom of the screen and click Reserves. The Reserves screen will appear.
- Click Add reserves. A new row of fields will appear.
- Enter the date you wish to begin the reserve from in Start schedule. If you know the date you wish to end the reserve, enter the date in End schedule, otherwise leave this field set to Never.
- Set the Start time and End time to reflect the time that the provider will be unavailable for.
- Select the days that the reserve should occur on, how often the reserve recurs and the frequency the reserve recurs.
- Enter a purpose for the reserve, for example, 'Lunch Break'.
- Add any further reserves required for the provider, and click Save.

NOTE Once a provider's working hours have been set up through the user profile, you can edit the provider in the appointment book by clicking the provider's name at the top of their column.

Last updated: 09 June 2025.