
Set up Guidance-based Requesting for Imaging
What is guidance-based requesting?
The guidance-based requesting (GBR) workflow generates imaging requests based on clinical context and patient demographic data, rather than relying on broad sets of standard tests. GBR generates imaging requests that are tailored to individual patients and are less costly to the practice, by reducing the number of redundant tests included in stock test groups.
Recommended and additional tests suggested by guidance-based requesting are based on current clinical guidelines from relevant health organisations such as RACGP, Diabetes Australia, and the Heart Foundation.
Guidance-based requesting has been made available to a limited number of practices by Best Practice Software as part of a trial program. Your Best Practice Software representative will supply you with a setup file to enable GBR. Copy the setup file to your Bp Premier server, double-click the file to start the installation, and follow the instructions in the setup wizard.
You will need to supply the folder where eOrdering request files are exported from by your messaging software.
Set up eOrdering
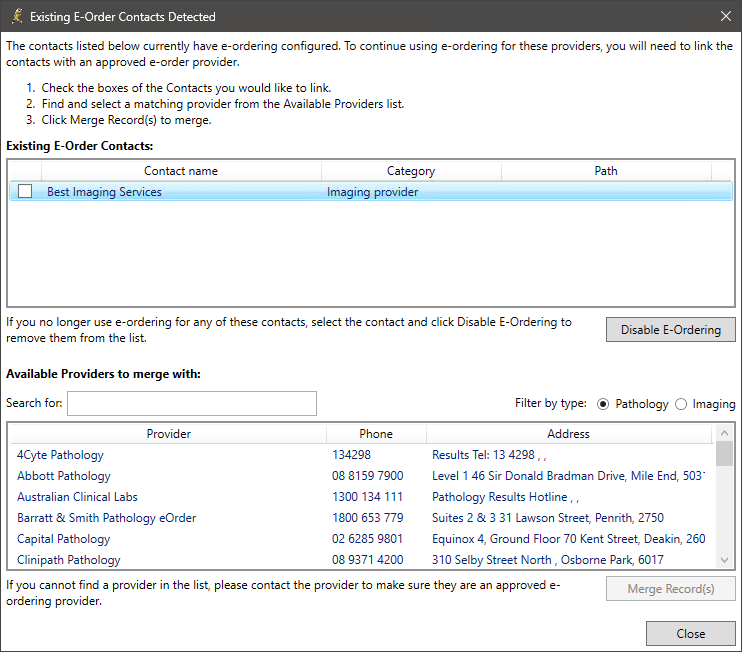
If you have existing eOrdering contacts set up in Bp Premier, when you select View > Contacts > Setup > eOrdering, the Existing eOrder Contacts Detected screen will appear and you will be asked to merge your existing contacts with corresponding providers listed on the screen.
Merge eOrdering provider contacts
Providers listed in the eOrdering setup screen are partnered with Best Practice Software, and will be added and updated regularly via Data Updates.
IMPORTANT There is a known issue in which Laboratories configured for legacy eOrdering that have been merged with enhanced eOrdering contacts, do not retain their laboratory code. Best Practice Software recommend noting the Laboratory Code prior to merging legacy eOrdering contacts with enhanced eOrdering contacts, as it will need to be entered again once the merge is complete.
- Follow the instructions on the screen to merge your existing eOrdering contacts with the listed providers.
- Once you have selected the records you wish to merge and clicked Merge Record(s), The Merge Records screen will appear.
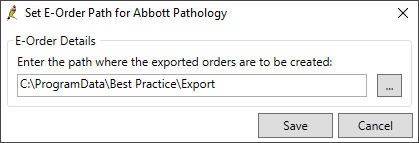
- If you did not select a primary contact in step 2, you will have the option to set the eOrder path for the provider. Enter the path that the merged eOrdering contact used previously, and click Save. If you are unsure of what path should be used, contact the provider.

From the existing contacts list, select a primary contact to retain its user preferences and eOrdering path.
When the contacts are merged, pathology user favourites, as well as preferred lab, eOrder export path, Location Lab codes, 'Use plain paper' or 'Paper has specimen labels' along with the values for the primary contact are preserved.
NOTE Perform the merge for each available provider that has corresponding existing contacts.
The Setup eOrdering screen will appear.

Managing Duplicate eOrder Contacts
The potential duplicates window will be displayed when adding a new eOrdering contact inView > Contacts > Setup > eOrdering if Bp Premier detects a laboratory contact with a similar name. Potential duplicates will be displayed for both existing eOrdering laboratory contacts and laboratory contacts not using eOrdering. The potential duplicates window allows the user to create a new eOrdering contact or merge with potential duplicates.
- From the Bp Premier home screen on your server, select View > Contacts. The Contacts screen will appear.
- Select Setup > eOrdering from the menu at the top of the page. The Setup eOrdering screen will appear.
- Search for the pathology provider you wish to configure, and click Add.
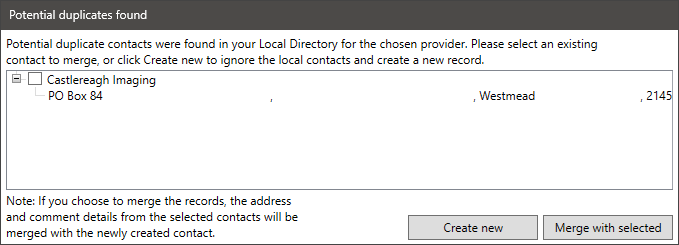
- If Bp Premier detects an existing contact with a similar name, it will display the Potential Duplicates Found window.
- If you choose to Create New, the configuration settings for the laboratory will be displayed. For information on configuring eOrdering Labs, see Configure eOrdering Providers.
- If you choose to Merge contacts, tick the box next to the Laboratory name and then click Merge with selected and the configuration settings for the laboratory will be displayed. For information on configuring eOrdering Labs, see Configure eOrdering Providers.
The potential duplicates window allows the user to create a new lab or merge with potential duplicates.
Potential duplicates will be displayed for both eOrdering laboratory contacts and non-eOrdering laboratory contacts.
NOTE By selecting to merge the records, the address and comment details from the selected contacts will be merged with the newly created contact.
Before you begin
Depending on how you wish to use the eOrdering setup screen, the following permissions are required.
|
Action |
Section |
Permission level |
|---|---|---|
|
View the eOrdering setup screen |
Contacts |
View |
|
Use the eOrdering setup screen |
Contacts |
Add/Edit/Delete |
|
Configure eOrdering preferences for all users |
User preferences |
Add/Edit/Delete |
|
Configure eOrdering preferences for yourself only |
Own preferences |
Add/Edit/Delete |
NOTE eOrdering can only be configured on the Bp Premier database server.
Install messaging software
You may need to install messaging software on each Bp Premier server or workstation that will be generating eOrders. The provider can tell you if you need to install any software (such as Fetch) and if the HL7 eOrder files need to be stored on a specific location on the machine.
Add an imaging provider
- On the Bp Premier Database Server, go to the main screen of Bp Premier and select View > Contacts > Setup > eOrdering.
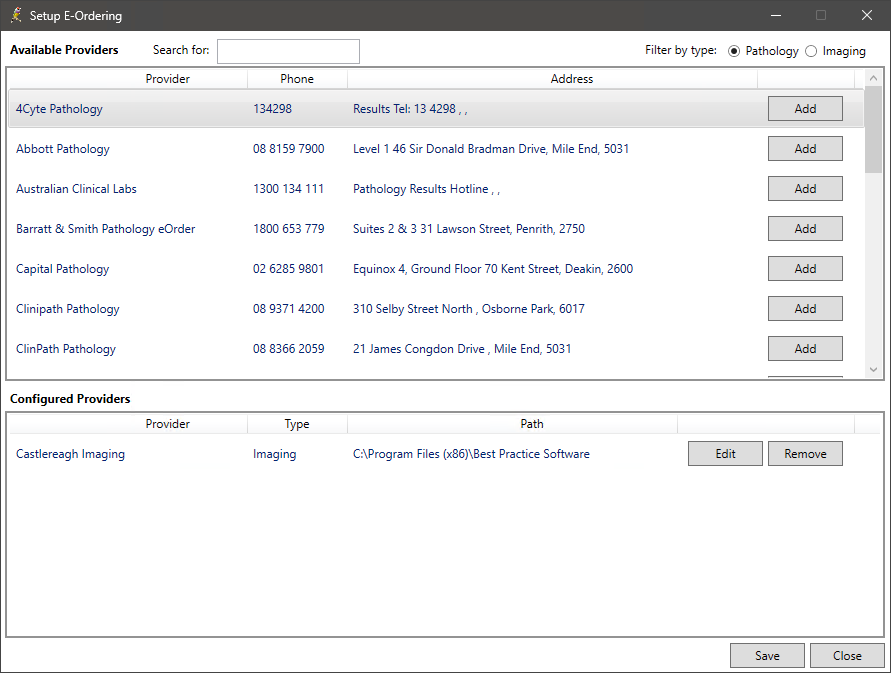
- Set Filter by Type to Imaging. A list of imaging providers will be available.
- Search for the Imaging provider you want to configure and select Add. The configuration settings for the imaging provider will be displayed.

If the imaging provider you wish to set up for eOrdering is not listed in the eOrdering setup screen, ask the imaging provider to contact the Best Practice Software Partnerships team at partners@bpsoftware.net.
Configure imaging provider details
If you have Add/Edit/Delete permissions set for User Preferences, you can add default preferences for the whole practice by configuring imaging provider details and clicking Apply to all users. You can also add preferences for other users by selecting them from the User name menu.
Once the practice defaults are set, if you have Add/Edit/Delete permissions set for Own preferences, you can change your own settings as required.
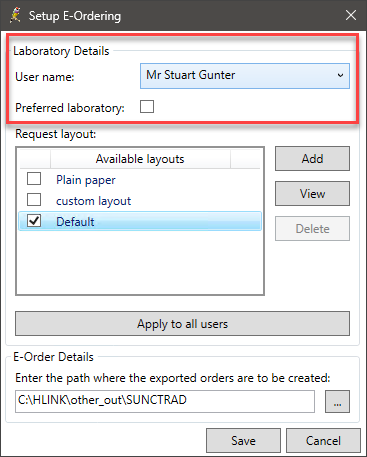
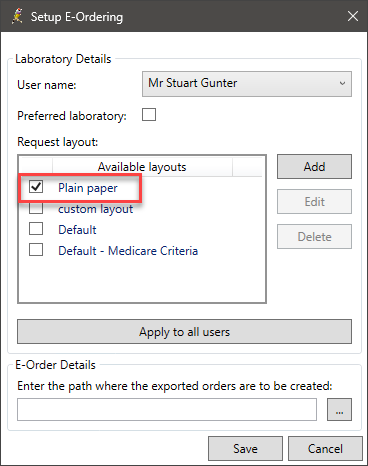
- In the Laboratory Details section, select the user from the User name: menu whose imaging provider details you want to configure.
- Tick Preferred Laboratory to indicate if the imaging provider is a preferred laboratory.
- In the Request Layout: section, select the imaging provider request form layout you want to use:
- Provided layouts will have coordinate information pre-populated. Provided layouts will be added in data updates.
- Provided layouts cannot be edited.
- Click Add. The Add Layout screen will be displayed.
- Enter a Layout name and add the measurements in mm from the top left corner of the page for each element.
- Click Save. The new layout will appear under Available layouts.
- Click Apply to all users to apply the current imaging provider details to all users.
|
Field |
Action |
|---|---|
|
Plain paper |
If the laboratory does not supply pre-printed stationery, tick Plain Paper. |
|
Default |
If the imaging provider requires the use of preprinted stationery and has supplied a layout, that layout will be referred to as Default. |
|
Custom layout |
If the imaging provider requires the use of preprinted stationery and has not supplied a layout, you will have to create a layout that suits their stationery.
|

Configure preferred address details for a laboratory
To help patients identify their nearest laboratory, providers can include the address of a nearby preferred laboratory on printed copies of eOrdering requests.
- Select View > Contacts or press F11 from the main Bp Premier screen. The Contacts screen will be displayed.
- Search for the Pathology or Imaging Laboratory and click Edit.
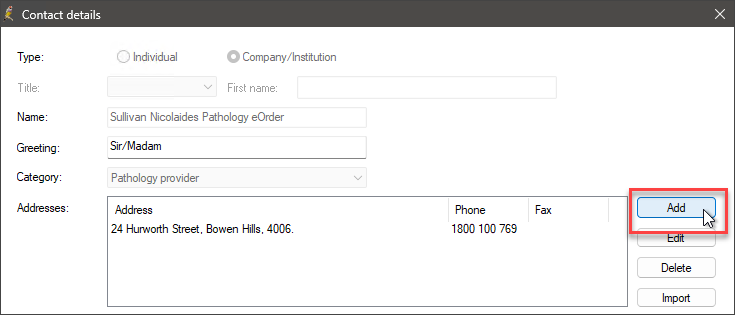
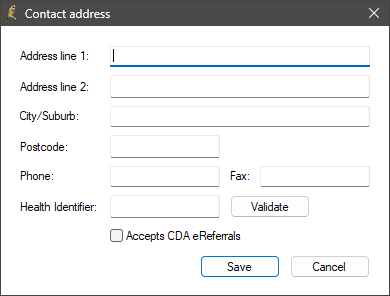
- Click Add. The Contact Address screen will appear.
- Enter the address details for the preferred local laboratory and click Save.
- The newly Added address and Contact information will appear on the Printed eOrdering request when the laboratory layout is set to Plain paper.
- From the Contacts screen, select Setup > eOrdering from the menu at the top of the page. The Setup eOrdering screen will appear.
- Select the laboratory from the Configured Providers and click Edit.
- If all providers use the Plain Paper format, click Apply to all users; otherwise, configure each relevant user individually, then click Save.
- Click Save on the Setup eOrdering screen to confirm the changes.
Based on the information the laboratory has given to Best Practice Software, the Addresses section will already have one address filled in.
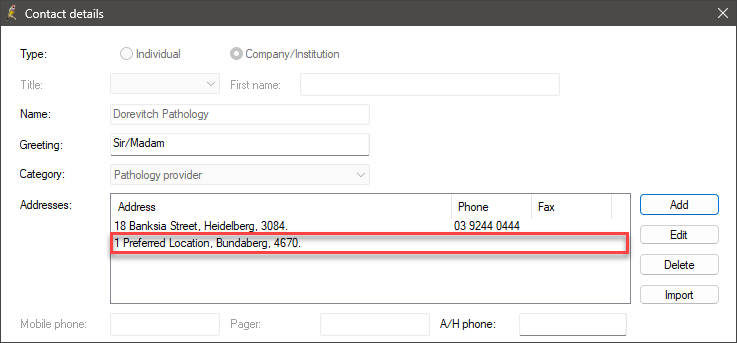
NOTE There is no restriction on how many additional addresses can be added to a contact. However, only one of them will be visible on the eOrdering request. The address will be taken from the first custom entry made in the address details.
NOTE Users must first log out of Bp Premier and then log back in for the updates to take effect.
Configure eOrder details
- In the Setup e-Ordering screen, go to the e-Order details section and click on the ellipsis to choose the location where the exported orders are to be created.
- Click Save.

The imaging provider can tell you if eOrder files need to be in a specific folder.
If the nominated folder does not exist, Bp Premier will create the folder.
Some labs may supply a default eOrder path, so if the field is pre-populated, then this is the default path set by the lab. It is recommended that you keep the default eOrder path if one has been supplied.
The outgoing file path for exported eOrders should be communicated to your Messaging Provider. The software used by your Messaging Provider may require that the outgoing file path be recorded directly within their system.
The imaging provider has been set up and will be displayed in the Configured Providers section of the Setup E-Ordering screen.
Testing eOrder generation
- Test creating an eOrder request from both the Server and a Client Machine after setting your eOrder provider.
- Before making requests, make sure the BP Messaging Service is set up and operational. See Troubleshoot Bp Messaging Service for more information.
- Confirm that the ORM HL7 files are being successfully generated to the file path set for the lab.
- The Bp Script file provided below displays the eOrder records and reports their status, allowing you to determine whether the creation was successful or encountered an issue that led to failure.
- Download the Display_eOrderLog_Status.bpscript file.
- Run the downloaded script on the Bp Premier server using the Bp Script Runner Utility. Instructions on running Bp Script Runner are available here.
Enable clinical context ordering
- Log in as a user with permission to update user preferences.
- From the Bp Premier main screen, select Setup > Preferences. The User Preferences screen will appear. Select the Imaging tab.
- If you are enabling GBR for a provider other than yourself, select the provider from the User name drop down at the top of the screen.
- Tick Use Clinical context ordering for Sonic imaging providers.
- The pop up red flag window will be ticked by default. If this option is ticked red flag windows will appear when some contexts are selected, allowing you to add further details.
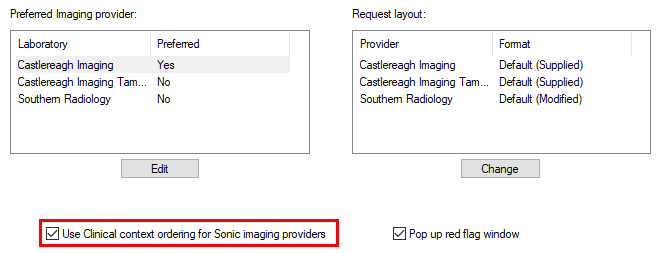
Pop up red flag window
Set the default imaging provider
This step is optional, but if you only use one imaging provider for GBR requests, setting a default provider will automatically select this provider in the Request Imaging screen.
- From the Imaging tab in the User preferences screen, select the GBR imaging provider you created from the Preferred Imaging Provider list.
- Click Edit. The Preferred Laboratory popup appears.
- Tick Preferred Laboratory and click Save.
- Click Save to save user preferences.
Configure email
This step is optional, but you need to configure an email server in Bp Premier if you want to send feedback about clinical context requesting.


 AU
AU 