medEbridge is a UHG proprietary system that communicates between the Bp Premier server and UHG to electronically complete insurance reports. The electronic capability reduces the time required to complete an insurance report. The medEbridge system is a secure and efficient means of transmitting the information you provide to UHG about your patients.
In this article:
How medEbridge works
UHG report requests are handled in a similar manner to other requests. After medEbridge is set up, requests to complete a report from UHG are received by the practice in the Incoming Reports screen and the provider Inbox. Requests are allocated to a doctor and patient if an exact match is found in the database based on the details in the incoming request. If a match cannot be made, you must allocate the request to a provider manually.
Once a request is in a provider's inbox, the provider answers and submits the report, which is marked as 'completed' and a copy retained in the patient record.
If your practice uses medEbridge, it is good practice to set up a regular procedure to handle unallocated incoming UHG requests, such as part of regular end of day or end of week activities.
Activate medEbridge after a Bp Premier upgrade
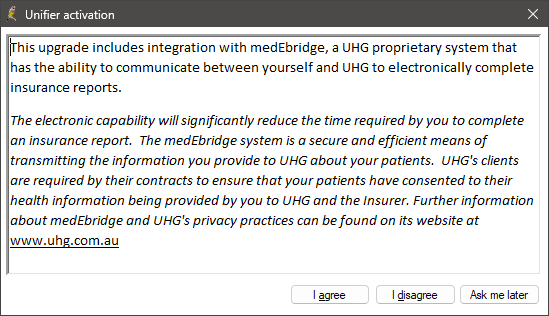
If you have just upgraded to the latest version of Bp Premier, you may be prompted to confirm medEbridge usage when you first log in.
- Log into Bp Premier after upgrading. The Unifier activation screen may appear.
- Select I agree to activate medEbridge. A screen will prompt you to check your practice details to ensure that you have the correct details entered.
- Select Setup > Practice details.
- Select the practice location that receives incoming UHG reports from the Practice locations list. Check the details are correct in the bottom field.
- UHG will contact you to finalise your registration and you will be sent an activation confirmation email. This email will provide information on how to enter your UHG login password into Bp Premier.

The system uses this information to transmit a request to the medEbridge system for registration. The request includes your site ID, practice name, email address, and phone number.
If you select Ask me later, the next time you log into Bp Premier, you will be prompted again whether you would like to use medEbridge.
Activate medEbridge at any time
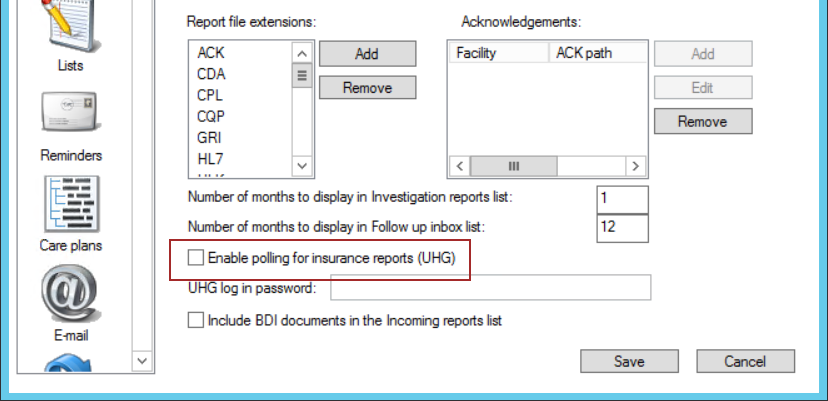
- Log in to Bp Premier the server and select Setup > Configuration from the main screen.
- Select the Results Import tab.
- Tick the Enable polling for Insurance reports (UHG) tick box and ensure that the UHG log in password field is blank.
- UHG will contact you to finalise your registration and you will be sent an activation confirmation email. This email provides information on how to enter your UHG login password into Best Practice.

Change the default medEbridge polling frequency
By default, the medEbridge servers will be polled every 30 minutes (48 times per day) by Bp Service. Edit the configuration file to increase or decrease the polling frequency.
- Browse to the folder C:\Program Files\Best Practice Software\BPS\BPSupport on the server.
- Open the file called BPService.exe.config in Notepad or a text editor.
- At the top of the file is an entry:
- Increase the value '48' to poll more frequently, or to poll less frequently, decrease the value.
- Save and close the file.
- Go to Windows Services and restart the service Best Practice Service.
<add key= MedEbridge_PollsPerDay value = 48 >
Allocate a medEbridge request to a doctor
- From the Bp Premier main screen, select View > Incoming Reports . All results and documents that have been imported but not yet actioned will be displayed.
- Tick Show unallocated only to show only incoming reports not allocated to a doctor or patient.
- Look for items where the Test column shows MedEbridge Information Request. The Addressed to column will show the doctor to whom the request was made.
- Select a MedEbridge item and click Allocate to User at the bottom of the screen. Select the doctor that this request should be allocated to. If you want Bp Premier to remember the allocation next time, tick Make this a permanent alias.
- Click Save to return to the Incoming reports screen.
The request can now be processed from the doctor's Inbox.
Process a request
IMPORTANT UHG’s clients are required by their contracts to ensure that their patients have consented to their health information being provided by you to UHG and the insurer. Further information about medEbridge and UHG's privacy practices can be found at the UHG website www.uhg.com.au.
- Press F3 or select View > Inbox to open a provider's Inbox. Select a request titled MedEbridge Information Request in the list of unprocessed items.
- Click View Request at the bottom of the report to open the Insurance medical report wizard. The first screen in the Insurance medical report wizard is the Payment screen.
- Press Preview report to preview the list of questions in the report.
- If the patient has not yet given consent, click Patient Consent Form at the bottom of the screen to display the consent the patient has given for the doctor to complete the questionnaire.
- Click Accept to proceed through the rest of the wizard.
- If you click to accept, the wizard will walk you through a series of questions relating to the patient. Use the Next and Back buttons to move through the wizard. Click Save and close to save your progress and come back to complete the questionnaire later on.
- The second to last screen on the wizard is the Requester Directions page. There may be a question at the top asking to provide additional clinical information. Under this is a text box for answers to these questions.
- The bottom section of the screen has tabs for each of the main sections of the patient record. Select a tab to include the information to be sent in your report or click Include all displayed data. Use the slider to limit the data for a certain range of years.
- Click Next to go to the Confirmation screen, which shows the answers to all questions. You can still click Back to change answers to questions or select different records.
- If you are sure you have completed the questionnaire, click Submit to transmit the report to UHG in the background. You can continue to work in the Inbox or anywhere else in Bp Premier.
If you do not wish to proceed or do not agree with the terms of payment, click Unable to proceed, select a reason from the drop-down list, and click Submit. The request will be removed from your inbox.
If the request has been submitted successfully, a message will appear as confirmation and the request will be removed from your inbox. Two documents will be created in the correspondence out section of the patient record: UHG Clinical Data Submissions and UHG Submissions Question and Answers.
Troubleshooting medEbridge
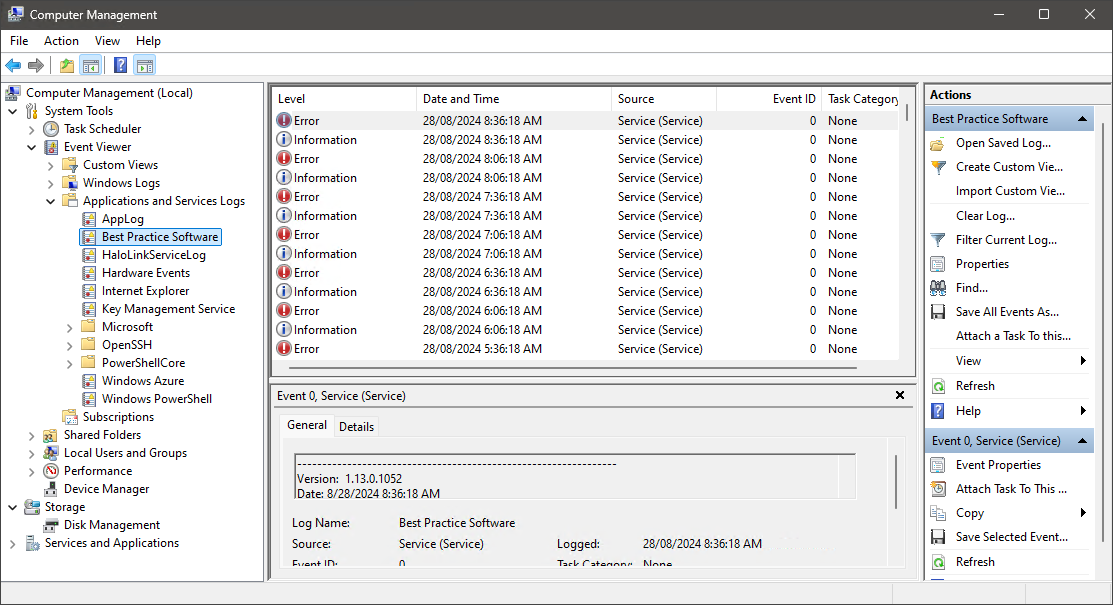
Use the Windows Event Viewer to view error events
The Windows Event Viewer on the server contains all of the event logs for Bp Premier, including error events regarding the medEbridge functionality.
To view the Windows event viewer, select Start > Control Panel > Administrative Tools > Event Viewer. Contact your practice's IT services provider if you are unsure about accessing the Windows event viewer.

Bp Premier connecting to the medEbridge TLS 1.0 endpoint
Security changes were made as part of the Orchid program update to Bp Premier to the endpoint utilised by medEbridge. This security change moved from a TLS 1.0 to a new TLS 1.2 endpoint.
For this change to occur, the Bp Premier configuration file will be updated during the program updates for Bp Premier, starting from the Bp Premier Orchid release.
From the 31 October 2024, the old TLS 1.0 endpoint will be shut down. Sites still communicating with the TLS 1.0 endpoint after this date may experience issues where they no longer receive UHG reports. This can occur in environments where the Bp Premier configuration file has not been updated, potentially due to the logged-in Windows user not having sufficient file permissions to update the configuration file to the latest version.
Resolution
To update the configuration file, manually remove the contents of the VirtualStore folder and allow Windows to recreate it with the latest version of the files.
Perform the following steps on each affected workstation:
- Browse to the VirtualStore folder for the affected Windows user profile.
- Delete the Best Practice Software folder containing the outdated VirtualStore files for Bp Premier.
- Right-click the Best Practice Software shortcut on the desktop and click Run as Administrator.
C:\Users\%USERPROFILE%\AppData\Local\VirtualStore\Program Files\Best Practice Software
NOTE If the practice uses Terminal Services, these steps must be performed for each affected Windows user profile.
IMPORTANT Before proceeding, Best Practice Software strongly recommends taking a backup copy of the files that will be deleted.

Last updated: 28 August 2024.