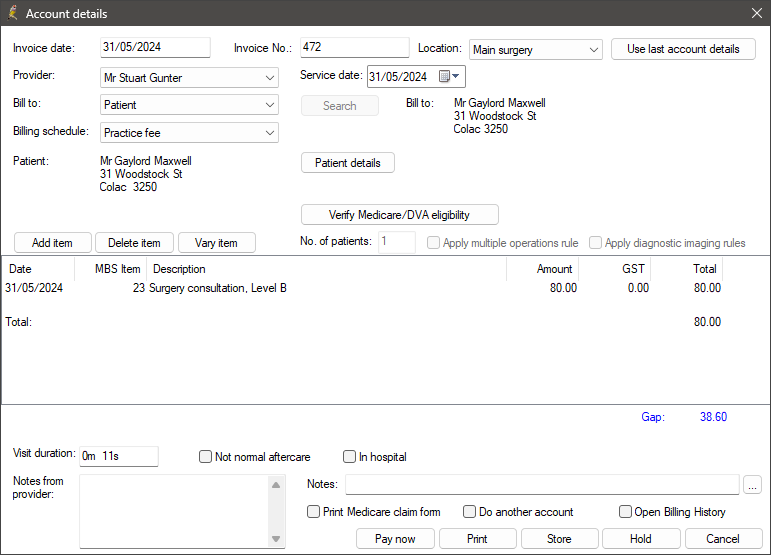
This article describes how to create an account for a patient after the doctor has finished a consultation.
What status indicates that an appointment can be billed?
The appointment book status shows if the doctor has finished the consultation with the patient:
- With doctor — If the billing status is 'With doctor', the provider has not yet finalised the visit.
- At Billing — After a visit has been finalised by a provider, the status of the appointment in the appointment book and waiting room changes to 'At Billing'. The appointment will be shaded in green.
If you select Create account from an appointment with this status, the Add account item screen will be displayed instead of the Account details screen. This screen allows items to be added to the account, but you cannot create an account until the visit is finalised.
You can now create an account using the details from the provider's finalisation. If necessary, you can also pay an account later from the Patient Billing History screen.
Create an account
- To create an account from the Waiting Room or Appointment Book, choose one of:
- select the appointment and click the Create Account toolbar icon
- double-click the appointment
- select the appointment and press Ctrl + F3 on the keyboard
- select the appointment and click the Create account button at the top of the window
- right-click on the appointment record and select Create account
- select the appointment and select Billing > Create account from the menu.
- All details except the Invoice date and Invoice No. fields can be modified before the account is finalised:
- The Provider, Bill to, and Billing schedule can be changed
- Edit Patient details prior to the account being finalised by clicking the Patients details button.
- To bill additional items, click the Add item button and complete the details in the Add account item screen.
- The final step is to process the account and enter payment details. The buttons for processing the account are along the bottom right of the screen:
- After an account has been created for an appointment, the status of the appointment will change to 'Completed' and the appointment will be shaded in grey.
- Account creation is complete. The invoice can be paid now or later.
The Account details window will appear with the information specified by the provider when the visit was finalised.

For more information on the fields in the Account details screen, see Create a simple account
TIP Medicare rules mean that it is not possible for two consultation items to be added to the one account. The Account details screen will delete any existing consultation item number if you add a new consultation item.
|
Button |
Description |
|---|---|
|
Pay now |
Select this option if the account is being paid immediately. Bp Premier will save the invoice and display the Payment details screen so that the receipt can be created. |
|
|
Select this option to save the invoice and print a copy of the account for the patient. To print the Medicare Claim form for the patient, tick the Print Medicare claim form check box before you click Print. If the account is a Medicare or DVA account, the Medicare Assignment form will be printed, otherwise, the standard invoice will be printed. |
|
Store |
For Medicare and DVA accounts, this option stores the account for batching. Do not use Store for bulk bill accounts that aren't finalised, because Store will make the account available to be batched. Use Hold for accounts that will be finalised later. For private billings, if you select this option, the account can be completed and processed later. However, Hold should be used instead. |
|
Hold |
Select this option to save the invoice with a Held status. The invoice will be highlighted in green in the Patient Billing History screen, but will not include outstanding totals. The invoice will also not be listed when using the Process Payment screen and will be excluded from totals in management reports. Held accounts can be finalised using Management > Held accounts or by adjusting the account in the Patient Billing History screen. |
|
Cancel |
This option will cancel the account creation or undo any changes made to an existing account. |
What do I do next?
Last updated: 02 August 2023.