Bp Premier's internal messaging allows users to send a message to other users or groups of users who also use the software.
To set up messaging groups, a user needs the Setup/Configuration permission. To send and receive internal messages, a user needs the Messages permission set to 'Allowed'.
If a user has unread messages, a small pop-up will appear in the bottom corner when they log in to Bp Premier.
Internal message usage
You can use Bp Premier's internal messaging system in any way that best suits your practice's inter-staff communications. However, internal messaging is not intended to be a permanent record of communications, like contact notes. Old messages should be cleaned up frequently to minimise database size. See Clean up messages for more information.
Care should also be used when messaging clinically sensitive information between providers. Use the Link to patient function to insert a message automatically and permanently in the patient record when a recipient provider opens the message. See Link to patient for more information.
Set up messaging groups
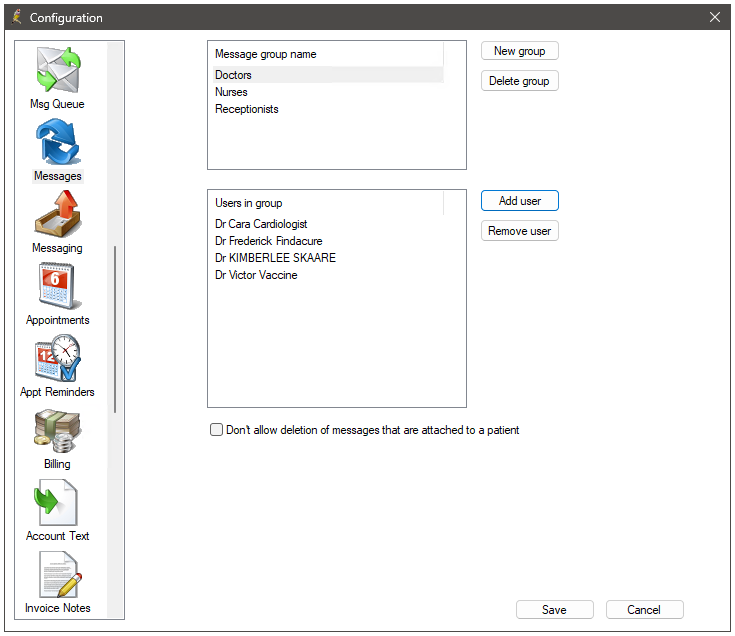
- Select Setup > Configuration > Messages.
- Click New group. Enter a name for the group and click Save.
- Select the group name in the top section and click Add user. The Select message user screen will appear.
- Select a Location to show only users from that location.
- Select the users to be included in the group and press Select.
- Tick Don't allow deletion of messages that are attached to a patient to prevent patient-related messages from being cleaned up.
- Click Save to save the group.

Send a message
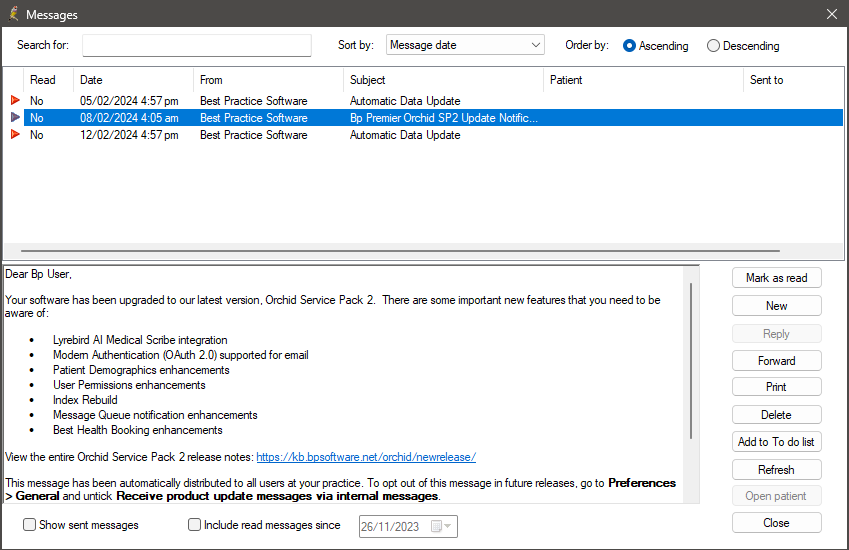
- Select Utilities > Messages or press F8 from the main screen, appointment book, or patient record. The Messages window will appear.
- Select Show sent messages and Include read messages to include sent and read messages in the list.
- On the right hand side of the screen is a list of buttons for actioning messages:
-
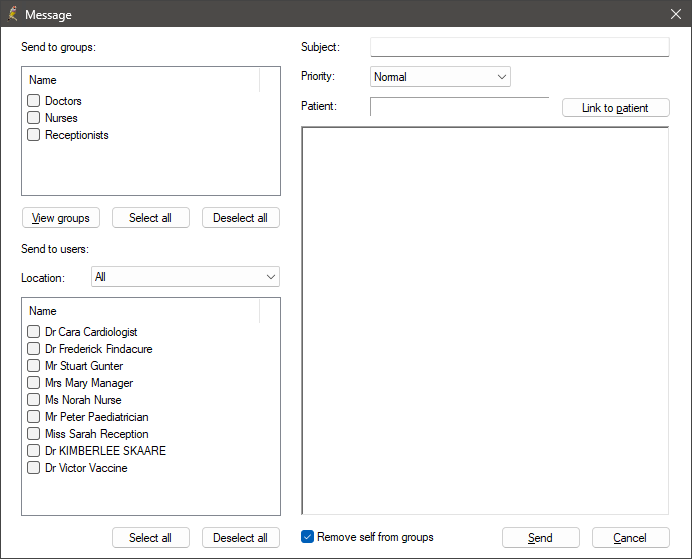
If you select New, Reply, or Forward, the Message window will appear.
- Select one or more groups to send to groups, or select users to send to users. You can select both.
- If you are sending to users, select a Location to filter the user list to that location only.
- Enter a subject and select a priority for the message.
- Enter the body of the message in the text box. You can include hyper links as part of the message body text.
- If you are part of a send group, you will receive the message unless you untick Remove self from groups.
- Click Send.

This screen shows messages received by the logged-in user that have not been actioned or marked as read.
|
Button |
Action |
|---|---|
|
Mark as read |
Mark the selected message as read. |
|
New |
Create a new message. |
|
Reply |
Reply to the selected message. |
|
Forward |
Forward the selected message to other users. |
|
|
Print the selected message. |
|
Delete |
Delete the selected message permanently. |
|
Add to To do list |
Adds the selected message to your To do list. This will copy the text from the message into the comments section of the new To Do List item. |
|
Open patient |
If the selected message relates to a patient, open the patient record and place a copy of the message text into the patient's visit notes. |
|
Refresh |
Refreshes the messages window to see if any new messages have arrived while the window has been open. |
|
Close |
Closes the window. |

Link to patient
If a message is patient-related, click Link to patient to associate a patient with the message.
When the recipient opens a linked patient from a message, the contents of the message with a time stamp are copied into the patient's notes for reference. If the original internal message is deleted, the notes will not be deleted.
Search messages
Use the Search for: field to search for messages based on:
- message subject
- from user (unless searching on sent messages)
- sent to user
- patient.
When searching on users or patients, search by surname first, split with a comma (for example: Doe, John).
Use the Sort by: menu to sort messages by:
- message date
- From user
- patient
Use the Ascending and Descending radio buttons to select the order in which the messages are sorted.
Clean up messages
Best Practice Software recommend that received and sent messages that have been actioned be cleared on a regular basis, such as weekly, to help minimise database size.
To manually bulk-delete messages, use SHIFT + or CTRL + click to select multiple messages and click the Delete button on the right side to delete messages. Tick Show Sent Messages button to include sent messages in the deletion.
A Delete messages utility is also available in Bp Utilities to delete all received messages for one or more doctors. You will need Setup/Configuration permission to use this utility. The utility will not delete sent messages, however, which will require manual deletion through the Messages screen.
NOTE Messages deleted from the Messages screen or the Delete Messages bulk utility will be deleted permanently. Any notes inserted into a patient record from the Link to Patient function will remain in the patient record.
Last updated: 06 June 2023.