You can save the results from a query to an XML or CSV formatted file, and use a spreadsheet or other application to extract or reformat the data. Note that exporting a set of query results is not the same as exporting patient data; you are only exporting the columns shown in the bottom half of the Database search screen.
In most cases you will save the export file as a .csv file, which is easier to manipulate and extract data. If you are importing the results into an XML or HTML editor, or converting to a format like JSON, XML is a better format to export to.
Save the results of a query to file
- Create or load a query from the Database search screen, and run the query.
- Click the disk icon in the toolbar, or select File > Save. The Save As screen will appear.
- Replace the default File name with a meaningful file name, so you can recognise the results file.
- Select the file format from the Save as type field: XML, CSV, or tab delimited. Select 'CSV' if you intend to use the results in a spreadsheet application.
- Click Save.
Import into Excel
Bp Premier preserves leading zeroes in the export file. However, if you import a .csv file into Microsoft Excel, by default, Excel truncates leading zeroes so that the first digit is a non-zero number. This will result in any phone numbers with leading zeroes being truncated during the import and invalidating the phone number.
As one option to manage this, you can change the data type of imported phone numbers from numeric to text.
- Open a blank document in Microsoft Excel.
- Select the Data tab from the ribbon up to top. From the Get & Transform Data panel, click From Text/CSV. A file explorer will open.
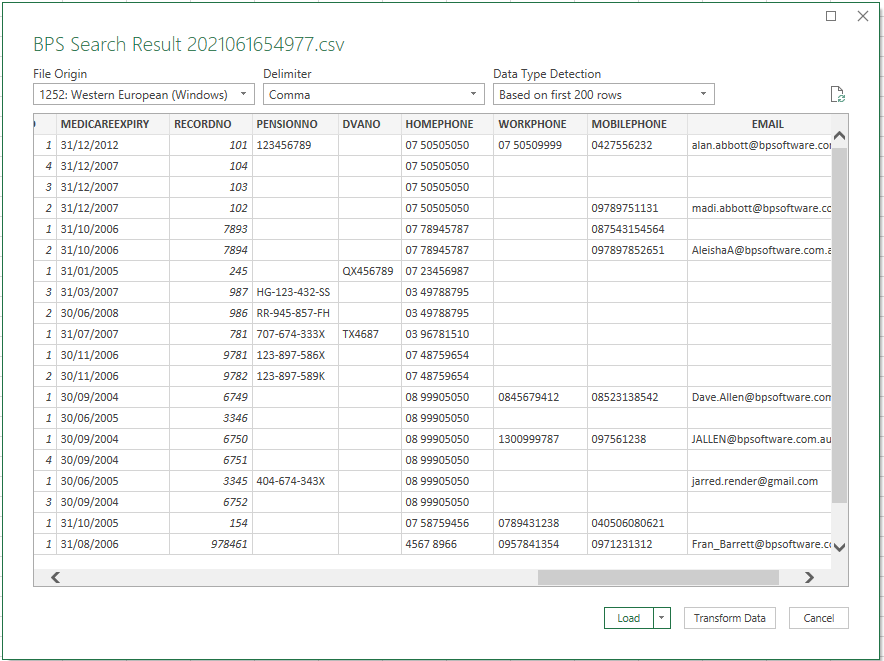
- Browse and select the database query export file you want to import. Click Import. Excel will pause while it processes the file and will open a data transform window.
- Click Transform Data. Excel Power Query Editor will open the file.
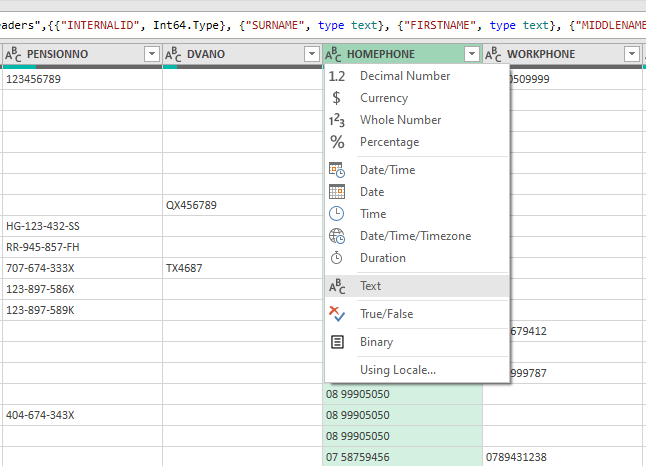
- In Power Query Editor, click the ABC icon at the left of a phone column.
- Select 'Text' from the drop down.
- Repeat for all phone number columns.
- Click Close and Load in the top left. Excel will import the .csv file with preserved spaces for the columns you set to text.


If you wish to obtain a list of email addresses for patients from a search result, click the column heading in Excel, or click and select a group of cells, and copy the Email column in the spreadsheet application. For phone numbers, copy one of the Phone columns.
This Microsoft Office Knowledge Base article provides more information on using Excel's Power Query function to preview and format data columns prior to import. If you use a different spreadsheet application, consult that application's help for information on preserving leading zeroes when importing.
Related topics
Last updated: 14 August 2023.