This article describes how to configure the HICAPS terminal in Bp Premier. HICAPS offers integrated Medicare Easyclaim, integrated Medicare Online, integrated EFTPOS, and integrated EFTPOS Refunds.
The integration of HICAPS and Bp Premier brings an exciting new era in the healthcare sector. HICAPS has consistently evolved its services in response to the dynamic requirements of practitioners and patients, maintaining its position as a market leader. HICAPS integration with Bp Premier offers general practitioners access to the same dependable and long-standing claiming solutions that more than 90,000 allied health providers have used for the past 25 years.
Visit the HICAPS website to learn more about the difference HICAPS can make in your practice.
Bp Premier and HICAPS offer the following functionality:
- integrated Medicare Easyclaim (Patient claiming rebate paid via the EFTPOS Terminal).
- integrated Medicare Online (Patient claiming rebates paid via EFT to the patient's bank account within the next 2-3 business days).
- integrated EFTPOS (payment by EFTPOS and Credit Card).
- integrated EFTPOS Refunds (refund payments to EFTPOS and Credit Cards).
Integrated Medicare Easyclaim
Use HICAPS to transmit patient claims via Medicare Easyclaim for private patient accounts. When a patient pays through the Integrated HICAPS solution, the payment and the claim are submitted one after the other in real-time.
Medicare will assess the claim, and if it is approved, the patient can use an EFTPOS card to receive the rebate directly into their bank account for fully or partially paid accounts.
To send private patient claims to Medicare via Easyclaim, tick the Send via Easyclaim check box before paying the account.
Visit the Services Australia website to learn more about Medicare Easyclaim..
Integrated Medicare Online
Use HICAPS Integrated EFTPOS to process payments for private patient accounts and then submit the claim to Medicare using the Patient Claiming functionality in Bp Premier.
Medicare will assess the claim, and if it is approved, Medicare will deposit the rebate amount directly into the patient's bank account for fully or partially paid accounts.
To send private patient claims to Medicare via Patient Claiming, tick the Send via Patient Claiming check box before paying the account.
Visit the Services Australia website to learn more about Patient Claiming.
Integrated EFTPOS Payments
Use HICAPS Integrated EFTPOS to process EFTPOS and Credit Card payments for custom item numbers and private patient accounts.
Integrated EFTPOS Refunds
Use HICAPS Integrated EFTPOS to refund EFT payments directly to the patient's EFTPOS or Credit Card.
IMPORTANT HICAPS Integrated EFTPOS can only be used to refund payments in Bp Premier. Bp Premier does not support the cancellation of Medicare Easyclaim rebates; cancellation must be arranged with Medicare directly. See Cancel processed Medicare rebates for more information.
Before using HICAPS with Bp Premier, you must perform the following configuration. Some of the steps may require contact with HICAPS support. Bp Premier Support cannot assist with the installation of HICAPS hardware or software.
- Ensure Bp Premier version Spectra or later installed on the server and all workstations.
- Apply for a HICAPS terminal (if you already have one, proceed to the next step).
- Register for a HICAPS Digital account (if you already have one, proceed to the next step).
- To configure HICAPS for Provider Bank Accounts, you must also register your Practitioners as merchants.
- Download and install HICAPS Connect for GP on each workstation that will be used to process HICAPS transactions.
- Download and install the Bp Payments Utility on the server as well as on each workstation that will connect to HICAPS.
- Activate HICAPS as a payment integrator in Bp Premier.
- Configure HICAPS payment integration for practice and provider bank accounts.
- As part of this step, you’ll generate API keys through the HICAPS Digital portal, which are required for authentication.
Steps 6–8 are described below.
HICAPS functionality within Bp Premier requires a persistent internet connection on any machines you process payments from.
NOTE The Bp Payments Utility must be installed on the server as well as on each workstation that will connect to HICAPS.
Bp Premier integrates with HICAPS via the Bp Payments Utility. This utility is separate from Bp Premier and when installed, can be found in your system tray on your Windows desktop on the right-hand side of your taskbar.
![]()
- The Bp Payments Utility can be installed by navigating to Setup > Configuration > Payments. In the About Payment Integration section, click Install Bp Payments Utility.
- A progress bar is displayed during the download of the Bp Payments Utility, and installation commences as soon as the download is complete.
- The Bp Payments Utility will be visible in your taskbar.
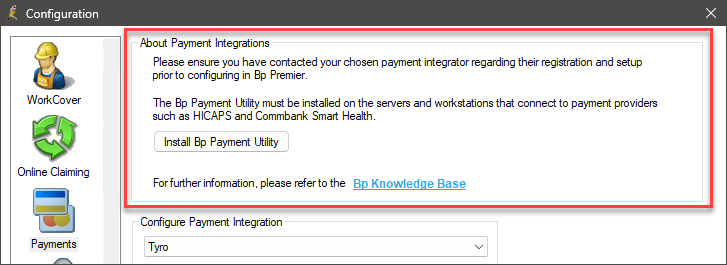

NOTE If you're using a terminal server, you may need to configure the Bp Payments Utility on each user session
How can I upgrade the Bp Payments Utility?
When an update is available for the Bp Payments Utility, an alert will be displayed to users.

- Click Update to apply the most recent version of the Bp Payments Utility.
- Updates to the Bp Payments Utility must be installed on the server as well as each workstation that has the Bp Payments Utility installed.
See Bp Payments Utility Release Notes for more information.
NOTE The Bp Payments Utility requires administrator level permissions to update.
Activate HICAPS Payment Integrations
- Log in to Bp Premier and navigate to Setup > Configuration > Payments.
- In the Configure Payment Integration section, select HICAPS from the drop down list.
- Tick Activate Payment Integration.
- If you want HICAPS to be your default payment method, tick Set as default payment integration. See Configuring Multiple Payment Integrations for more information.
- Tick Activate Easyclaim Private Patient Claiming. HICAPS Easyclaim allows rebates to be paid instantly to the bank account associated with a patient's EFTPOS card.
- Click Save.
When a payment integration is activated for the first time, the Set as default payment integration check box is automatically selected and the option will be greyed out.
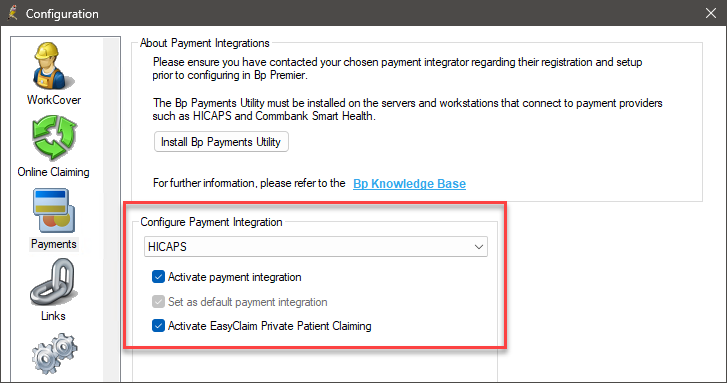
NOTE If you activate Medicare EasyClaim, you must add each provider to your HICAPS terminal. To learn more about adding providers to the HICAPS terminal, visit the HICAPS Support Hub.
Set the default Payment Type
- Select Setup > Configuration from the main Bp Premier screen. The Configuration screen will appear.
- Select the Billing tab.
- The Payment type field determines the active payment type when you first open the Payment details screen. The default is 'Cash'. Set this field to 'EFT' if you regularly use HICAPS for payments.
- Press Save to update billing settings.

This section describes how to configure Practice and Provider Bank Accounts in Bp Premier for HICAPS integration.
- Configure HICAPS for Practice Bank Accounts
- For a single merchant setup (with all funds deposited into the practice's bank account), only a Practice Bank Account needs to be configured.
- Configure HICAPS for Provider Bank Accounts
- For a multi-merchant setup (where funds are deposited into individual Provider Bank Accounts), both the Practice and Provider Bank Accounts must be configured.
Before you begin
To configure a Practice Bank Account in Bp Premier for HICAPS integration, the following steps must be completed:
- Each workstation used to connect to HICAPS must have the Bp Payments Utility installed and running.
- Before generating the HICAPS API Keys, ensure that you have everything you need to configure both the HICAPS Connect Extension and Bp Premier, as simultaneous authentication is required. For a detailed guide on generating the HICAPS API Key and authenticating the HICAPS Connect extension, visit the HICAPS Support Hub.
Configure HICAPS for Practice Bank Accounts
To configure the Practice Bank Account in Bp Premier:
- Ensure the Bp Payments Utility is running in your taskbar. If the utility is not running you can start it by navigating to C:\Program Files (x86)\BP Payment Utility and double-clicking BpPaymentsUtility.Wpf.exe.
- Log in to Bp Premier and navigate to Setup > Configuration > Bank Accounts.
- If the practice has only one bank account, you only need to edit the Practice account. Select the practice account listed in the top section and click Edit. The Bank account details screen will appear.
- In the Payment Integration Details section, select HICAPS from the Payment Integrator drop down.
- Click Authenticate. The Bp Payments Utility will launch the Authentication screen.
- Enter the primary merchant API key and API Secret.
- Click Connect. Bp Premier will connect to HICAPS and return the MID number if the connection is successful.
- Click Configure to set the default terminal. The Bp Payment Utility will launch the Configure Terminals screen.
- The default terminal column will display a drop down list of all available HICAPS terminals detected on your network. Select a default terminal for the Global default and each workstation.
- Click Test Connections.
- Click Ok. The global default terminal will be displayed in Payment Integrations Details.
- Click Save.
- If you have multiple practice accounts, repeat steps 3-12 for each account, using the HICAPS API key and API Secret credentials for the associated bank account.
![]()
Payment Integration Details will not be displayed in Bank Accounts if your Practice has no active payment integrations.
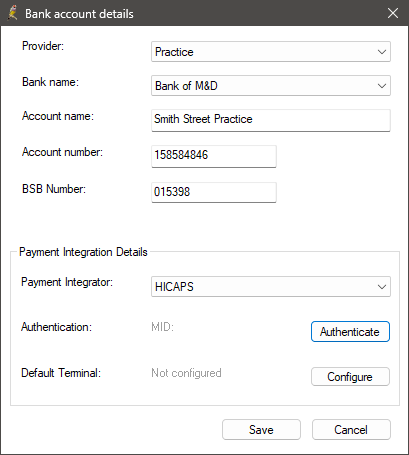
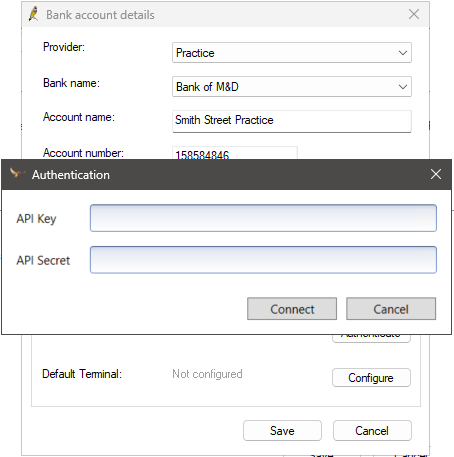
NOTE This is the same primary merchant keys you have generated from HICAPS Digital and used in the HICAPS Connect Extension.

The workstation column will display a Global Default that cannot be removed, as well as a list of all workstations that have the Bp Payment Utility installed.
NOTE Practice Bank Accounts must have a default terminal configured. Provider Bank Accounts are not required to have a default terminal configured.
The terminal status text displayed next to the workstation will read Online if the terminal connection test was successful.
If the terminal connection test failed, the terminal status text displayed next to the workstation will read Offline, along with the duration the terminal has been offline.

Before you begin
To configure Provider Bank Accounts in Bp Premier for HICAPS integration, the following steps must be completed:
- Each workstation used to connect to HICAPS must have the Bp Payments Utility installed and running.
- Before generating the HICAPS API Keys for individual providers, ensure that you have everything you need to configure both the HICAPS Connect Extension and Bp Premier, as simultaneous authentication is required. For a detailed guide on generating the HICAPS API Key and authenticating the HICAPS Connect extension, visit the HICAPS Support Hub.
Configure HICAPS for Provider Bank Accounts
To configure the Provider Bank Accounts in Bp Premier:
- Ensure the Bp Payments Utility is running in your taskbar. If the utility is not running you can start it by navigating to C:\Program Files (x86)\BP Payment Utility and double-clicking BpPaymentsUtility.Wpf.exe
- Log in to Bp Premier and navigate to Setup > Configuration > Bank Accounts.
- Select the Provider Account and click Edit. The Bank account details screen will appear.
- In the Payment Integration Details section, select HICAPS from the Payment Integrator drop down.
- Click Authenticate. The Bp Payments Utility will launch the Authentication screen.
- Enter the API key and API Secret for the secondary merchant that you have generated from HICAPS Digital.
- Click Connect. Bp Premier will connect to HICAPS and return the MID number if the connection is successful.
- A default terminal is not required for Provider Bank Accounts. However, if you want to set a default terminal, click Configure.
- The terminal ID column will display a list of all available HICAPS terminals detected on your network. Tick the check box next to the terminal ID to set the default terminal.
- Click Test Connections.
- Click Ok. The default terminal will be displayed in Payment Integrations Details.
- Click Save.
- Complete steps 3-12 for each provider bank account using the HICAPS API key and API Secret credentials for the associated bank account.
![]()
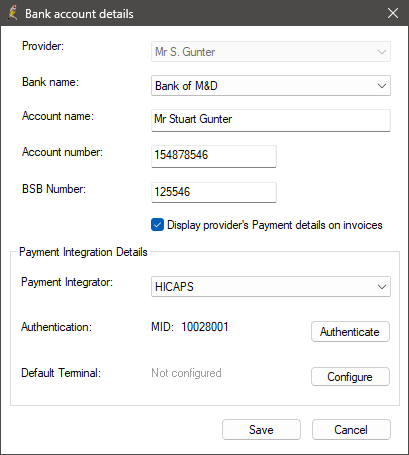
Payment Integration Details will not be displayed in Bank Accounts if your Practice has no active payment integrations.

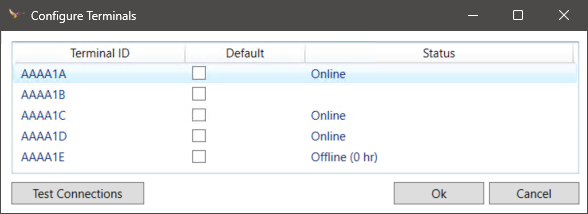
The terminal status text displayed next to the workstation will read Online if the terminal connection test was successful.
If the terminal connection test failed, the terminal status text displayed next to the workstation will read Offline, along with the duration the terminal has been offline.
Information correct at time of publishing (28 May 2025).