Before you can record and print a vaccination, you need to:
- Add the vaccinations that your practice offers to the Bp VIP.net database
- Set up a 'Patient Immunisations' autotemplate.
- Set up vaccinations as a chargeable item.
NOTE Because vaccinations differ from practice to practice, the Patient Immunisations form is not linked by default. You will have to add a link to the Immunisations form from the Medical Desktop used by doctors who offer vaccinations. This may have already been done as part of system configuration after installing Bp VIP.net.
Add a vaccine to the database
Bp VIP.net does not yet connect to centralised repositories of vaccination information, such as the Australian Childhood Immunisation Register or the New Zealand National Immunisation Register. If your practice offers immunisations, you must manually enter the details of vaccines your practice offers.
- Log in to Bp VIP.net as a user with permission to update vaccinations.
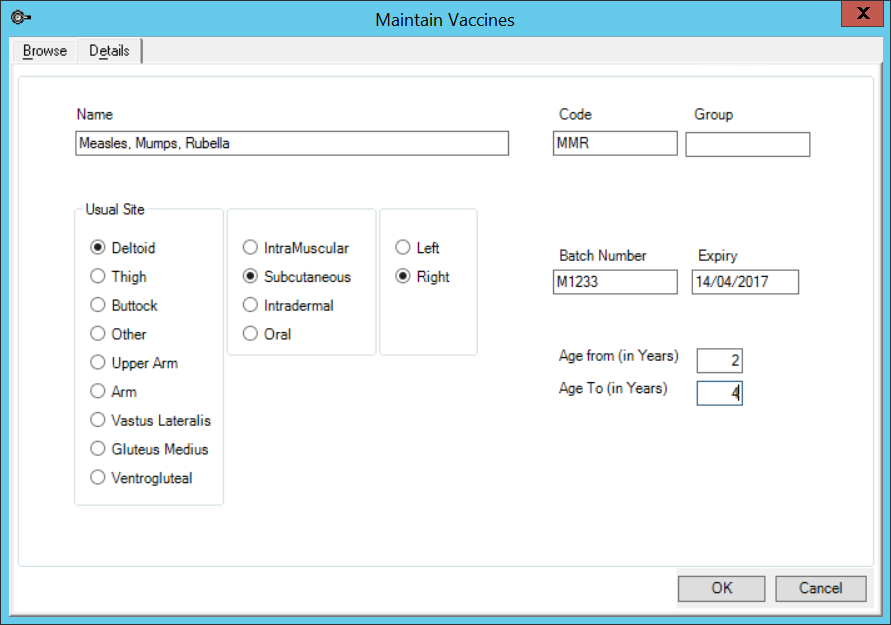
- Select Setup > Medical > Vaccines. The Maintain Vaccines screen appears.
- Click New. The Details tab will be enabled.
- Complete the administration and batch details for the vaccination.
- Click Ok. The vaccination can now be selected when recording a patient's immunisation.

Download or create an Immunisation Autotemplate
Bp VIP.net provides sample immunisation autotemplates from the online library. To download immunisation templates:
- Select File > Utilities > Live Update. The VIP Live Update screen will appear.
- Make the following selections:
- Section 1 — Select Import.
- Section 2 — Select Bp Library.
- Section 3 — Select Auto Templates.
- Section 4 — Select Bp FTP.
- Click Next.
- Tick /General Practice and click OK.
- Tick Patient Immunisations and click OK. Any immunisation autotemplates in the online library will be downloaded to your Bp VIP.net server.
- Click Close to close the VIP Live Update screen.
Or you can create your own autotemplates for printing immunisation records.
- Select Setup > Auto Templates. Click New. A blank autotemplate is opened.
- Insert fields to create a standard letter opening for your practice. For example, insert the date as the top field, and the patient's name under that.
- Insert Immunisations > Immunisations All Columns into the template from the list of Lookup fields on the right hand side.
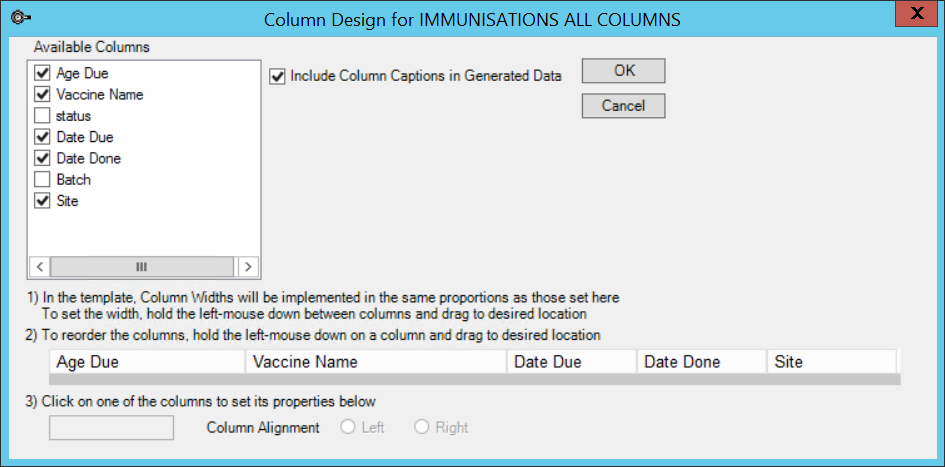
- Double-click the Immunisations All Columns field you just inserted. The Column Design screen will appear.
- Tick Include Column Captions in generated data.
- Tick each field you want to add as a column. The column structure will be reflected at the bottom of the screen. Rearrange the columns if required.
- Click Save and Close to save the autotemplate. Click Options from the row of buttons at the bottom. The Printer Settings screen will appear.
- Untick Ask for letter name and Print letter immediately on the Settings tab.
- Print a test immunisation record from Medical Desktop to see how the layout looks. If the layout is correct, open the Printer Settings screen again and tick the options you unticked in step 8.
NOTE Other Immunisations fields can be selected, depending on the fields you want available in the template.

Add an Immunisation link to a user-defined form (UDF)
Because not all practices offer immunisations, particularly specialists, the default Medical Desktop form that ships with Bp VIP.net does not offer an Immunisation button. However, you can add a link to record immunisations to a Medical Desktop form in Design Mode.
- Log in to Bp VIP.net as a user with permission to access Design Mode.
- Select Setup > User-Defined Forms. The User-Defined Forms screen will appear.
- Select the Medical Desktop form you want to insert an immunisation link into and click Modify.
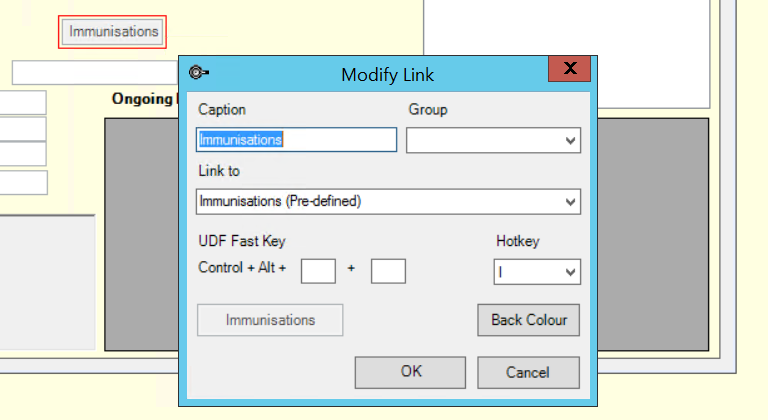
- Decide where on the form you want to position the link. Click the Link to icon on the Form Designer toolbar. The Modify Link screen appears.
- Add a Caption for the link button, such as 'Immunisations'.
- Selected 'Immunisations (Pre-defined)' from the Link to dropdown.
- Assign a UDF Fast Key and Hotkey if Immunisations will be regularly accessed.
- Click Ok. An Immunisations button linking to the Immunisations form will be placed on the UDF.
- Rearrange and restyle the new button and save the Medical Desktop form.

Immunisation setup is complete.
What do I do next?
Last modified: July 2020