Bp VIP.net integrates with Fuji Epiphany systems to allow synchronisation of relevant patient and appointment data, and to submit and receive cardiology examinations and results.
How does Bp VIP.net transfer data to Epiphany?
Fuji Epiphany clinical software (Epiphany) is not supplied or maintained by Best Practice Software. For more information on installing Fuji Epiphany software, contact Fuji Epiphany Support for the appropriate software. The instructions below assume that Epiphany software has already been successfully installed on your practice network.
Bp VIP.net communicates with Epiphany in two ways:
- Bp VIP.net creates HL7 messages and delivers the messages via TCP/IP. The message files contain patient demographics and patient appointment booking data. Bp VIP.net Services polls the Bp VIP.net database periodically to determine if there are messages to create.
- A Bp VIP.net TCP/IP listener waits for incoming connections from Epiphany. When an incoming connection is accepted, Bp VIP.net accepts incoming HL7 results, determines the patient record to which they belong, and imports the embedded PDF result into the patient’s record. Unmatched results are added to Unfiled Images in Bp VIP.net, and can be manually allocated to the correct patient.
The Fuji Epiphany integration with Bp VIP.net will always use a Patient Matching method of 'Internal unique ID'.
NOTE Because the Epiphany interface relies on Bp VIP.net Services to poll the database, Bp VIP.net Services must be running for data to be transferred between Bp VIP.net and Epiphany. Contact Best Practice Software Specialist Product Support if you need more information on installing and starting Bp VIP.net Services.
What data does Bp VIP.net send to Epiphany?
If a new patient is created, or changes are made to the following fields, Bp VIP.net will create or update the corresponding patient record in Epiphany:
- NHI Number
- First name
- Surname
- DOB
- Sex
- Address
If any appointments associated with the selected Work List Filters are created or updated, Bp VIP.net will create or update the corresponding appointment book information in Epiphany.
Bp VIP.net Services will look to see if Epiphany (and other interfaces) has been installed, and if so, polls the database about every two minutes for new or updated records. If any changes or new records are created, the interface will export the data to Epiphany. If the interface is scanning or exporting, the poll timer stalls and restarts when the process is finished.
When you install the Epiphany interface for the first time, the process may take some time to transfer existing data, depending on the number of patients and appointments you have stored, for example.
Before you begin
The Fuji Epiphany integration uses a nominated TCP/IP port, instead of a Windows folder, to send and receive data between the two systems. You will need to know the port number used by your Epiphany software when setting up the interface definition in Bp VIP.net.
Set up the Epiphany interfaces
Install interfaces
- Log in to Bp VIP.net as a Bp VIP.net Administrator.
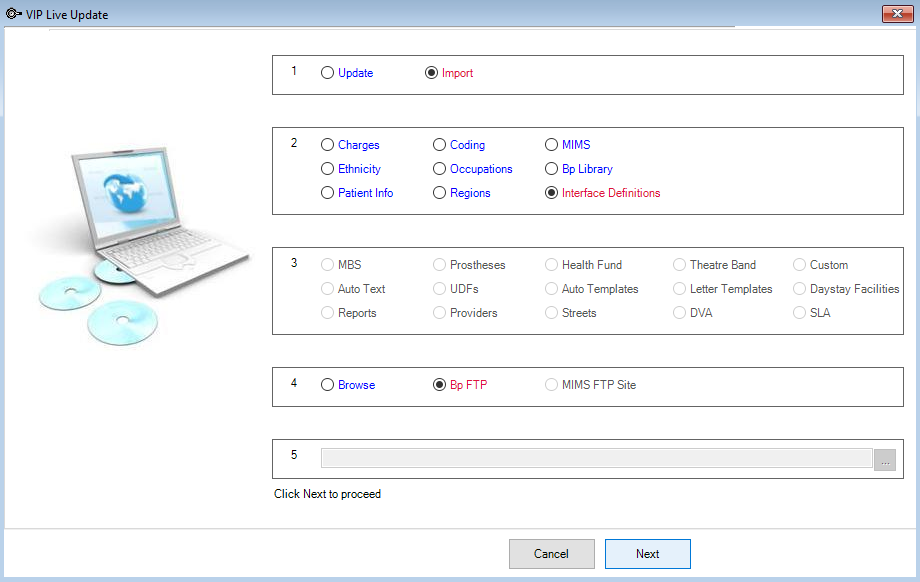
- Select File > Utilities > Live Update to open the VIP Live Update screen.
- In the VIP Live Update screen:
- Section 1 — Select Import.
- Section 2 — Select Interface Definitions.
- Section 4 — Select Bp FTP.
- Click Next.
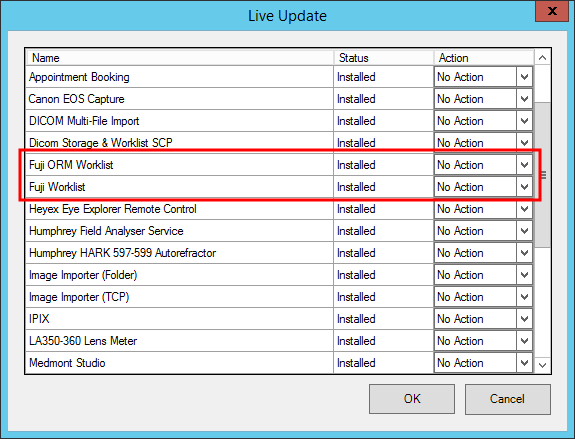
- In the Live Update window, check the Status column for the two interfaces:
- Fuji ORM Worklist.
- Fuji Worklist
If the Status column shows 'Installed', you do not need to reinstall the interfaces. Click Cancel, and click Cancel again to close the VIP Live Update window. Go to Set up interfaces.
If the Status column shows 'Not Installed', select 'Install' from the Action column for both interfaces and click OK. The interfaces will be installed.
In the following example, the two Fuji interface files have been installed and require no action.
Set up interfaces
Add Fuji Worklist
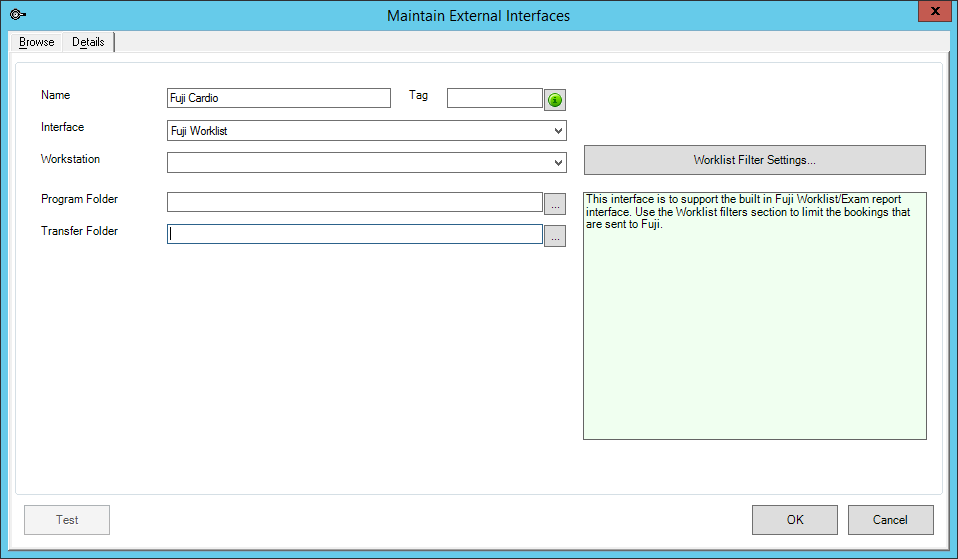
- In Bp VIP.net, select Setup > Medical > External Interfaces. Click New in the Maintain External Interfaces screen.
- Click New. The Details tab will open.
- Enter a descriptive Name for the Fuji Epiphany interface, such as 'Fuji Cardio'.
- Select the Interface 'Fuji Worklist'.
- Leave the Program Folder and Transfer Folder empty.
- Click Worklist Filter Settings. The Work List Filters screen will appear.
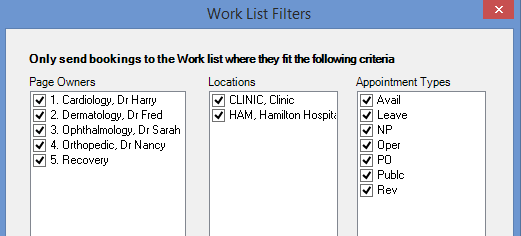
- Select the Page Owners, Locations, and Appointment Types that you want transferred to Synergy when new records are created or changes are made.
- Click OK to return to the Maintain External Interfaces screen.
- Click OK to save the interface.
In the example below, all options have been ticked, which means any new patients or appointments, or any updates to patients or appointments will be transferred to Fuji Epiphany. If you did not select the Page Owner 1. 'Dr Harry Cardiology', for example, appointments booked for this provider would not be transferred.
Add Fuji ORM Worklist
- In the Maintain External Interfaces screen, click New to create the second interface. The Details tab will open.
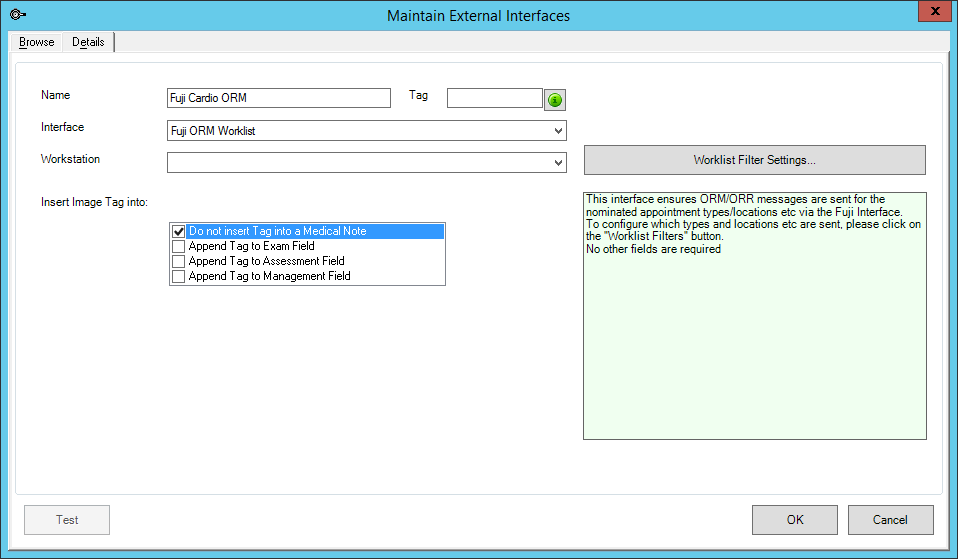
- Enter a descriptive Name for the Fuji Epiphany interface, such as 'Fuji Cardio ORM'.
- Select the Interface 'Fuji ORM Worklist'.
- This step is optional. Select where in Bp VIP.net you want descriptive text from Fuji Epiphany imported to:
- Do not insert Tag (ignore)
- Exam Field in medical note
- Assessment Field in medical note
- Management Field in medical note.
- Click OK to save the interface.
- An image file, contained within the incoming message, will be displayed in the Medical Desktop, in the filmstrip.
Set TCP/IP ports
The method will depend on the version of Bp VIP.net you are running. To find out which version of Bp VIP.net you have installed, select Help > About from the main menu and inspect the Version field.
When setting the ports that will be used, you also must ensure that your practice network and firewalls have been configured to allow connections on those ports. Your IT service provider can assist with network configuration.
For Bp VIP.net version 2.1.517.033 or later
- Log in to the Bp VIP.net server as a Bp VIP.net administrator.
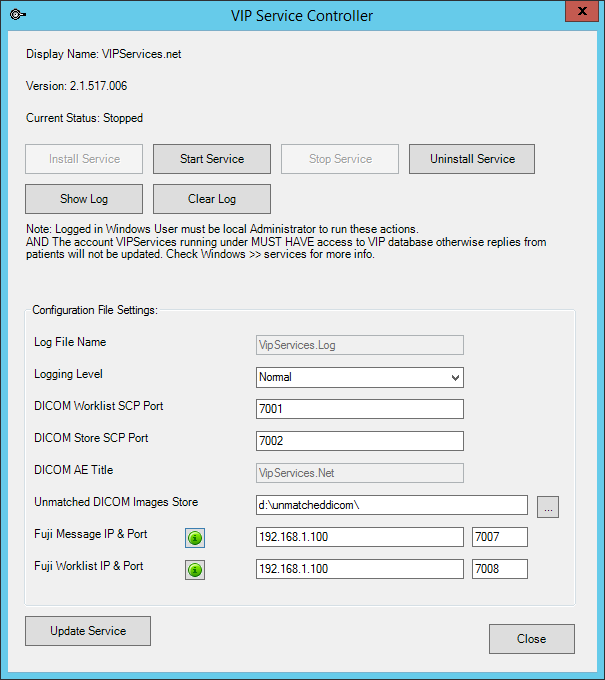
- Select File > Utilities > VIP Service Controller. The VIP Service Controller window will appear.
- Enter the incoming and outgoing ports to use:
- Fuji Message IP & Port — The IP address and port which the VIP services component will listen on for incoming HL7 embedded PDF messages.
- Fuji Worklist IP & Port — The IP address and port to which the VIP services component will send HL7 messages.
- Click Update Service. Bp VIP.net will indicate if VIP Services has been updated. Click OK.
- Restart VIP Services.
Edit the config file
If you are running Bp VIP.net version 2.1.517.033 or earlier, you will need to edit the file VIP.Services.Net.exe.config.
You need to edit the VipServices.Net.exe.config file to add the IP address and TCP/IP port that Bp VIP.net will use to send and listen for incoming updates.
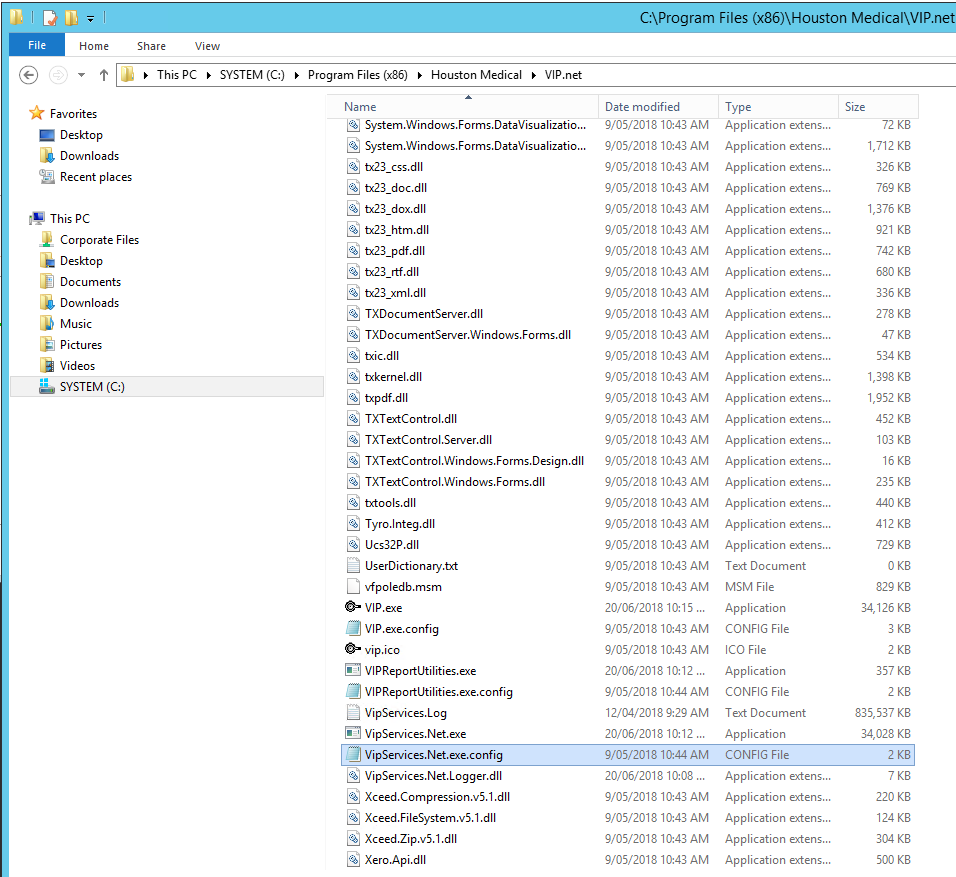
- On the Bp VIP.net server machine, open a Windows file explorer and browse to C:\Program Files (x86)\Houston Medical\VIP.net.
- Right-click on the file VipServices.Net.exe.config and select Edit. The config file will open in Notepad.
- Add the following lines inside the section <appSettings> </appSettings>
- IncomingPort / IncomingIPAddress — The IP address and port which the VIP services component should listen on for incoming HL7 embedded PDF messages.
- SendToFujiPort / FujiIPAddress — The IP address and port to which the VIP services component should send ADT, SIU, and ORM messages.
- Save the file and close Notepad.
<add key="FujiReportMessagePort" value="IncomingPort"/>
<add key="FujiReportMessageIpAddress" value="IncomingIPAddress"/>
<add key="FujiWorklistPort" value="SendtoFujiPort"/>
<add key="FujiWorklistIpAddress" value="FujiIPAddress"/>
Where the values should be:
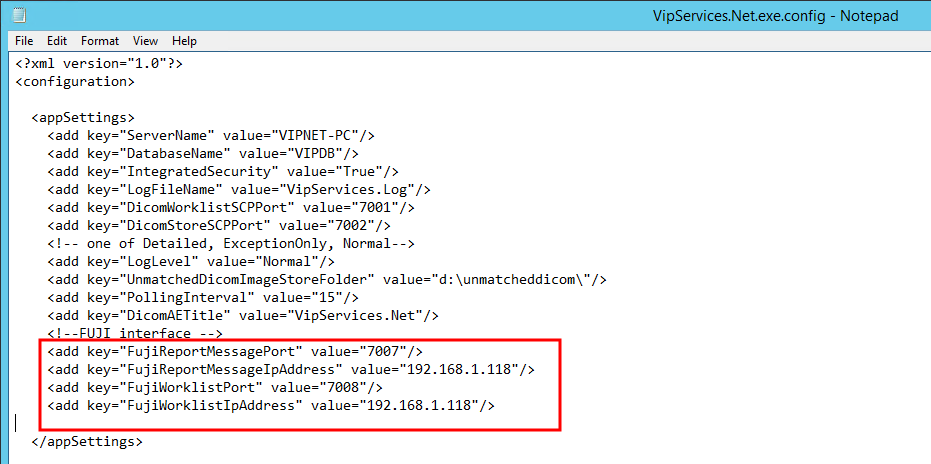
The following example shows the lines added with values. The exact values will depend on your specific practice and Fuji software.
Restart VIP services
Go to the Windows Services screen and stop and restart VIPServices.net:
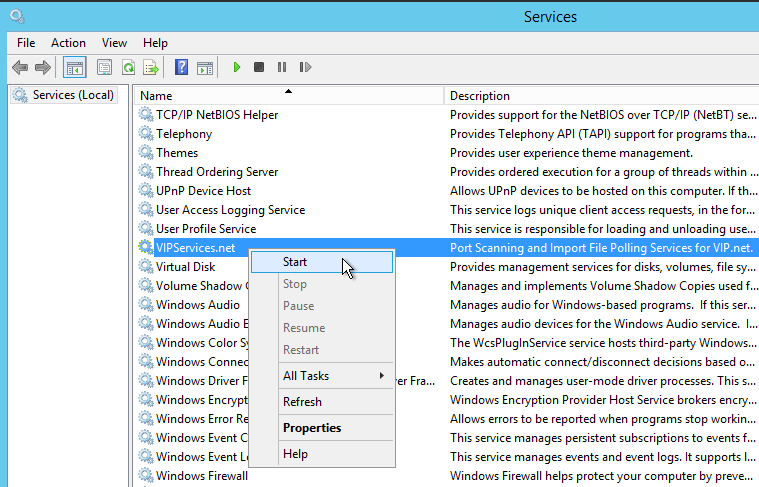
Your IT provider or system administrator can assist with restarting this service.
Epiphany interface setup is complete.
Last modified: July 2020