Phone: For support in Australia, call 1300 401 111 and select option 3 for Bp Allied. Next, select option 1 for Support or Option 3 for Training. For support in New Zealand call 0800 401 111 and select option 3 for Bp Allied. Next, select option 1 for Support or Option 3 for Training
QG - Add a Client to the Wait List
In the Appointment Book
From the right-hand menu, select Waiting List
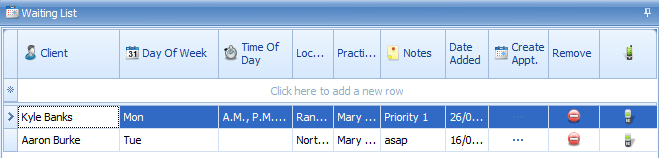
The Waiting List screen will display
Click in the Client field in the "Click here to add a new row" row to begin entering a client to your waiting list
Tab to move between each field
Client (required): Choose the client by either, using the drop down list and scrolling down the Client List
OR
Start typing the clients name to see a shortened version of the Client List
Day of the Week: Select the day(s) of the week the client can attend an appointment by ticking the options in the drop down list
Time of the day: Select the time period for which the client can attend an appointment by ticking the options in the drop down list.
Location: Select the Location(s) where the client can attend an appointment by ticking the options in the drop down list.
Practitioner: Select the Practitioner(s) the client wishes to see.
More than one option can be selected for most of the above fields by ticking more than one tick box
Notes: Add any additional details specific to the client on the waiting list.
Create Appointment: Click the Create Appointment button to create a New Appointment for the client displayed on the waiting list.
Remove: Click the Remove the button to remove the client from the waiting list. This needs to be manually done once an appointment is created.
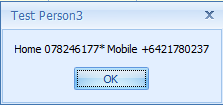
Phone Icon:Click the phone icon to see the clients phone contact details
An * denotes the Primary Phone number
Click here to see the full details on the Waiting List.