
This article explains how to back up and restore the Bp Premier database.
- Back up the entire database
- Schedule a backup
- Restore the entire database
- Restoring production data to a test server
- Back up and restore from the command line
Frequently asked questions
Best Practice Software recommend that you back up your Best Practice data daily using the supplied utility BP Backup, even if you use a third-party backup utility. BP Backup provides the simplest restore of the database.
Best Practice also recommend that a test restore of the backup is performed to a separate server on a regular basis to ensure that your backups are valid and can be restored. Store backups off-site in a secure location.
You can manually back up the database at any time, but it is better practice to set up a scheduled backup to run overnight or during a time of minimal server activity.
NOTE Users performing backup and restore operations will require some or all of the Configuration, Perform a backup, and Perform a restore permissions set to 'Allow access'.
Your practice's IT and disaster recovery guidelines may require you to use another software tool for database backup and archive. The BP Backup utility will not interfere with any third-party archiving software. However, Best Practice Software Support are unable to provide comprehensive support to sites trying to recover a backup performed by a third-party product, only with backups from the BP Backup utility.
In Orchid SP1 Revision 1, the database browser password and button have been deprecated and replaced by Third-Party Backups. Setting a database backup password for this account allows database backups to be performed using the BPSBackup login. See 1.1. Security Enhancements to BP Browser SQL Logins for more information.
When using a third-party backup software that has an SQL agent, the user details required to access the database are:
User: BPSBackup
Password:
- In Bp Premier version Orchid SP1 and below, the BPSBackup password is set in Setup > Configuration > Database > Database browser.
- In Bp Premier version Orchid SP1 Revision 1 and above, the BPSBackup password is set in Setup > Configuration > Database > Third-party backups.
NOTE The password needs to be 6—10 characters in length and use lower case lettering.
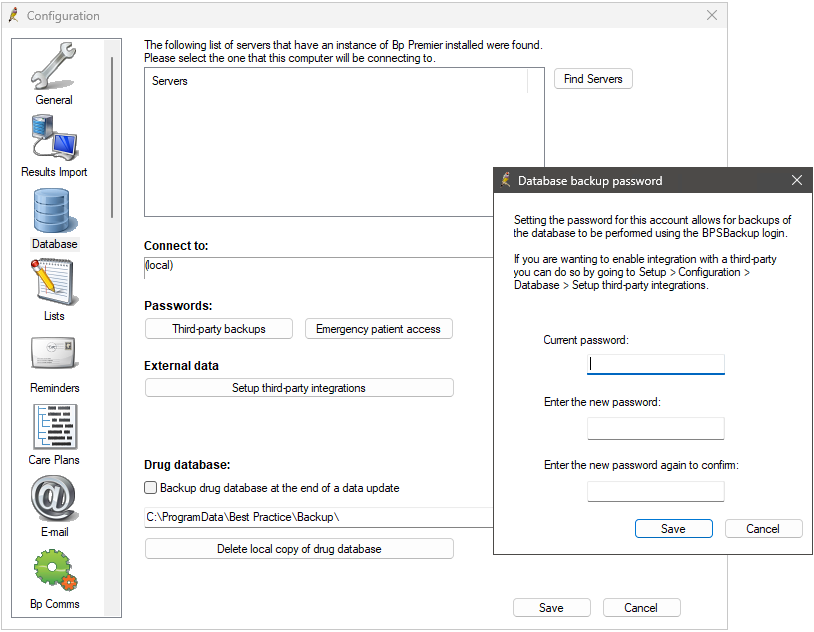
IMPORTANT Do not lose the password that you set for this account, because it cannot be reset by a Bp Premier user. Store the password in a secure location such as the practice safe.
Back up the entire database
- Log into Windows on the Bp Premier server as a Windows Administrator user. If you are not an administrator user with sufficient privileges, Windows may ask you to elevate and supply an administrator password when you run the backup utility.
- On the centre or left end of the taskbar, select the Start
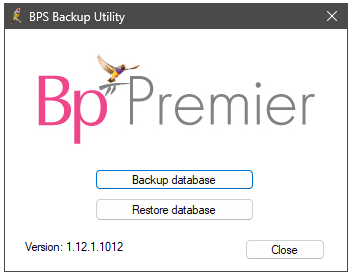
 icon > Apps > BP Backup. The BPS Backup Utility screen will appear.
 - Click Backup database. Enter the user name and password of a Bp Premier user with the permission Perform a backup set to 'Allowed'. A file explorer will open.
- Browse to the folder you want the Best Practice Software backup file to be stored.
- From the Save as type drop-down, select the type of compression. This step is optional.
- Click Save. The file name will default to a time stamp format, for example, 'BP_20080513105335'.
A compressed backup creates one zip file containing a file for each Best Practice database and requires free space on the Bp Premier hard disk at least three times the size of the database, to allows creation of temporary files.
An uncompressed backup creates one file for each Best Practice database.
After the backup has completed, BP Backup will notify the success or failure of the backup. Best Practice Software recommend that you copy or move the backup files to an external device that can be stored in an off-site location.
Schedule a backup
Scheduled backups allow you to back up Bp Premier data while the system is unattended, and schedule a backup several times a week or on the same day (a lunchtime and evening backup, for example). Backups are scheduled through the Bp Premier Windows service BpService.
- Select Setup > Configuration > Bp Service tab.
- Click Configure Automated backup. The Scheduled backup screen will appear.
- Tick Perform scheduled backup.
- Set a Default backup folder to store backup files in. You can override this setting when you create a schedule.
- Click Add to add a new schedule. The Backup details screen will appear.
- Select the Days of week to run the backup.
- Select the Backup time to run the backup.
- Select the Backup folder to store the backup files. Ensure the hard disk has enough space for the backup process and files. If you are running an uncompressed backup and the backup folder is on a network, you must use a mapped drive. UNC paths are not supported.
- Select Compressed to run a compressed backup. Compressed backups require free space on the Bp Premier hard disk at least three times the size of the database.
- Click Save to return to the Scheduled backup screen.
- If you do not wish to keep old backup files, tick the check box Delete old backups in the same folder.
- Tick Send message if backup fails and select one or more Bp Premier users if you want staff notified if a backup fails.
- Click Save to exit.


NOTE Ensure that the destination directory for backups has permissions set to allow read/write/delete. Set the permissions level to 'full control' for the 'network service' user name. Your IT support can assist.
Restore the entire database
IMPORTANT If you are restoring a Production database to a Test Bp Premier server, for example, to test a backup file is still valid, or to test a Program Update, follow the steps in Restoring production data to a test server. This restore scenario includes additional steps.
When restoring, always log in to the Bp Premier server on the local machine or through a console connection. If you attempt to restore the database through a Remote Desktop session, Bp Premier will return an SQL error and will not restore.
- Log all users out of Bp Premier and shut down the Bp Premier server. Restoration will replace all existing data.
- Log in to Windows on the Bp Premier server as a Windows Administrator user.
- On the centre or left end of the taskbar, select the Start icon > Apps > BP Backup > BP Backup. The BPS Backup Utility window will appear.
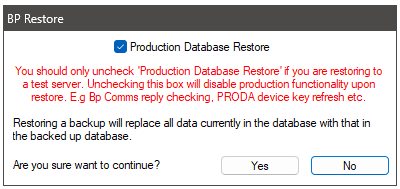
- Click Restore database. Bp Premier will prompt that restoration will replace all current data. Ensure Production Database Restore is ticked in the prompt (it will be ticked by default), and Click Yes.
- Log in to the restore utility with a Bp Premier user name and password.
- Browse to the folder where the backup file is stored that you wish to restore.
- Select the file to restore: .bku for an uncompressed backup, or .zip for a compressed backup file.
- Click Open. The restore process will begin.
- Click Close to close the backup utility after a successful restoration.
If you are restoring an uncompressed backup, select ‘Uncompressed file’ from the Files of type: drop down. If you are restoring a compressed backup, select ‘Compressed file’ from the Files of type: drop down.
Restoring production data to a test server
Sometimes you will restore a backup of a Production environment database to a Test Bp Premier server, for example, to:
- Test a Program Update upgrade before upgrading your Production server
- Test a database converted from other practice management software
- Test that a backup file is still valid.
Restoring production data to a test server
If you have upgraded to Saffron SP2, you will no longer be required to disable Bp Premier processes and run the Stop Polling Bp database script when restoring production data to a test server.
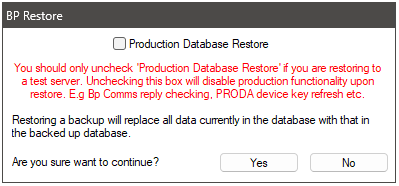
When restoring production data to a test server in Saffron SP2, follow the instructions in Restore the entire database. Once you reach step 5, ensure that Production Database Restore is unticked in the prompt, and click Yes.
IMPORTANT You must untick Production Database Restore when restoring to a test server. Unticking Production Database Restore ensures production functionality is disabled on restore.
Continue with the remaining steps under Restore the entire database.
Restoring production data to a test server in Saffron SP1 or earlier
After you restore a production database backup, the test server will be loaded with your live configuration data and will begin operating as a production server, such as pulling in SMS schedules and results from a network share. You must disable all Bp-related services before the restore, and run a Bp database script after the restore to prevent this.
1. Disable Bp Premier processes
Bp Premier services can be disabled through the Windows Services app. You may need Windows Administrator permissions on the Bp Premier server to access the Services app.
- From the Windows Desktop search bar, search for 'Services'.
- Click the Services Desktop App.
- Scroll down the list of services until you see services prefixed with 'Best Health' and 'Best Practice'.
- Right-click on the first service highlighted in the example and select Stop. The Status of the service will change from 'Running' to blank. .
- Right-click on the same service and select Properties.
- Select a Startup Type of 'Disabled' and click Ok to save changes.
- Repeat for all services highlighted in the example. All of these services should have 'Disabled' in the Startup Type column.

Further down in the Services list, Bp Premier includes some identifiable SQL Server services, as shown. These services, especially SQL Server (BPSINSTANCE) and SQL Server Browser, must be running.

2. Run the production database restore
Restore the production database image or backup to the test server, following the instructions in Restore the entire database.
3. Run the Stop Polling Bp database script
Download and run the 'stop polling' database script immediately after the database restore has finished.
- Right-click here and select Save as or Save Link As to download the script file DisablePollingAfterRestore.bpscript to a known location. Some browsers may alert that the file is a security risk. You can safely download and keep this file.
- Copy the file to the test Bp Premier server you just restored.
- Download the Bp Script Runner utility to the test server. This Support article describes how to download Script Runner and run a .bpscript file.
- Run the DisablePollingAfterRestore.bpscript file through script runner.
You can now start the Bp Premier test server without polling any production data.
Back up and restore from the command line
You can back up and restore an individual database on the Bp Premier server by using sqlcmd at a command prompt. You could also use sqlcmd if you needed to schedule backups outside of Bp Premier, for example, Your IT support can provide more assistance on using sqlcmd to back up ad restore databases.
To use sqlcmd, you will need to set up your bpsviewer account password. You may need to reapply your database browser password if you have recently upgraded, because the BPSBackup account may not yet be associated with the correct password.
The following are two examples of using sqlcmd:
Back up the active BPSPatients database:
sqlcmd -U BPSBackup -P <pwd> -S \BPSINSTANCE -Q "BACKUP DATABASE <database> TO DISK='<path>'"
Restore a BPSPatients database:
sqlcmd -U BPSBackup -P <bp pwd> -S \BPSINSTANCE -Q "RESTORE DATABASE <database> FROM DISK='<path>' WITH REPLACE"
where:
- <pwd> = the bpsviewer account password
- <database> = the name of the database
- <path> = the path and file name of the backup or restore file.
For example:
sqlcmd -U BPSBackup -P password123 -S \BPSINSTANCE -Q "BACKUP DATABASE BPSPATIENTS TO DISK='c:\backups\bpspatients.bak'"
Related topics
Troubleshooting
Last updated: 20 November 2023.


 AU
AU 