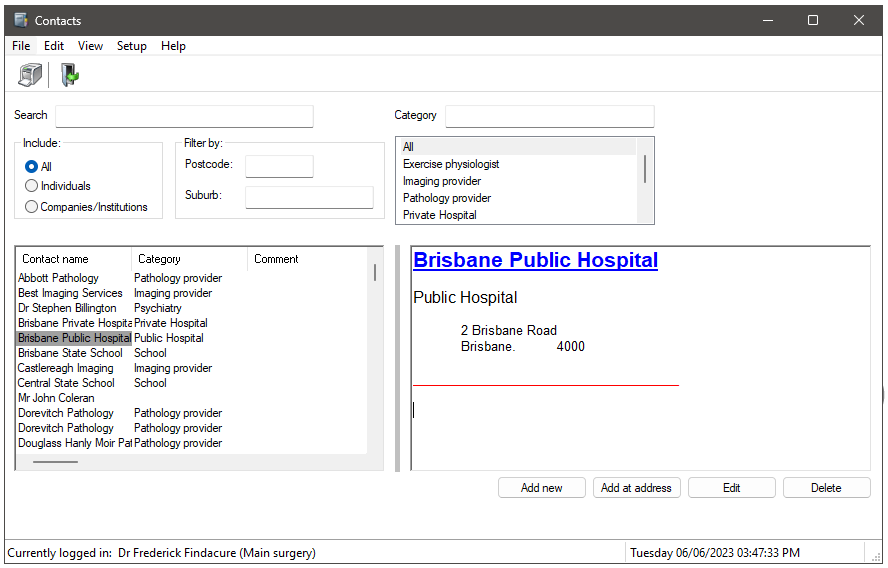
A contact in Bp Premier is used to record any entity that is not a patient, user, or practice provider. Contacts can be an individual, or company or institution. You can nominate a contact from many Bp Premier screens, such as referral details, care plans, and importing correspondence in.
Examples of individual contacts include:
- Referred and referring providers external to your practice, including allied health professionals
- Providers who attend your practice on a rare or irregular basis
- Employers.
Examples of institution contacts include:
- Health insurance companies
- Pathology and imaging labs
- Other practices and health care facilities.
Contacts can also be created by synchronising with an online directory. See Using Online Directories and HealthShare Referrals Directory for more information.
TIP You can create new contact categories from Setup > Configuration > Lists, if you have permission to access configuration.
Add a contact
- Select View > Contacts or press F11 from the main Bp Premier screen. The Contacts screen will be displayed.
- You can filter the list of contacts shown in three ways:
- Surname or company name — Tick an option to include All contacts, Individuals, or Companies/Institutions. Start typing in the Search field to filter by individual surname or company name.
- Address — Start typing in the Postcode and Suburb fields to filter by address.
- Category — Start typing in the Category field or select from the list to only display a specific category of contact.
- Filters can be combined, for example, searching for contacts of category 'General Practice' with a specific postcode.
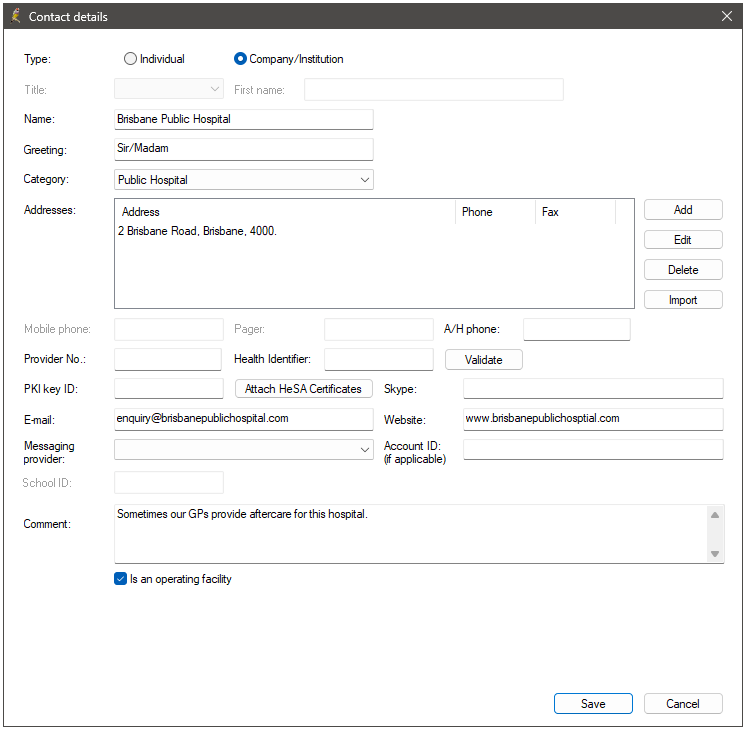
- If you want to add a new contact with the same address as an existing contact, select the contact from the list and click Add at address. Otherwise, click Add New. The Contact Details screen appears.
- Complete the fields in this screen. Not all fields will apply to all types and categories of contact.
- For individuals, tick Available to assist at operations at the bottom if the contact is a provider who assists at operations at your practice. For companies, tick Is an operating facility if the contact is or houses an operating facility.
- Click Save to save the contact. The contact can now be selected from Bp Premier screens and the word processor.


Health Identifier
Any number entered into the Provider No. or Health Identifier fields must be valid to save the record. You can leave these fields blank to save the record and enter valid numbers later.
If you are adding a contact of type ‘Company/Institution’, Health Identifier represents the organisation’s HPI-O. If you are adding a contact of type ‘Individual’, Health Identifier represents the provider’s HPI-I.
Contacts require a valid Health Identifier to access My Health Record.
CDA eReferrals
If you want this contact to be able to receive CDA-format eReferrals, the Messaging provider you select must have Send CDA eReferrals ticked in the messaging provider setup in Setup > Configuration.
Schools
If you have chosen Company/Institution as the type of contact, School will be available to select from the Category: menu.
If you select School, the School ID: field can be filled in.
You can use school contacts when recording vaccinations for students in school programs. See Record Immunisations and Send to AIR for more information.
Merge contacts
You can merge contacts if a user has accidentally created two records for the same contact.
- Select View > Contacts or press F11. The Contacts screen will be displayed.
- Select the contact from the list that you want to keep. This is the primary record.
- Select Edit > Merge. Bp Premier will warn that only address and comment information is kept from the secondary record. Click Yes.
- Search for and select the secondary record from the Select contact screen. This record will be deleted, and address and comments details will be merged into the record selected in step 2.
- Click Select. The primary record will be updated and the secondary record deleted from the list.
Pathology and imaging e-ordering contacts
Pathology and imaging e-ordering labs configured via Setup > E-Ordering are added to the list of contacts in the Contacts screen. For e-ordering contacts, certain fields in the Contact details screen cannot be edited. In particular, address details supplied with the e-ordering contact cannot be edited or deleted. However, you may add, edit or delete any address details that are not supplied with the contact.
If you delete an e-ordering contact via the Contacts screen, it will become unlinked in the e-ordering configuration form.
If you choose to remove the e-ordering contact via the e-ordering setup screen, and you choose not to delete the e-ordering contact's record, the contact's supplied details will be removed from their record in the contacts screen, and only manually added data will remain.
If you choose an e-ordering contact as the second contact when merging, the e-ordering contact will also become unlinked in the e-ordering configuration form.
See Set up Pathology eOrdering and Set up Imaging eOrdering for more information.
Related topics
Last updated: 06 June 2023.