This article describes how to set up printing preferences for document types at your practice.
NOTE For any printing preferences not referenced in the article such as double-sided printing, update the printing preferences from the Printers & Scanners settings on your local machine.
In this article:
Send different document types to different printers
For each document type in your installation of Bp Premier, you can set the default printer or printer tray, or set Bp Premier to prompt the user to select a printer. For example, scripts could print from Tray 1 on a Kyocera printer, invoices could print from Tray 1 on the Canon printer, and letters could print from Tray 2 on the Canon printer.
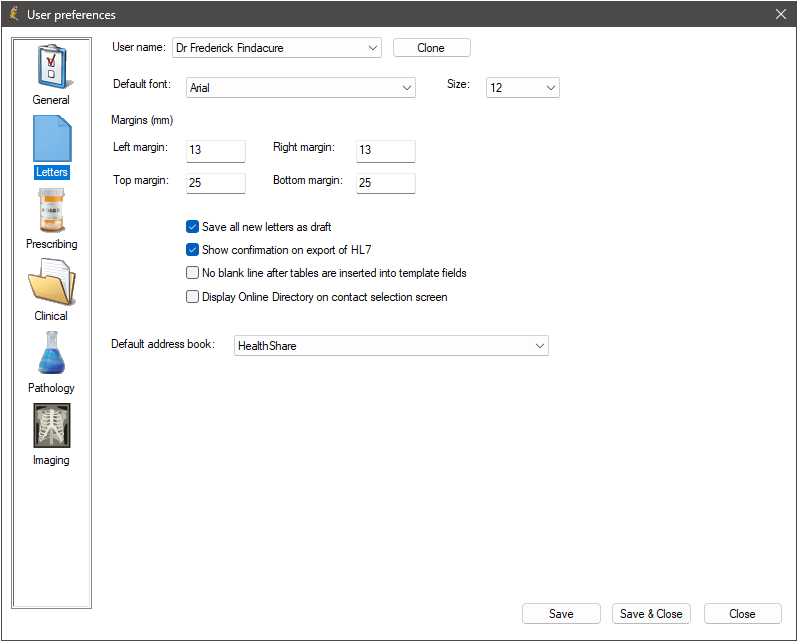
Users can also set default layout preferences for new documents. For example, when a blank document is opened from the word processor, the margins and default paragraph font are automatically set for the user.
NOTE Printer preferences in Bp Premier are set per workstation, rather than for the logged in user, or for the whole practice.
Printing on Terminal Servers
If your practice uses terminal servers, you must ensure that all computers connecting to the terminal server have a unique name.
To find a computer's name:
From the Windows desktop Search bar in the bottom left, type 'system' and select the System Information App. Under System Summary, the System Name field will show the computer's name.
If your practice uses terminal servers, where a workstation uses a local printer rather than a network printer, Best Practice Software recommend selecting 'Default Printer' from the Setup printer screen, because printer names change for each terminal session.
When setting up printing for a terminal server, test print each document type to ensure that printing is functioning as expected on that workstation.
IMPORTANT Every user in the practice who is using the terminal server must log out of their Windows session after each use. If not, and the user logs into the terminal server on another workstation, Windows may automatically recover the previous session's incorrect workstation name and printer settings.
Set up printers
Only users with the Printers permission set to Allow access are able to set up printers. See User Permissions for more information.
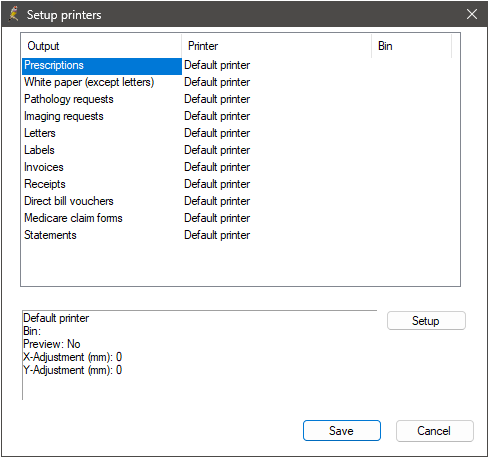
- From the Bp Premier main menu, select Setup > Printers .
- Select the document type from the Output column you want to assign a printer to.
- Select the Printer column for that document type, and click the blue down arrow that appears. The list of installed local and network printers will be displayed.
- Select a printer from the Printer column, or select Prompt for printer to prompt the user with the windows Printer screen each time the document type is printed.
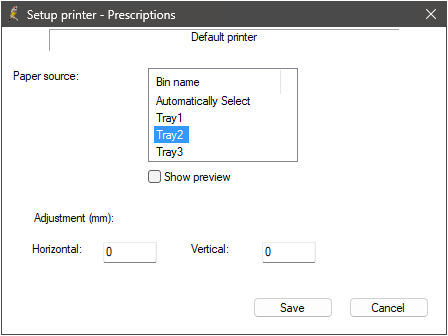
- Click Setup. The Setup printer screen will appear.
- Select the Paper source to use from the selected printer.
- Tick Show preview to display a print preview before printing.
- Enter Horizontal or Vertical adjustments from the left and top if required for the printer.
- Click Save.

NOTE Prompt for printer is suitable for document types used by staff without a fixed workstation, for example, who need to be able to print to any printer.

The horizontal and vertical settings allow negative values, if the printer prints the margins too far to the right or from the top.
Printer output reference
The below table provides descriptions of each of the output types in the Setup printers screen.
NOTE When printing from the Bp Premier document viewer, documents will print using the windows default printer instead of using white paper.
|
Output |
Description |
|---|---|
|
Prescriptions |
Prescriptions print from the Current Rx and Past prescriptions screens in the Patient record. See Add, Edit or Cease a Prescription (Rx) for more information. |
|
White paper (except letters) |
The white paper output includes documents in Correspondence in, Investigations, product information, drug sheets, payment and processing reports, and printouts created using the File > Print option. NOTE Drug sheets will use the white paper output except for National In Patient Medication Charts, which will print using the Windows default printer. |
|
Pathology requests |
Pathology requests print from the Pathology request screen in the patient record. See Submit a pathology request for more information. |
|
Imaging requests |
Imaging requests print from the Imaging request screen in the patient record. See Submit an imaging request for more information. |
|
Letters |
Correspondence out and letters print from the word processor. |
|
Labels |
Labels print from the patient record, the patient list and the search screen. Labels include the patient's name, address, Medicare number and date of birth. See Set up printed label layouts for more information. |
|
Invoices |
Invoices print from the Account details screen for privately billed accounts. |
|
Receipts |
Receipts print from the Payment details screen for privately billed accounts once payment has been received. |
|
Direct bill vouchers |
The Direct bill vouchers output includes Bulk Bill assignment of benefit forms (DB4 forms) and DVA treatment service vouchers. These forms print from the Account details screen for invoices billed to Medicare Direct Bill. or DVA Direct Bill . |
|
Medicare claim forms |
Medicare claim forms print from the Account details screen for private accounts. Select Print Medicare Claim form then click Print. |
|
Statements |
The statement output includes Medicare Australia Online Claim statements and DVA Online Claim Statements. You can print these statement when sending a either a Medicare or DVA Direct Bill Batch via Management > Online Claiming > New Claim, or by selecting a claim in the online claiming window and clicking File > Print Statement. |
Set word processor user preferences
- Select Setup > Preference > Letters.
- Select the Default font and Size.
- Set the default margin spacing.
- Tick Save all new letters as draft to default to saving all new letters as drafts and not final documents. Saving as a draft allows the letter to be opened and modified later.
- Tick Show confirmation on export of HL7 if you want Bp Premier to prompt a confirmation when a document is successfully exported using HL7.
- Tick No blank line after tables are inserted into template fields if you do not want a blank line automatically inserted after a table is inserted into a template field.
- Click Save & Close.

Set page size and orientation
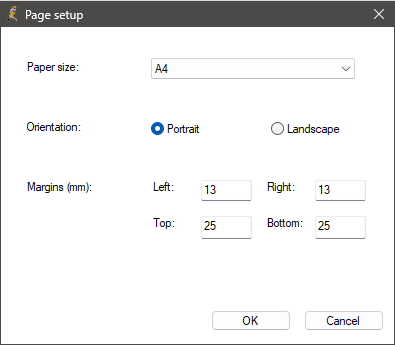
You can change the page orientation for open documents.
- From the word processor, select File > Page setup. The Page setup screen will be displayed.
- Select the Paper size and paper Orientation.
- Enter the margin spacing for the current document.
- Click OK.

Print in colour
If you wish to print in colour, from the Setup Printers screen, select Prompt for printer as the printer for the output. When printing, the Print prompt will appear. Select a printer and click Properties to view further options.
Last updated: 15 May 2025.