This article describes how to book a one-off appointment from the appointment book, edit an existing appointment, and view a patient's appointment history.
To open the appointment book from the main Bp Premier screen, select View > Appointment book or press F12.
Book a new appointment
There are many different ways to create a new appointment, depending on how your staff like to use Bp Premier.
TIP If you are just looking for the next available appointment, click Next Appointment in the appointment book toolbar, which will show the first available appointment slot for all doctors rostered that day.
- Double-click any slot, or click the slot to book in the Appointment Book and choose one of:
- start typing the patient surname
- click the Add new appointment button in the left hand side of the screen
- press F3 on the keyboard
- right-click the appointment and select New appointment
- click the Add new appointment icon in the toolbar
- select File > New Appointment.
An Add appointment window will appear, where you can book patient or non-patient appointments.
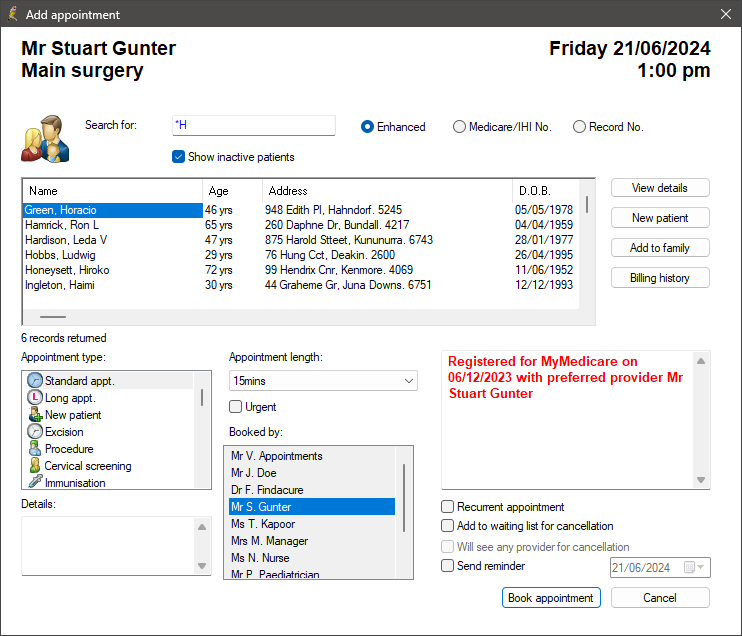
- To book a new appointment for a patient, enter the first few letters of the patient’s surname in the Search for field. A list of patients whose surname matches the letters entered will appear.
- If the search list is too long, continue entering the patient’s surname, add a comma, and enter the first few letters of the patient’s first name.
- You can search for the patient by Medicare No. or Record No. by changing the radio button.
- When the desired patient has been found, select them from the list and specify:
- the appointment type
- appointment details (text field)
- appointment length
- who booked the appointment and if it is a recurring appointment.
- If you wish to edit a patient’s details before booking an appointment, select the View details button to open the Patient details screen.
- If the appointment is urgent, tick Urgent. The Urgent check box is only available for same-day appointments and is not available for appointments booked for a future date.
- If the patient is available, select Add to waiting list for cancellation to add the patient to the Cancellation list.
- If your practice uses Bp Premier's clinical reminders, select Send Reminder to also generate a reminder of type 'Appointment' against the patient.
- Click on the Book appointment button to save the appointment to the appointment book.
TIP Custom appointment types can be created from Setup > Configuration > Lists > Appointment types.
Block a patient from making appointments
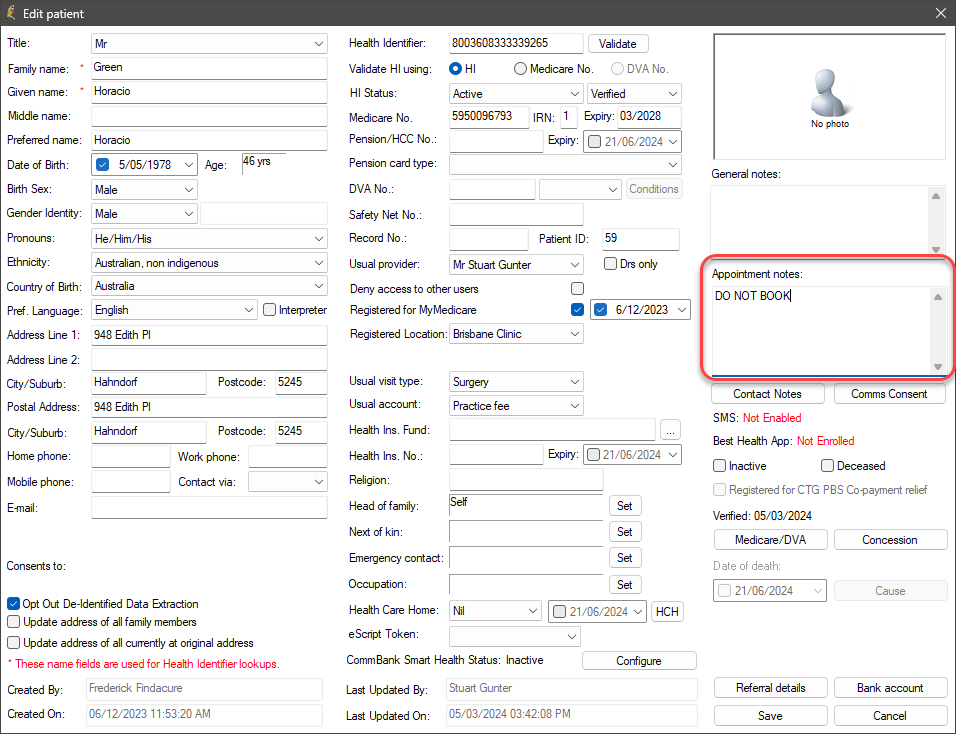
If you wish to prevent a patient from booking appointments, add a note to the Appointment notes: section in the Patient demographic, indicating that appointments should not be booked for the patient.
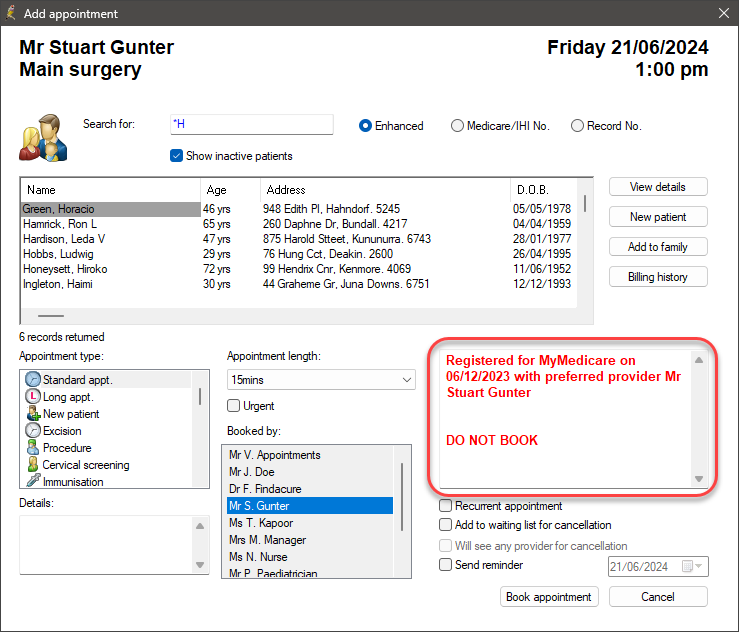
When the add appointment screen is opened and the patient is selected, the note will appear indicating to reception staff that appointments should not be booked for the patient.
Book a patient appointment from the patient record
Clinicians can create appointments from the patient record.
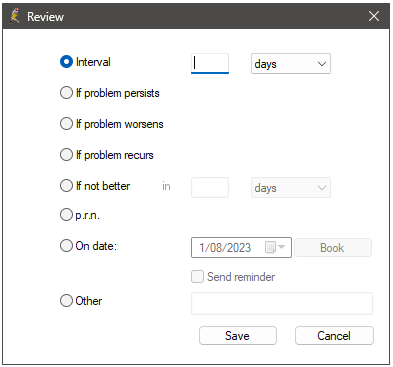
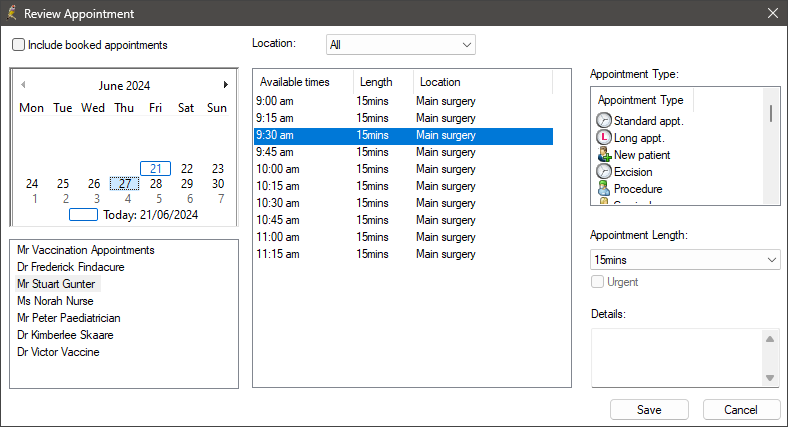
- From Today's notes, click Review. The Review screen will appear.
- Select On date:, choose a date for the next appointment, and click Book. The Review appointment screen will appear.
- Select an appointment time and type, add any extra information to the Details: field, and click Save.
- Click Save again to return to the patient record.
Book appointment for a non-patient
- To book a new non-patient appointment, leave the Search for field blank and select an appointment type. The appointment types that can be used for non-patient appointments are:
- Meeting
- Assist
- Nursing Home visit
- Teleconference
- Drug rep
- Other.
- Enter the appointment information into the Details field. The details will appear in the appointment book.
- Click on the Book appointment button to save the appointment to the appointment book.
Add a new patient quickly
If a patient does not exist in Bp Premier, you can quickly add them from the Add appointment screen.
- Click the New patient button. The New patient screen will be displayed.
- When opened from the appointment book, the only mandatory fields from this screen are the Family Name and Given Name fields, to allow you to book an appointment quickly. Complete these fields and click Save to return to the Add appointment screen.
- When the patient attends the appointment, complete the rest of the information required in the Patient details screen.
Edit an appointment
- To edit an appointment, choose one of:
- right-click the appointment and select Edit appointment
- select the appointment and click the Edit appointment button on the left hand side
- select File > Edit Appointment.
- Click the Save changes button to return to the appointment book.
The Appointment details screen will be displayed. You can edit all appointment details except for who the appointment is for. If you need to change the patient for an appointment, you must delete and rebook.
Can I see who edited an appointment?
To see who last updated an appointment, right-click the appointment slot and select View text, or press F10.
View a patient's appointment history
Select Management > Appointment history from the main screen. Search for a patient to open the Appointment history screen for that patient.
Tick Include family members to display the appointment history for all members of the patient's family.
Last updated: 17 March 2025.