This article describes how to configure the Tyro Terminal in Bp Premier. Tyro offers integrated EFTPOS, integrated multi-merchant, integrated Medicare Easyclaim (Patient Paid), and integrated Medicare Easyclaim (patient claiming and bulk bill).
Tyro Health has been a leader in innovation for nearly two decades and is dedicated to supporting their customers in moving forward. Tyro Health has been delivering payment and claiming solutions to the healthcare sector for over 15 years. Tyro Health launched an EFTPOS connection to Medicare via Medicare Easyclaim in 2009, and they have continued to innovate and support healthcare providers with fast payment and claiming solutions that improve clinic efficiency and provide more time for patient care.
Visit the Tyro Health website to learn more about the difference Tyro Health can make in your practice.
Tyro offers the following functionality in Bp Premier:
- integrated Medicare Easyclaim (Patient claiming rebates).
- integrated Medicare Easyclaim (Bulk Bill).
- integrated Medicare Online (Patient claiming rebates).
- integrated EFTPOS (payment by EFTPOS and Credit Card).
Before you can use Tyro with Bp Premier, you must carry out the following configuration. Some of the steps may require contact with Tyro Health Customer Support Team. Bp Premier Support cannot assist with the installation of Tyro hardware or software.
- Ensure the latest version of Bp Premier is installed on the server and all workstations.
- Register your practice with Medicare to use Online claiming, configure Online claiming, and test that it works correctly.
- Register with Tyro and purchase a Tyro terminal for your practice.
- Best Practice Software recommends temporarily decreasing Windows User Account Control (UAC) to its second lowest setting. It has been observed that higher UAC settings conflict with the Tyro Setup process.
- Download the Tyro Terminal Adapter Configuration Software and install the software on each workstation that needs to access the Tyro terminal.
- Run RegisterAll.bat on each workstation with the Tyro Terminal Adapter installed.
- Configure Bp Premier for use with Tyro.
- Configure with Bp Premier the Tyro Merchant ID.
Steps 5–7 are described below.
Tyro also requires a persistent internet connection on the workstation connected to the Tyro Terminal.
To obtain Tyro Terminal adapter software, follow the instructions supplied with the terminal device or download and follow Tyro's TTA Installation guide.
IMPORTANT Best Practice Software recommends consulting your practice's IT support for advice before installing the Tyro Terminal hardware and adapter software.
Install the adapter software on each workstation in your network that requires access to the Tyro Terminal. For example, workstations used by GPs that do not process payments will not need the adapter installed, but any reception workstations that process Medicare payments and claims will require adapter installation.
After this process, each configured workstation will be 'paired' with the Tyro Terminal device.
The Merchant ID and Terminal ID will be provided by Tyro when you purchase a terminal. Note these items down; you will require them in the last configuration step.
To correctly configure the Tyro Terminal in Bp Premier, complete the following steps in order:
- Run RegisterAll.bat on each workstation
- Set up Online Claiming with Tyro
- Turn on Tyro Easyclaim functionality
- Set the default Payment Type
Run RegisterAll.bat on each workstation
On each workstation that has the Tyro Terminal Adapter installed:
- Close Bp Premier.
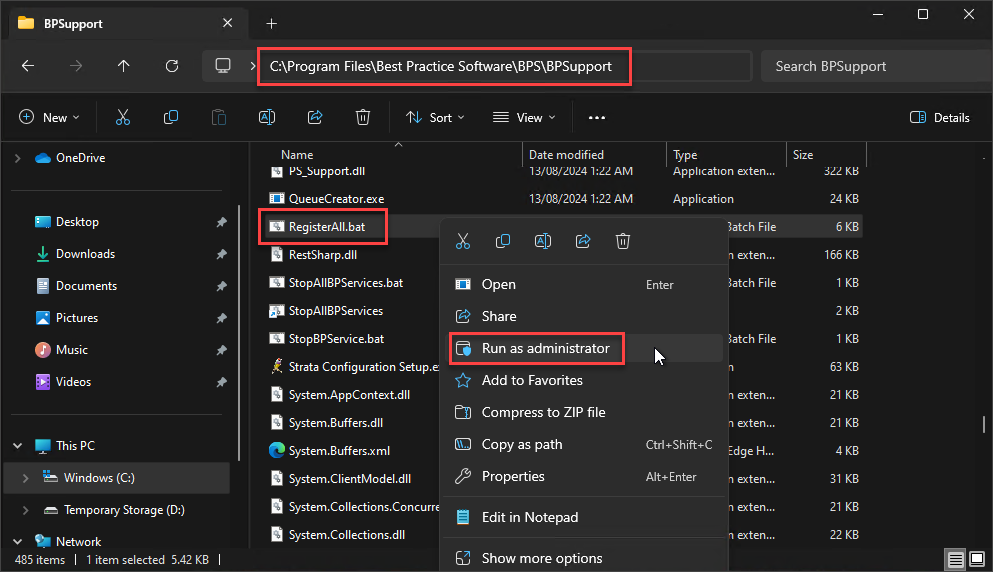
- Open the file explorer and navigate to RegisterAll.bat in C:\Program Files\Best Practice Software\BPS\BPSupport.
- Right click on RegisterAll.bat and select Run as Administrator.
Set up Online Claiming with Tyro
If you are already using Online Claiming in Bp Premier, the steps in this section should be complete; you can skip to Turn on Tyro Easyclaim functionality.
- Log into Bp Premier as a user who has access to configuration.
- Select Setup > Configuration. The Configuration screen will appear.
- Select the Online Claiming tab.
- The Activate Online Bulk Bill Claiming field should already be ticked if you have been using Medicare or DVA Online claiming. Do not change this setting.
- Select Activate Online Private Patient claiming to activate Send private patient claiming when creating payments.
- Tick Always send private patient claims by best available method to automatically select either Send via Patient claiming or Send via Easyclaim on the payments screen:
- If unticked, neither option will be ticked automatically on the payments screen.
- If you are using both Online Private Patient claiming and Easyclaim Private Patient Claiming, Send by Easyclaim will be ticked automatically on the payments screen.
- If you use only one claiming method, only that option will be ticked automatically on the payments screen.
- Press Save to update online claiming settings.

NOTE If this field is not ticked, this usually indicates online claiming has not been configured yet. Follow the instructions in Online Claiming: Direct Bill and restart this procedure.
This option allows you to send claims to Medicare and pay the rebate into the bank account that the patient has registered with Medicare.
This option can be used where the patient is not eligible to send the claim via Medicare Easyclaim (for example, multiple attendance items, or items requiring notes).
Turn on Tyro Easyclaim functionality
The Configuration menu in Orchid SP2 has been redesigned, and a new tab for managing Payments Integrations has been added. As part of the Payment Integration changes in Orchid SP2, the Tyro Setup.exe has been deprecated; Tyro can now be activated and configured by navigating to Setup > Configuration > Payments.
See Setup Payment Integrations for further information on the changes to Payment Integrations in Orchid SP2.
- Select Setup > Configuration. The Configuration screen will appear.
- Select the Payments tab.
- In the Configure Payment Integration box, select Tyro from the drop down list.
- Click Activate Payment Integration.
- Tick Activate Easyclaim Private Patient claiming. Tyro Integrated Easyclaim allows rebates to be paid instantly to the bank account associated with a patient's EFTPOS card.
- Tick Activate Easyclaim Bulk Bill Claiming. Easyclaim Bulk Bill Claiming allows your practice to send Direct Bill (bulk bill) claims by Tyro Easyclaim.
- Click Save.
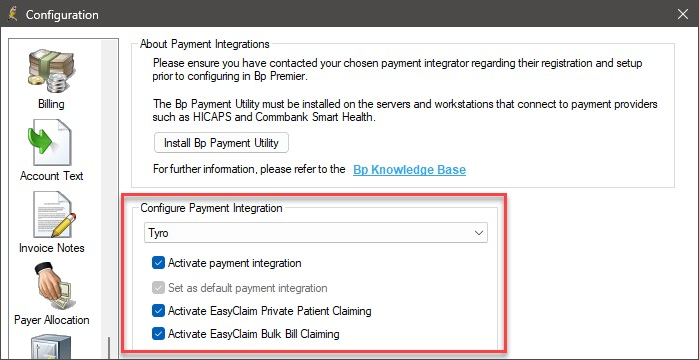
When a payment integration is activated for the first time, the Set as default payment integration check box is automatically selected and the option will be greyed out. Only one payment integrator can be selected as the default; for further information, see Configure Multiple Payment Integrations.
NOTE If the Activate Easyclaim Private Patient claiming check box is disabled, Bp Premier cannot connect to the Tyro terminal. Follow the instructions in Install the Tyro Terminal Adapter Configuration Software and ensure the Bp Premier server can connect to the terminal device.
NOTE These settings will take effect system-wide. However, the Use Tyro and Send via Easyclaim options will not appear on the payments screen if a workstation has not been paired with the Tyro terminal. Follow the instructions in Install the Tyro Terminal Adapter Configuration Software to pair a workstation with the terminal.
Set the default Payment Type
- Select Setup > Configuration from the main Bp Premier screen. The Configuration screen will appear.
- Select the Billing tab.
- The Payment type field determines the active payment type when you first open the Payment details screen. The default is 'Cash'. Set this field to 'EFT' if you regularly use Tyro for payments.
- Press Save to update billing settings.

Complete the steps in this section on the server or every workstation successfully paired with the Tyro Terminal.
Turn on Tyro Easyclaim functionality
- Log in to Windows on the Bp Premier server or workstation as a Windows user with administrator privileges.
- Browse to the folder C:\Program Files\Best Practice Software\BPS.
- Right-click the file Tyro Setup.exe and select Run as Administrator. A Login window will appear.
- Log in using a Bp Premier user name and password with setup/configuration permissions enabled. The Tyro Setup screen will appear.
- Tick the check box Use Tyro Patient claiming and click Save.
Set up Online Claiming with Tyro
- On the same computer, log into Bp Premier as a user who has access to configuration.
- Select Setup > Configuration. The Configuration screen will appear.
- Select the Online Claiming tab.
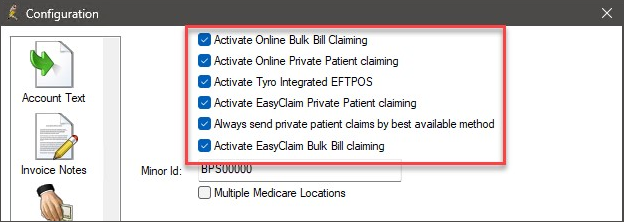
- The Activate Online Bulk Bill Claiming field should already be ticked if you have been using Medicare or DVA Online claiming. Do not change this setting.
- Select Activate Online Private Patient claiming to activate Send private patient claiming when creating payments.
- Select Activate Tyro Integrated EFTPOS.
- Select Activate Easyclaim Private Patient claiming. Tyro Integrated Easyclaim allows rebates to be paid instantly to the bank account associated with a patient's EFTPOS card.
- Tick Always send private patient claims by best available method to automatically select either Send via Patient claiming or Send via Easyclaim on the payments screen:
- If unticked, neither option will be ticked automatically on the payments screen.
- If you are using both Online Private Patient claiming and Easyclaim Private Patient Claiming, Send by Easyclaim will be ticked automatically on the payments screen.
- If you use only one claiming method, only that option will be ticked automatically on the payments screen.
- Press Save to update online claiming settings.
NOTE If this field is not ticked, this usually indicates online claiming has not been configured yet. Follow the instructions in Online Claiming: Direct Bill and restart this procedure.
This option allows you to send claims to Medicare and pay the rebate into the bank account that the patient has registered with Medicare.
This option can be used where the patient is not eligible to send the claim via Medicare Easyclaim (for example, multiple attendance items, or items requiring notes).
NOTE If the Activate Easyclaim Private Patient claiming claiming check box is disabled, Bp Premier cannot connect to the Tyro terminal. Follow the instructions in Install the Tyro Terminal Adapter Configuration Software and ensure the Bp Premier server can connect to the terminal device.

NOTE These settings will take effect system-wide. However, the Use Tyro and Send via Easyclaim options will not appear on the payments screen if a workstation has not been paired with the Tyro terminal. Follow the instructions in Install the Tyro Terminal Adapter Configuration Software to pair a workstation with the terminal.
Set the default Payment Type
- Select Setup > Configuration from the main Bp Premier screen. The Configuration screen will appear.
- Select the Billing tab.
- The Payment type field determines the active payment type when you first open the Payment details screen. The default is 'Cash'. Set this field to 'EFT' if you regularly use Tyro for payments.
- Press Save to update billing settings.

Tyro will provide your practice with a Merchant ID (MID) for each bank account you have registered with Tyro. You must link the Merchant IDs to the bank account records set up in Bp Premier.
Set up the Tyro Merchant ID in Orchid SP2 or later
Complete this procedure once on any workstation successfully paired with the Tyro Terminal.
- Select Setup > Configuration from the main Bp Premier screen. The Configuration screen will appear.
- Select the Banks Accounts tab.
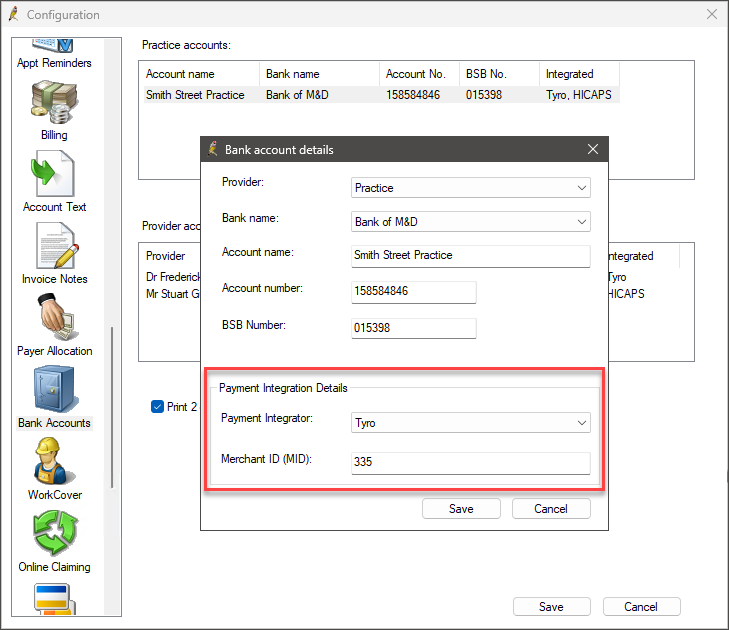
- If the practice has only one bank account, you only need to edit the Practice account. Select the practice account listed in the top section and click Edit. The Bank account details screen will appear.
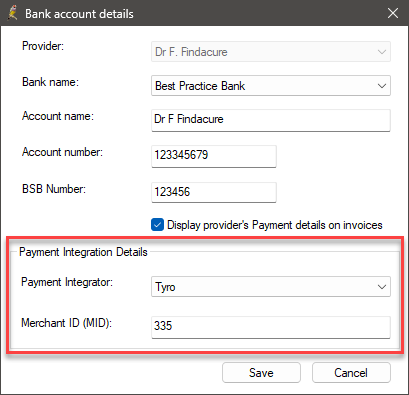
- In Payment Integration Details, select Tyro as the Payment Integrator and enter the Tyro Merchant ID (MID) provided by Tyro for the practice bank account.
- Click Save.
- If your practice has more than one practice account, repeat steps 3–5 for each practice account, using the Tyro Merchant ID (MID) provided for each practice account number.
- If your practice deposits payments into separate provider bank accounts, you must nominate a Tyro Merchant ID (MID) for each provider account. Select the Provider account and click Edit. The Bank account details screen will appear.
- In Payment Integration Details, select Tyro as the Payment Integrator and enter the Tyro Merchant ID (MID) provided by Tyro for the provider bank account.
- Click Save.
- Repeat steps 7–9 for each provider account, using the Tyro Merchant ID (MID) provided for each provider account number.
Practice Accounts
Provider Accounts
NOTE Each time a payment is entered into the system, the screen will display the Merchant ID (MID) and Terminal ID (TID) associated with the payment. If a provider has their own MID recorded, the screen will show the provider's MID; otherwise, the screen defaults to the MID associated with the first practice bank account.
Tyro setup is now complete.
Set up the Tyro Merchant ID in Orchid SP1 and below
Complete this procedure once on any workstation successfully paired with the Tyro Terminal.
- Select Setup > Configuration from the main Bp Premier screen. The Configuration screen will appear.
- Select the Banks Accounts tab.
- If the practice has only one bank account, you only need to edit the Practice account. Select the practice account listed in the top section and click Edit. The Bank account details screen will appear.
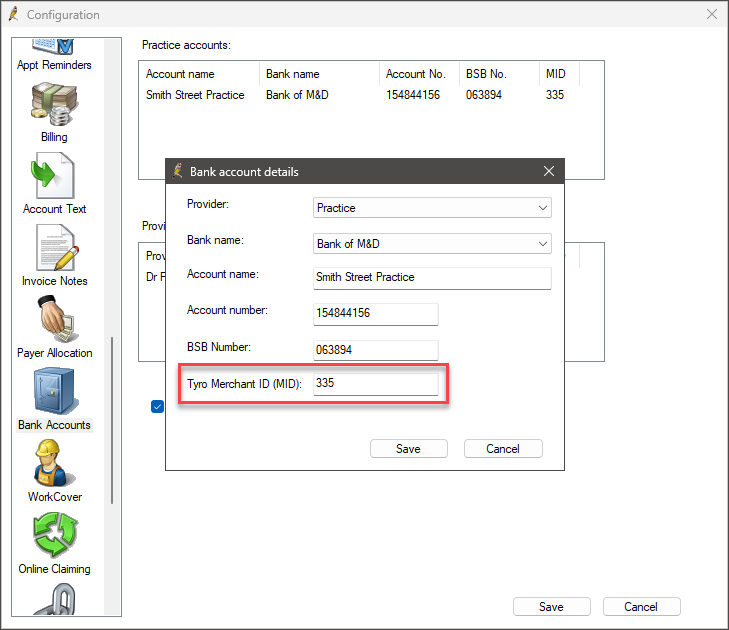
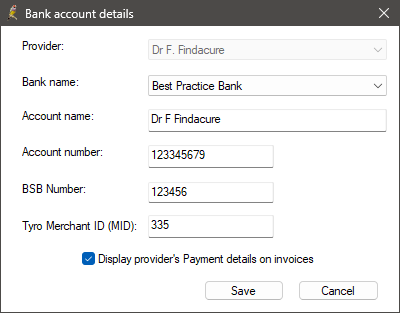
- Enter the Tyro Merchant ID (MID) provided to you by Tyro for the practice bank account and click Save.
- If your practice has more than one practice account, repeat steps 3–4 for each practice account, using the Tyro MID provided for each practice account number.
- If your practice deposits payments into separate provider bank accounts, you must nominate a Merchant ID for each provider account. Repeat steps 3–4 for each provider account by clicking Edit under the Provider accounts list. Enter the Tyro MID for each provider account number.
- Click Save.
NOTE Each time a payment is entered into the system, the screen will display the Merchant ID (MID) and Terminal ID (TID) associated with the payment. If a provider has their own MID recorded, the screen will show the provider's MID; otherwise, the screen defaults to the MID associated with the first practice bank account.
Tyro setup is now complete.
Tyro can assist with questions regarding processing payments and Integrated Medicare Easyclaim transactions. Tyro has a dedicated Easyclaim support option that can be accessed after calling the general support line.
Tyro Health Customer Support Team:
- Phone: 1300 00 8976. Select option 2, then option 1.
- Email: support@tyrohealth.com
Last updated: 04 September 2024.