If your practice will use a 'thick client' configuration, in which Bp VIP.net is installed on workstations that connect to the server, you must configure Windows Firewall on the SQL Server machine to allow external computers to connect to the database. Configuration involves creating an inbound rule that allows connections through a specific port.
Follow the instructions below for your version of Microsoft Windows. For more information on configuring Windows Firewall or Windows Firewall with Advanced Security, or if your Windows version is not listed below, search the Microsoft technical knowledge base at technet.microsoft.com or consult your IT resource.
IMPORTANT The instructions below assume that your SQL Server database uses the default port 1433 for incoming connections. If you have configured SQL Server to use a different port, or to use dynamic ports, you must configure Windows Firewall to suit your specific configuration. For large practices with complex networks, Best Practice Software recommend consulting with your IT resource to make sure incoming connections to the database are permitted while security is maintained.
Windows 8
- Go to Windows Start > Apps > Windows System > Control Panel.
- Click System and Security > Windows Firewall. The Windows Firewall screen will appear.
- Click Advanced Settings. The Windows Firewall with Advanced Security screen will appear.
- Follow the instructions from step 3 as for Windows Server 2019 below.
Windows 10
- From the Windows desktop, type 'Firewall' into the search bar next to the Windows icon in the bottom left.
- Click Windows Firewall with Advanced Security from the search results. The Windows Firewall with Advanced Security screen will open.
- Follow the instructions from step 3 as for Windows Server 2019 below.
Windows Server 2012 R2
- Go to Windows Start > Administrative Tools.
- Double-click Windows Firewall with Advanced Security. The Windows Firewall with Advanced Security screen will open.
- Follow the instructions from step 3 as for Windows Server 2019 below.
Windows Server 2019
- From the Windows desktop, type 'Firewall' into the search bar next to the Windows icon in the bottom left.
- Click Windows Firewall with Advanced Security from the search results. The Windows Firewall with Advanced Security screen will open.
- Click the Inbound Rules tab on the left hand side. Under Actions on the right hand side, click New Rule.... The New Inbound Rule Wizard will appear open at the Rule Type tab.
- Select Port and click Next.
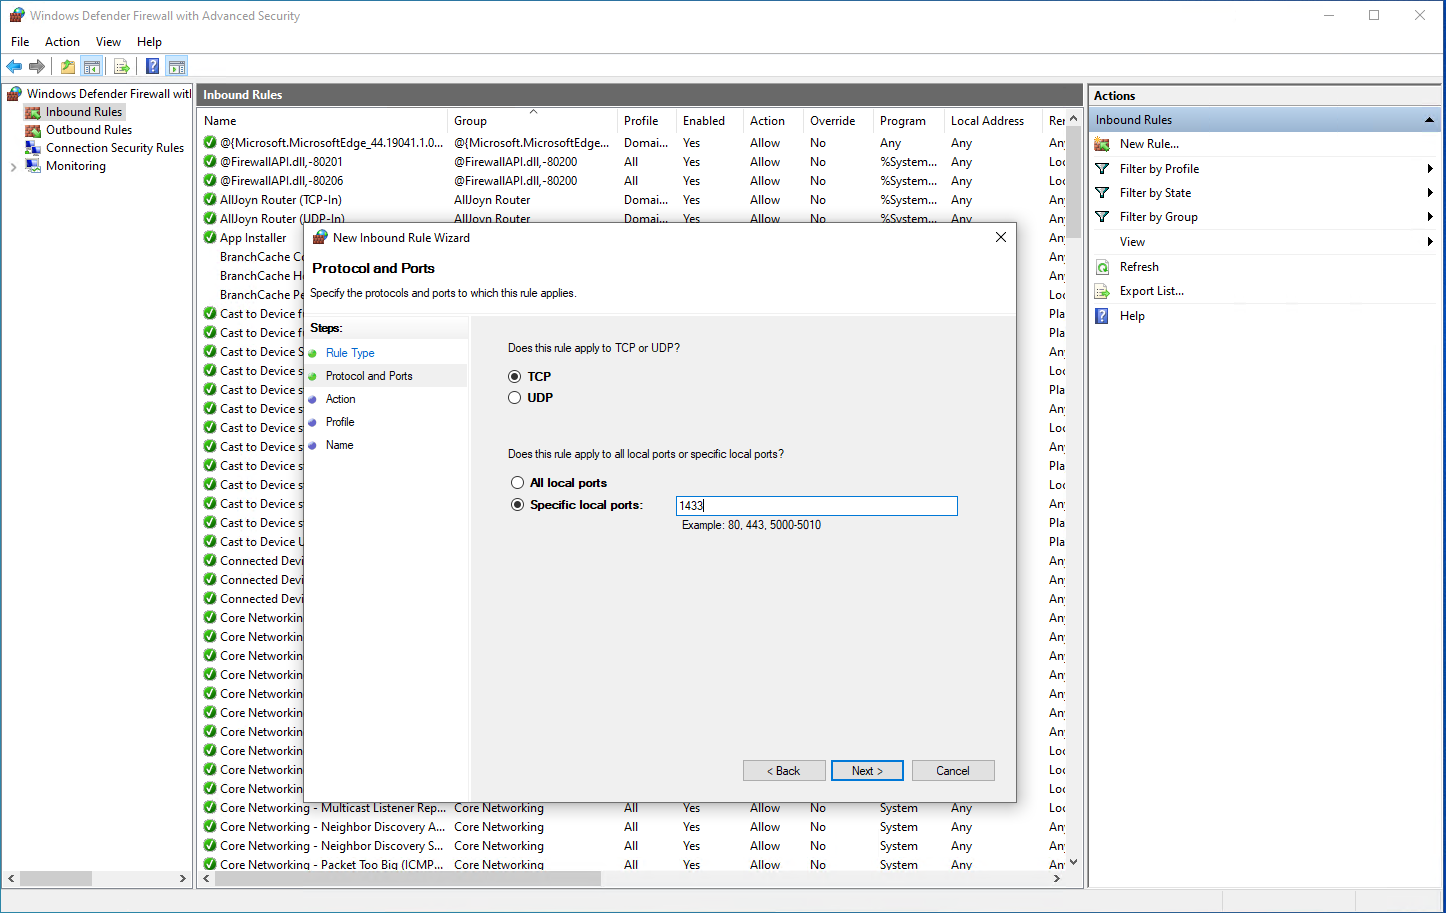
- Leave TCP selected. Select Specific local ports and enter '1433'. Click Next.
- Select Allow the connection. Click Next.
- Leave all profiles Domain, Private, and Public ticked and click Next.
- Enter a descriptive Name such as 'SQL Server', include a Description if you want, and click Finish.
- The Inbound Rule will be added to the list as the name you added in step 8. Double-click the rule to view the Properties.
NOTE If your practice's network uses IPsec for increased security, you may need to select Allow the connection if it is secure.

Last modified: 26 August 2022