This article explains how to indicate that a patient has given permission to upload specialist documents to My Health Record, and manage uploaded documents in the Documents list. You will need to have installed your NASH certificate and configured Bp VIP.net for My Health Record access.
The functionality described in this article is available only if you have updated to version 2.1.526.051 ('Topaz') of Bp VIP.net. To see the version of Bp VIP.net you have installed, select Help > About from the main menu.
View all My Health Record documents
Upload and manage specialist letters
Save a document to patient correspondence
View all My Health Record documents
- Click the MHR button to open the Manage My Health Record document list and view all uploaded documents, such as donor registrations, discharge summaries, referrals, specialist correspondence, and prescriptions.
Some documents authored by My Health Record, such as the Medicines View, Pathology Overview, Diagnostic Imaging Overview, and the Medicare Overviews, are always displayed at the top of the list. These are dynamic documents that will update the information inside the document when new episodes and documents are uploaded.
New prescription episodes will upload the medication to the Medicines view. Links in each dynamic view will display the original record authored by the clinicians when clicked.
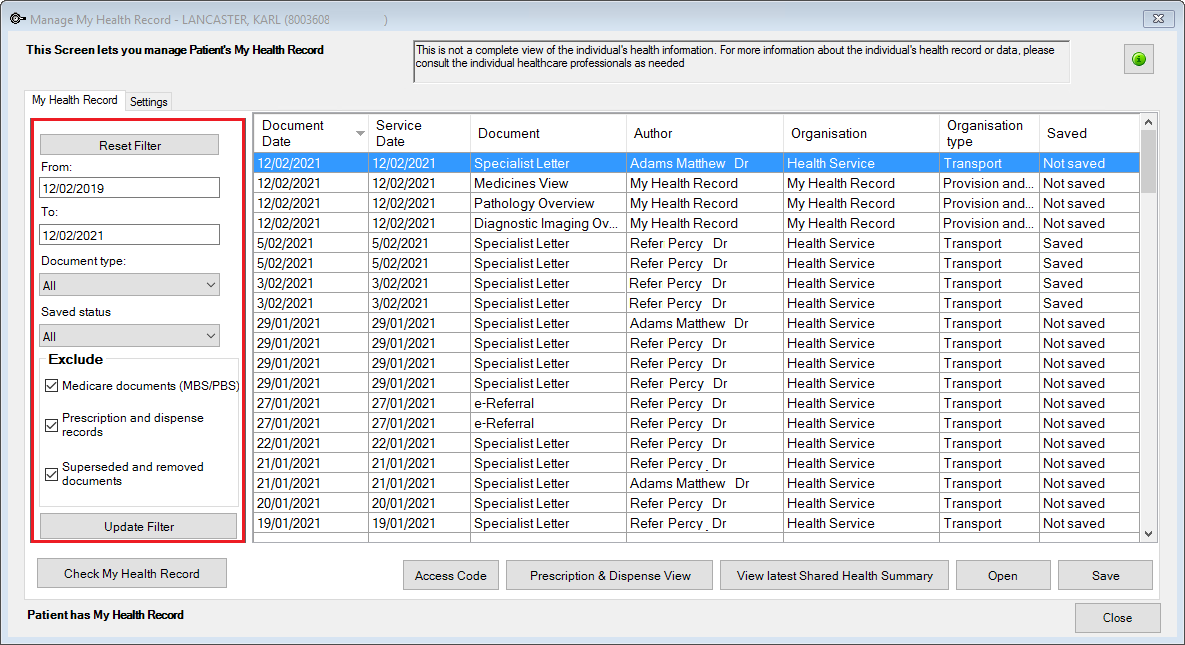
Use the filters on the left side of the screen to adjust the documents that are shown:
- Reset Filter — Resets filter values to default
- From / To — Only show documents uploaded during the date range
- Document Type — Only show documents of the selected type
- Saved Status — Show only saved, unsaved, or both
- Exclude... — Do not show documents of the selected type. See Find superseded and deleted documents for more information.
Click Update filter to apply filter settings to the list of documents.
Click on a column heading to sort the list by that column. ‘/\‘ or ‘\/’ in a column header indicates whether the list is sorted in ascending or descending order by that column.
The buttons along the bottom have the following actions:
- Access Code — Click to use a patient's restricted access code or emergency access to view the documents in the patient's My Health Record.
- Prescription and Dispense View — Opens the Prescription and Dispense view to view prescription events.
- View Latest Shared Health Summary— Opens the Shared Health Summary including the most recent changes. A warning will display if the patient has no Shared Health Summary uploaded yet.
- Open — Opens the document in the Bp VIP.net document viewer for printing.
- Save — Saves to document to patient correspondence. See Save a document to patient correspondence for more information.
Print a document
- From the My Health Record home screen, select a document and click Open or double-click on the selected document. The document will open in a viewer. Right-click on the document and select Print.
- From the patient's MyComms screen, you can click the Print Preview button above the document to print a letter, or click the blue link of the attached Report and click Print Preview to print a copy of the letter.
Find superseded and deleted documents
Documents can be superseded over time by the document author, for example, if information was omitted in an initial upload of an Event Summary. Not all document types can be overwritten this way.
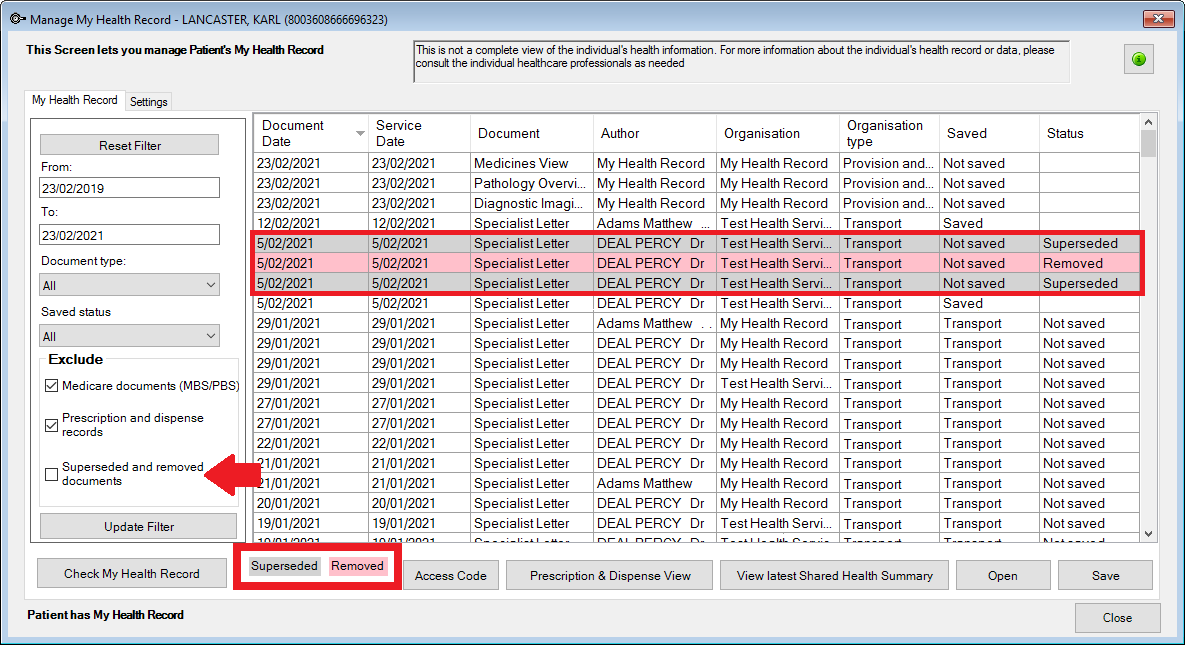
If you have saved a document that has been superseded or deleted after you have saved the document in Bp VIP.net, untick the Exclude... Superseded and Removed Documents filter and click Update Filter to see whether the author has superseded or deleted the record.
Superseded documents, where the original document has been amended, will display in grey. Removed documents will display in pink as per the key at the bottom of the screen.
Upload and manage specialist letters
Set up templates as a specialist letter
For letters can be uploaded to My Health Record, the letter template must be set as Specialist Letter:
- Click Setup > Letter Templates.
- Select the first template used for creating clinical letters for your patients.
- Click the Options button.
- Click on the My Health Record tab and select 'Specialist Letter' from the drop-down menu.
- Click OK to save and repeat steps 2–5 for each letter that you require to be uploaded to My Health Record.
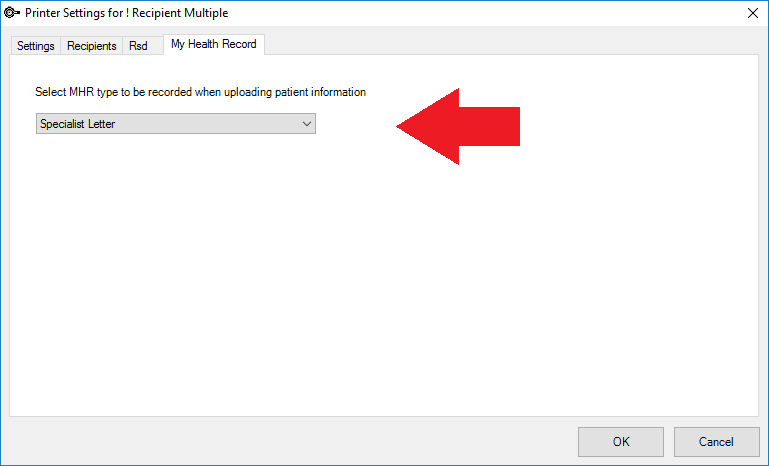
The document type of 'Specialist Letter' must be defined to enable upload. Specialist Letter is the only ‘type’ of document you can upload from Bp VIP.net. You can also amend the letter type to Specialist Letter on the Letter editing screen or prior to upload to My Health Record. Recording the MHR type as a Specialist Letter in the template Options screen will save time when uploading letters.
Upload letter to My Health Record from MyComms
When the letter has been created, the upload can be performed as part of the Print-Lock process or after the letter has been printed or sent.
Upload after the letter as part of the Print-Lock process
- Click the Outbox button, or if the patient is in the snapshot, click F4.
- Click the New button or press Insert on your keyboard and select Correspondence or Referral.
- Select the Recipients in the Letter Recipient screen (if you are using a template with the Single or Multiple Recipient function) and click OK.
- Complete the content of the letter.
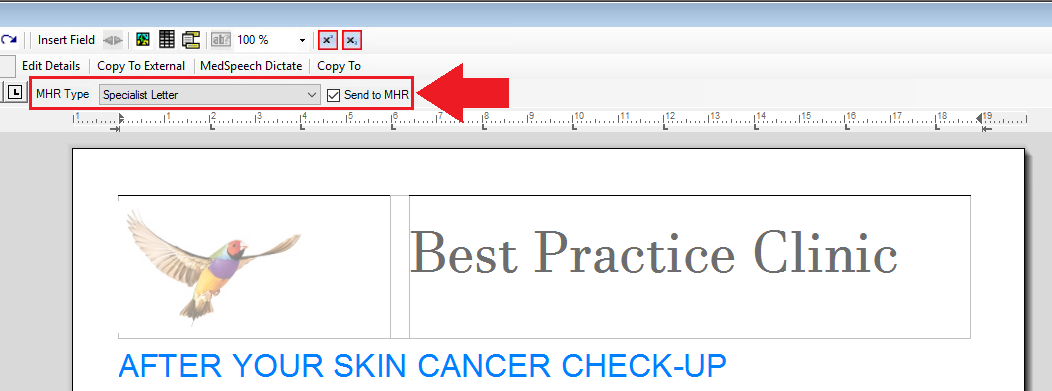
- The new MHR Type section displays if the letter has been configured as a Specialist Letter in the template options then this letter type will be displayed.
- 'Specialist Letter' can still be selected in the MHR Type drop-down at this point, but the selected value will only be remembered for this letter, not future letters.
- The Send to MHR tick box will be empty by default. Tick this box and click the Print-Lock button.
- The Letter Recipients screen appears again. Click OK.
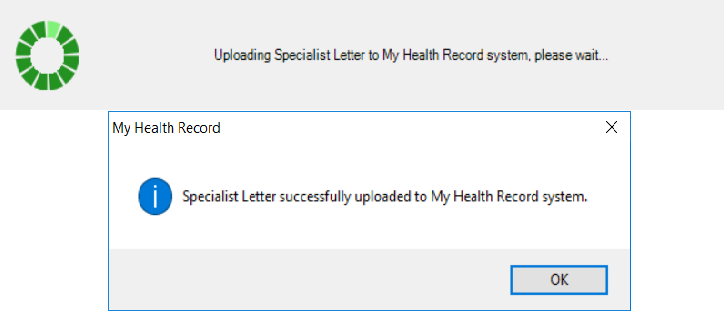
- The letter will print and send and upload to My Health Record. Bp VIP.net will indicate a successful upload.
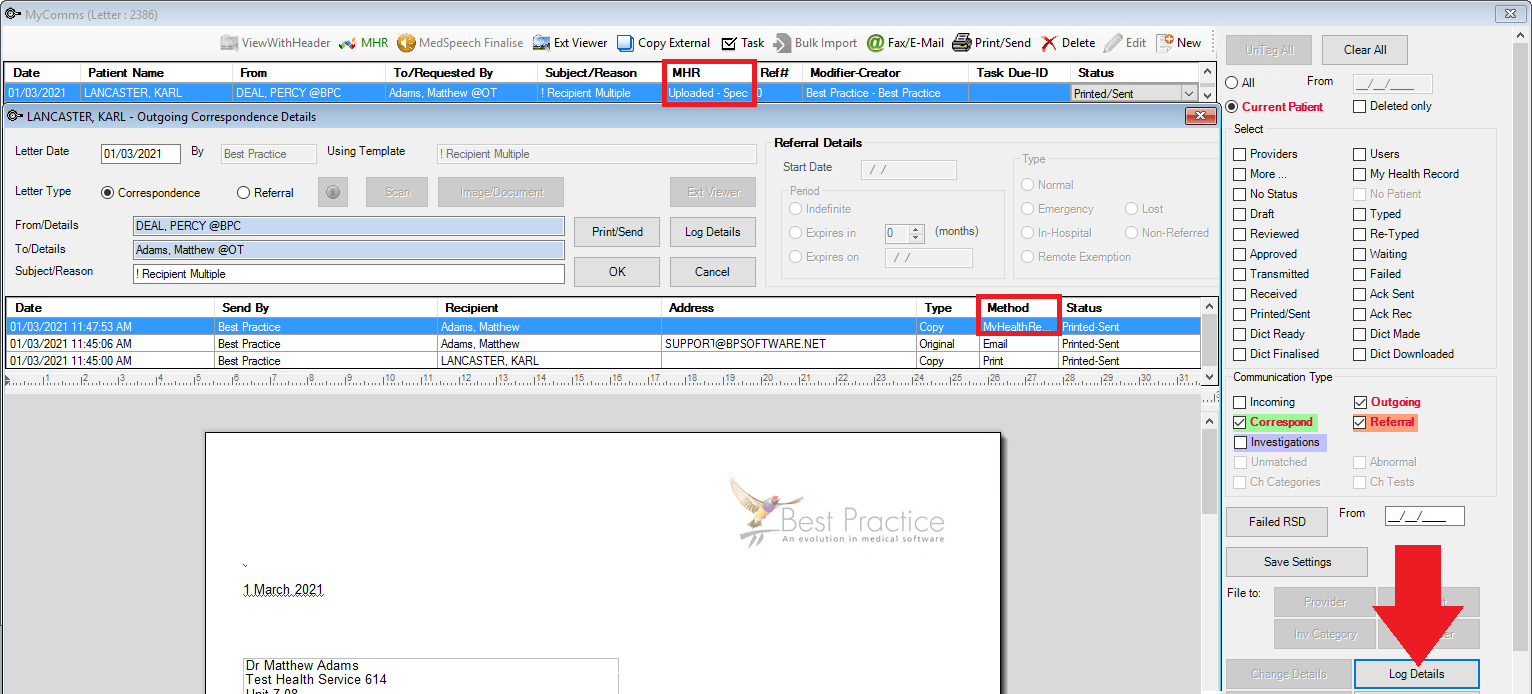
- Click the Log Details button to see the method of sending the letter.
- The MHR button will change to green and the MHR column on the MyComms screen will display 'Uploaded – Spec', indicating that the letter has been uploaded to MHR.
Upload the letter after the letter has been printed or sent
- Select the required patient and click F4.
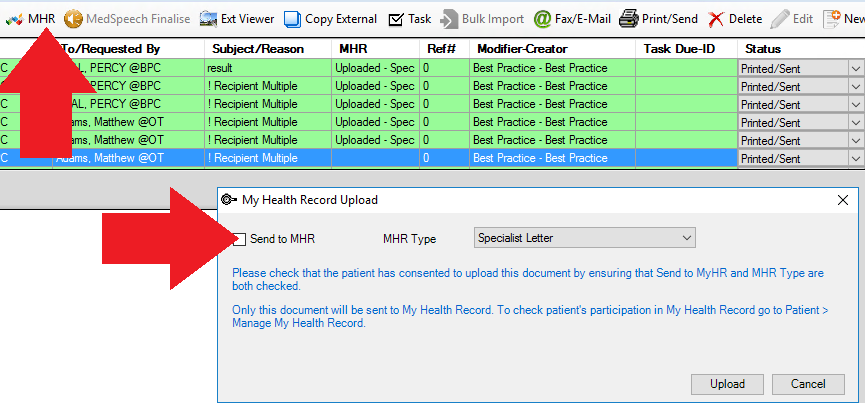
- Select the letter you wish to upload and click the MHR button from the MyComms menu. The My Health Record Upload screen is displayed.
- Tick the Send to MHR tick box. Read the blue text and click Upload when you are ready to complete.
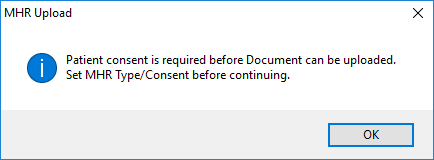
- If the patient has not opted in to My Health Record in Patient Details, the following message will remind you to check with the patient for consent prior to uploading.
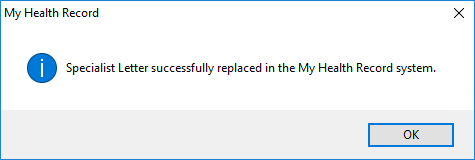
- Confirmation will display when the letter is successfully uploaded.
The MHR Type will default from what was recorded on the letter editing screen when sent.
IMPORTANT If you upload a letter that is not in a Printed/Sent status, uploading the letter will enforce a status of 'Printed/Sent' and send the letter via the selected sending methods as well as uploading to My Health Record.
Supersede an uploaded document
If you realise that a letter uploaded needs to be amended, you can only do this through the MHR button.
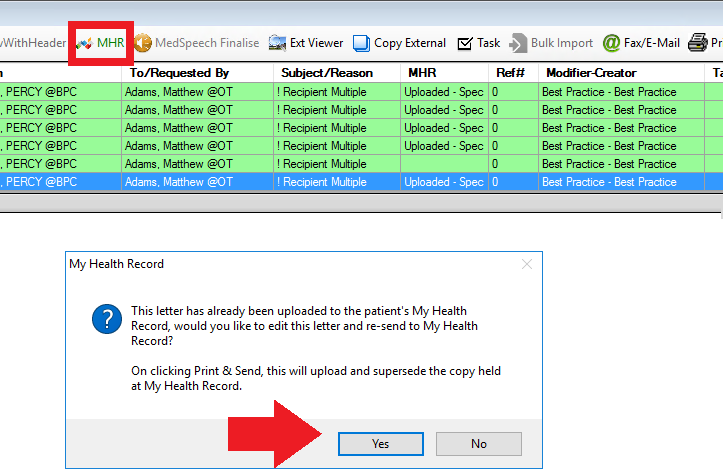
- From MyComms, select the letter and click the MHR button. A My Health Record warning is displayed.
- Click Yes to edit and supersede the original copy. The Correspondence screen opens again for you to edit the letter.
- Edit the letter and click Print-Lock to save the record and upload the amended letter to My Health Record.
The MHR Type and Send to MHR fields are disabled, as this letter will be uploaded to replace the original letter.
MyComms will show the original record with 'Superseded' displayed in the MHR column, as well as the new uploaded version.

Delete an uploaded document
If a letter has been uploaded in error, you can delete the record from both Bp VIP.net and My Health Record.
- Select the required patient and click F4.
- Select the letter and click Delete. Bp VIP.net will warn the user that the letter has been uploaded to My Health Record and that copy will also be deleted.
-
Click the Yes button. Bp will prompt to indicate the reason.
-
Select the Remove document reason and click OK.
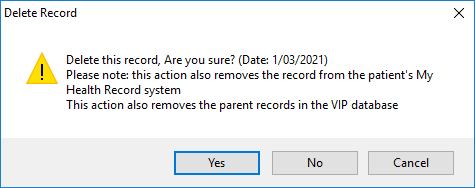
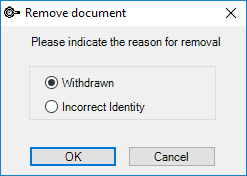
The document will be removed from My Health Record and show as a ‘removed’ record on the patient's My Health Record screen. The removed record cannot be viewed or downloaded to any other provider's database.

When the Deleted filter is used in the MyComms screen, the deleted record will show in strikeout font and the selected reason for removal will display with the subject of the letter.
Save a document to patient correspondence
- From the My Health Record home screen, select a document and click Save. Bp VIP.net will indicated a successful save to patient record: ‘The document has been saved successfully’.
- Click patient correspondence button or Shift F4 to show saved documents in the patient file.
- Click the Change Details button to:
A status of ‘Saved’ in the Saved column of the My Health Record home screen indicates that a document has been downloaded and stored in a patient record.
If the document is deleted from the patient record, the 'Saved' status will be reset to ‘Not saved’ to indicate that the document no longer exists in a patient record.
- File documents to providers
- Change the type to 'Referral'
- Change the subject reason.
The MHR column will always show the document ‘From MHR'. You should not need to ever file to another patient as you are accessing the My Health Record from the patient’s MyComms screen.
The Log Details screen will also show the Address as 'From MHR' and the Method as 'MyHealthRecord'.
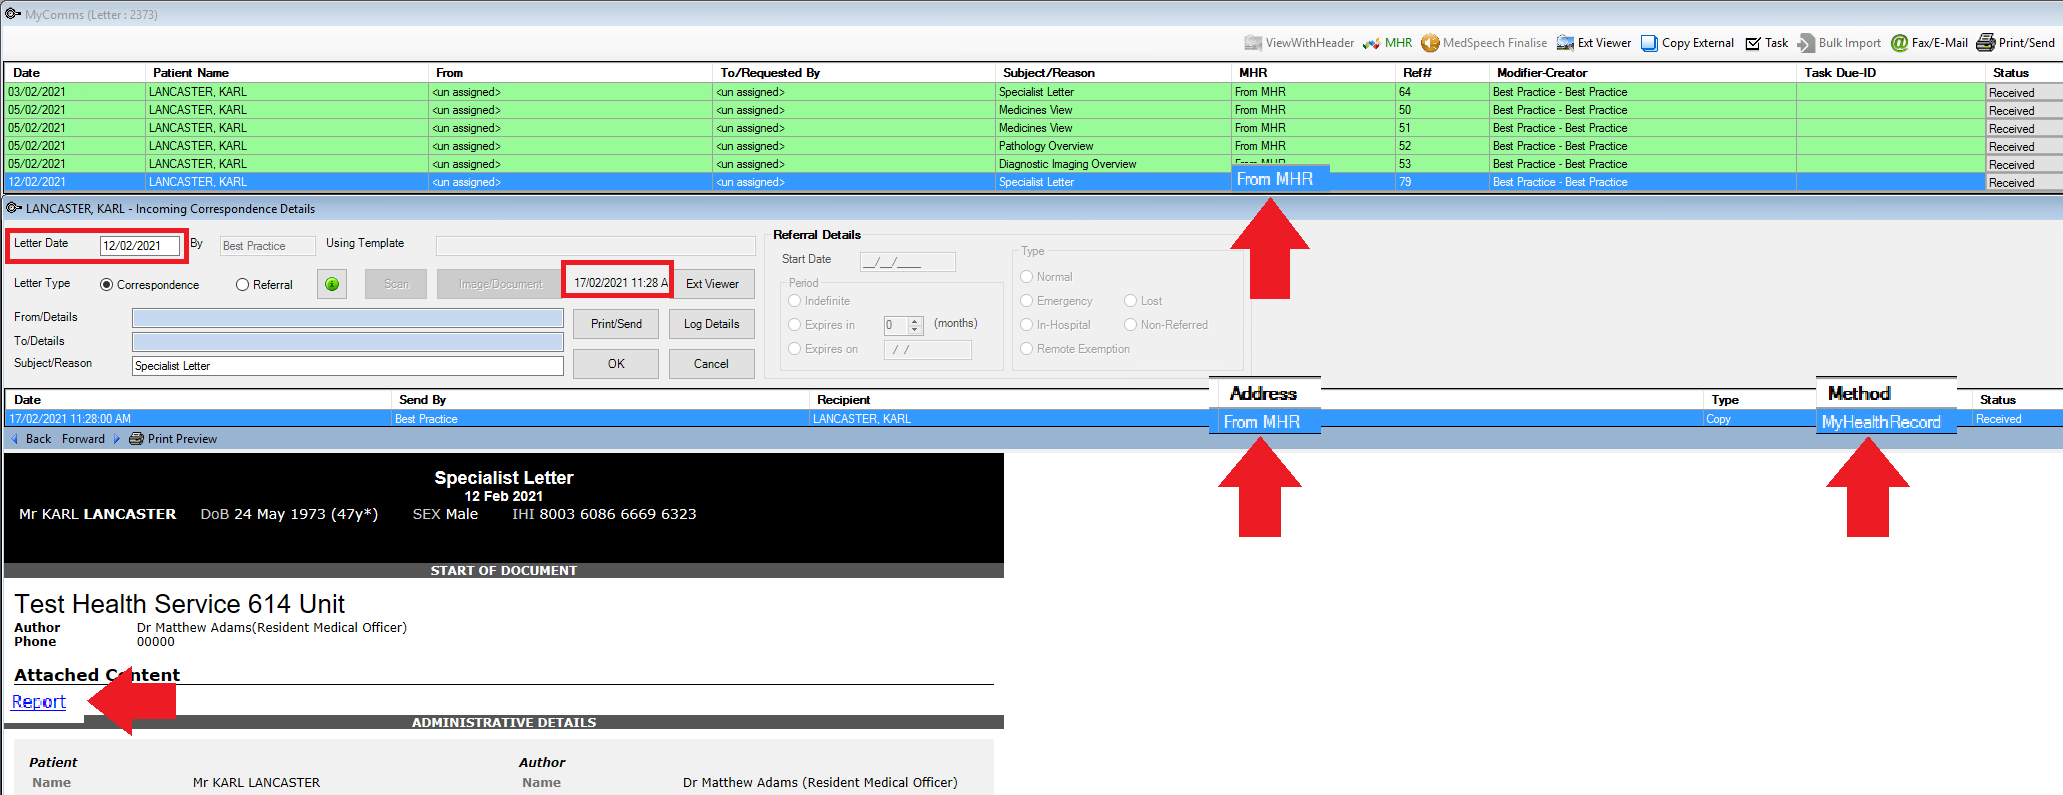
IMPORTANT Because you have downloaded this document from My Health Record, when considering the content of the letter as part of patient care, you should check in the patient's My Health Record in the future to ensure this copy has not been superseded or deleted, .
Related articles
Last modified: 9 June 2022