Adding more Client Details
This section covers in general the fields available for the capture of a clients demographic information. Not all of the fields will be available in all of the module layouts and their location may differ depending on the module installed.
The only fields that are required to be entered for a Client are First Name and Last Name. All other fields are optional. However, if an address is going to be entered for example then there are fields that are required to be entered to make that entry valid. These fields are denoted with an * e.g. Phone Type.
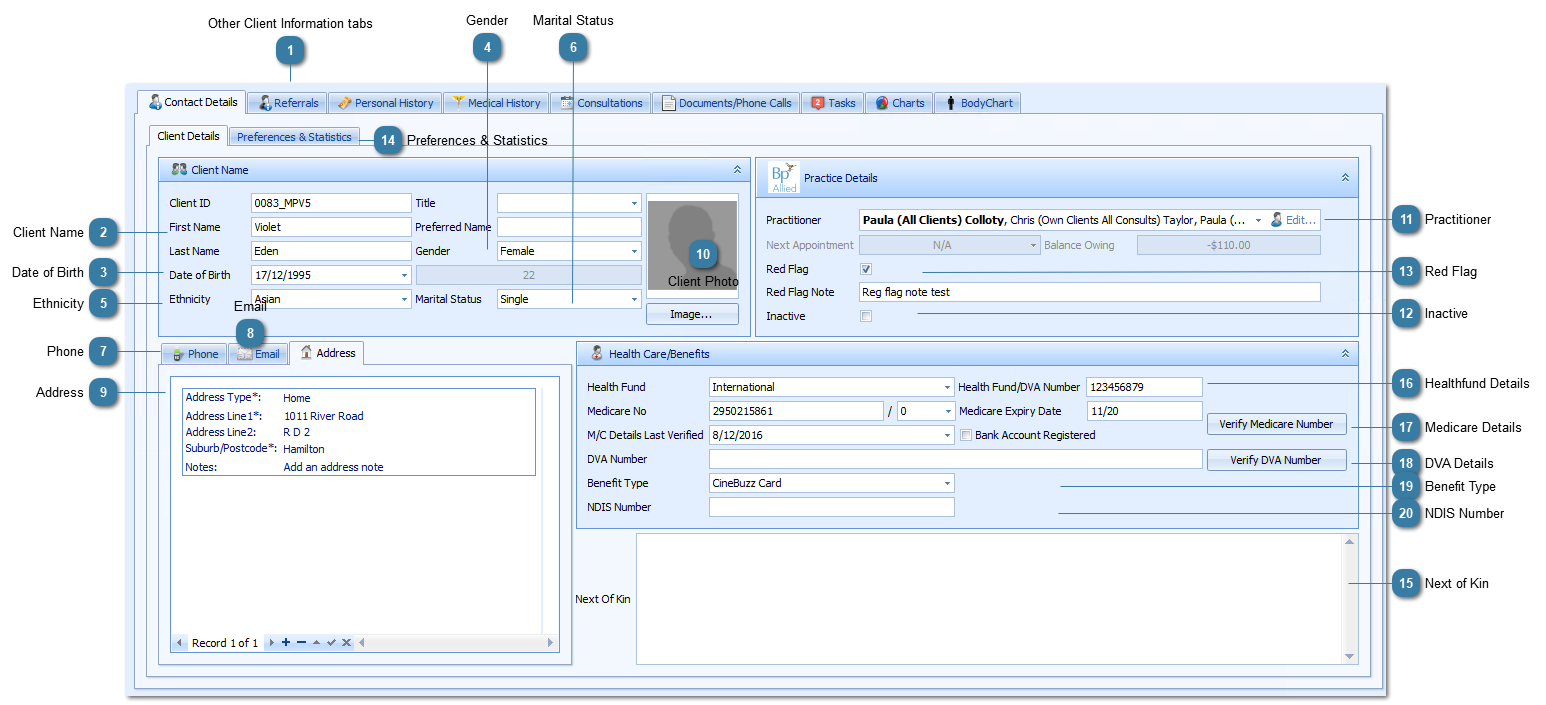
Other Client Information tabs
|
Client Name The Client ID is automatically assigned when a new Client is created.
A Client can be given a Title if required. The list of Titles available in the drop down list can be edited or added to via System > Data Maintenance > Titles
A Client's First Name amd Last Name are the only required client demographic details. Capture of all other details are dependent on individual business process.
A Preferred Name can also be added. This name could then be used in letters created from within Bp Allied. Note that if this is going to be used then it would need to be entered for all Clients so that the letters using the field will merge correctly for all clients.
Click in a field and type to edit.
|
EthnicitySelect the Ethnicity of the client. This field will also show in Reports and can be edited under System > Data Maintenance > Ethnicity.
|
PhoneUse the Arrow keys to scroll between phone records
Click on the + to add a new Phone Number
Select the Phone Type
Enter the Phone Number
Tick the Primary Phone tick box if it is their main contact number. This number will then display in the Appointment book if the option is enabled in System > Options > Appointment Book
Click the tick
Click Save
|
Click on the Email tab to view the clients email addresses
Use the Arrow keys to scroll between email records
Click on the + to add a new Email Address
Enter the Email Address
Click the tick
Click Save
|
Address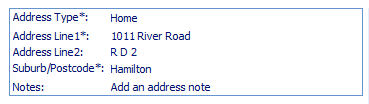 Click on the Address tab to view the clients addresses
Use the Arrow keys to scroll between address records
Click on the + to add a new Address
Select the Address Type
Enter Address Line 1 (Mandatory)
Enter Address Line 2, if required
Enter Suburb/Postcode (Mandatory)
Tick the Primary Phone tick box if it is their main contact number. This number will then display in the Appointment book if the option is enabled in System > Options > Appointment Book
Click the tick
Click Save
|

Practitioner
For details on editing this please review the sections on Client Access Permissions and Manually editing permissions for a Client
|
InactiveA tickbox that can be used to indicate whether a client is no longer an active client
If this is ticked then the Client can not be added to an appointment. The screen will display with a red X and all fields except for Cancel will be disabled.
 To display Inactive clients tick this option in System > Options > Client Details
|

Preferences & StatisticsThe Preferences & Statistics Tab includes preferences that can be set for a Client. For example:
|

Healthfund DetailsEnter in Health Fund by using the drop down lists
|
Medicare Details Enter in the Medicare No by clicking and entering into the field
Select the Medicare No suffix from the drop down
Enter in the Medicare Expiry Date as MM/YY e.g. 03/15
Enter in the M/C Details Last Verified date by using the drop down list or clicking into the field and typing in the date
Click Verify Medicare Number to check that the number is valid. This is required if running Medicare Online Claiming from within Bp Allied
Bank A/c registered with Medicare is an informational only box to indicate that the Client has their details registered and therefore any rebates resulting from running Medicare Online Claiming on their behalf will be directly input into their bank account.
|
Benefit TypeEnter in Benefit Type by using the drop down lists
|
NDIS NumberEnter NDIS Number here. This is used in the NDIS report.
Click Save to save all the client details entered
|
The ATAPS layout will show some additional information including SLK, Generate SLK and the ATAPS Client checkbox.