
Guidance based Requesting (GBR) is a workflow for requesting pathology tests. GBR uses the same Pathology Request screen as requesting from Favourites or adding tests manually, so the process is no different for providers used to ordering requests in Bp Premier.
For more information on the benefits of Guidance-based Requests, review What is Guidance-based Requesting?.
The main steps in a guidance based request are:
- Select the applicable clinical contexts, and select from the recommended tests for those contexts.
- Add any suggested tests that commonly return abnormal results for the context and patient demographic.
- Add from favourites and other tests.
- Include relevant clinical information, such as Rx and Past History or free text notes.
- Print collection notes for the patient and indicate out-of-pocket costs, if any.
- Submit the request.
You can use the guidance based request screen to:
- Add tests solely based on the suggested clinical contexts.
- Add tests from favourites and add additional tests from related clinical contexts.
- Add tests from favourites and other tests with no reference to clinical context.
or any combination of the above. At any time, you can click Clear all tests to restart the GBR request.
In this article:
Before you begin
You will need to enable guidance-based requesting for providers who wish to use this request flow, and set up at least one laboratory to accept GBR tests. See Enable Guidance-based Requesting for more information.
Order Pathology tests using Clinical Contexts
- From the patient record, press Ctrl+F6 or click the Pathology icon
 . The Pathology Request screen will appear.
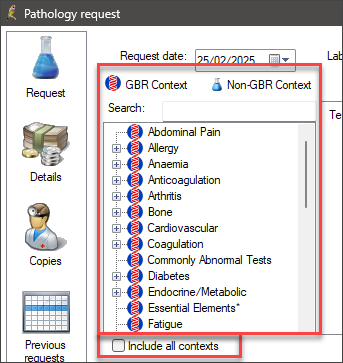
 - Contexts will be pre-filtered using the patient's demographic information. To display all contexts and ignore demographic filtering, tick Include all contexts.
- If a context is not displayed, scroll up or down the list or, to search for a particular context, begin typing in the Search bar. The contexts will be filtered to include only those applicable to the search keyword.
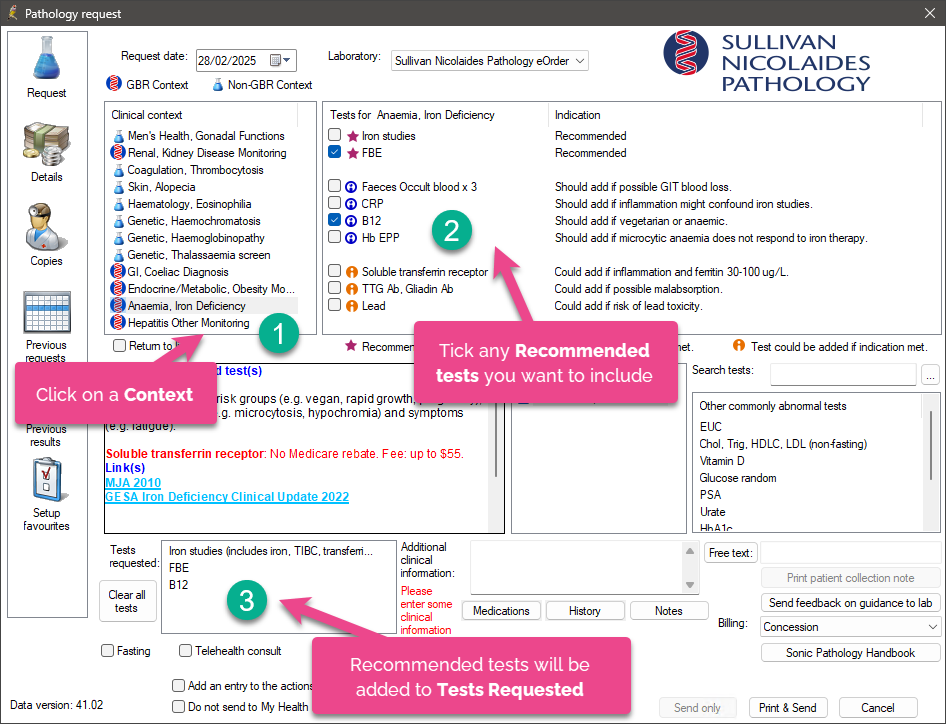
- Click on a Context to open a full panel of recommended Tests on the right-hand side.
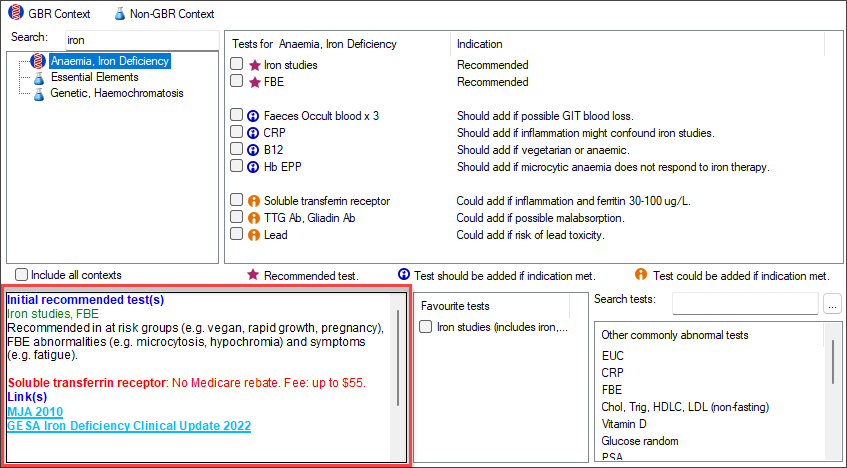
- Recommended test: for initial investigations for all patients.
- Test should be added if indication met: further investigative tests of relevance to the specific condition under investigation. Consider referring to these tests based on the patient’s personal medical circumstances and in the context of the results of the initial tests.
- Test could be added if indication met: these tests are discretionary and not specifically aligned to the condition under investigation. In referring to any of these tests, consider their suitability with respect to the patient’s clinical condition, symptoms, current health status and co-morbidities.
- Initial recommended tests are displayed in green with supporting text in black.
- Tests that will incur out-of-pocket expenses are displayed in red.
- Tests that may incur out-of-pocket expenses are displayed in pink.
- Tests that are based on current clinical guidelines are displayed in light blue. Double click to view the source.
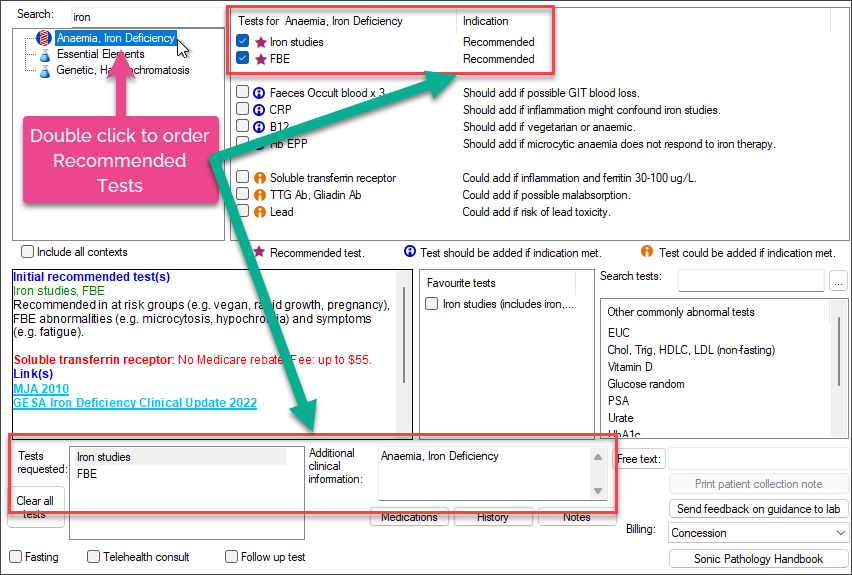
- Double click on a Context to order Recommended Test/s and populate Additional clinical information.
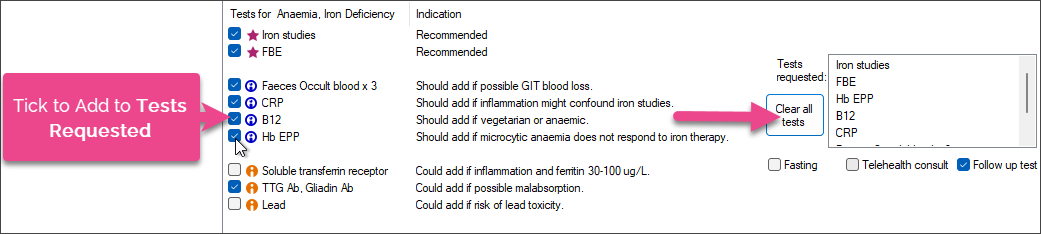
- To order tests that are marked as Should be added if indications are met and Could be added if indications are met, tick the check box to the left of the test name, and the tests will be included in the Test Requested list.

NOTE If the screen doesn't look like the example above, check that the selected Laboratory at the top of screen has been enabled for guidance-based requesting. You may wish to set this laboratory to be your preferred laboratory for pathology.
Contexts will be filtered using the following patient information: age, birth sex, pregnancy, Aboriginal and Torres Strait Islander and diabetes status.
For example, the context 'antenatal screen' will only be displayed if the patient is pregnant. The context of 'prostate screening' will be displayed exclusively for male patients who are 45 years of age or older.
GBR Context key:
 GBR Context: full rigour of Guidance Based requesting with explicit clinical references.
 Non-GBR Context: based on the expert opinion of Sonic Healthcare pathologists and may extend beyond primary care.


The list of Tests for the selected clinical context will be categorised as follows:

Additional information located beneath the clinical Context section offers information to support clinical decision-making and patient reference, including out-of-pocket costs and links to relevant resources.
Additional information will be organised by colour, and an explanation of the meaning of each colour is provided below:
If you are satisfied with the tests recommended from clinical context and do not wish to add any more tests, you can start adding clinical information for the lab.
Otherwise, you can add tests identified as commonly abnormal results for the context, and add tests from your favourites.
Add common abnormal tests
Guidance-based requesting also provides a list of tests that have been determined to produce common abnormal results based on the patient's demographic information. This data is based on analysis of over one million pathology requests by providers.
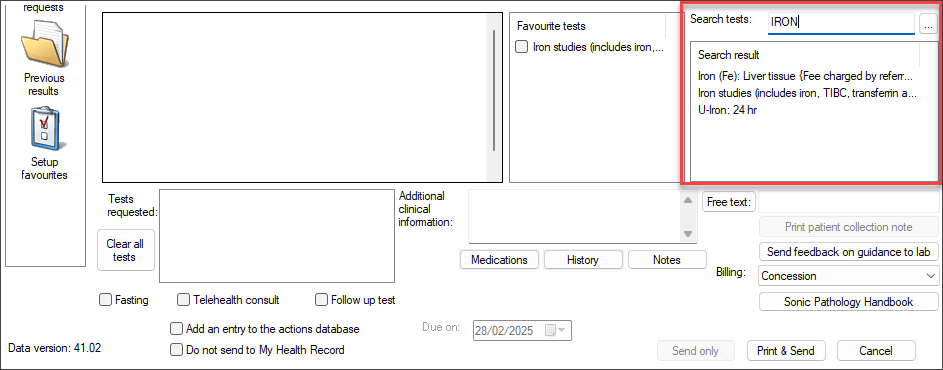
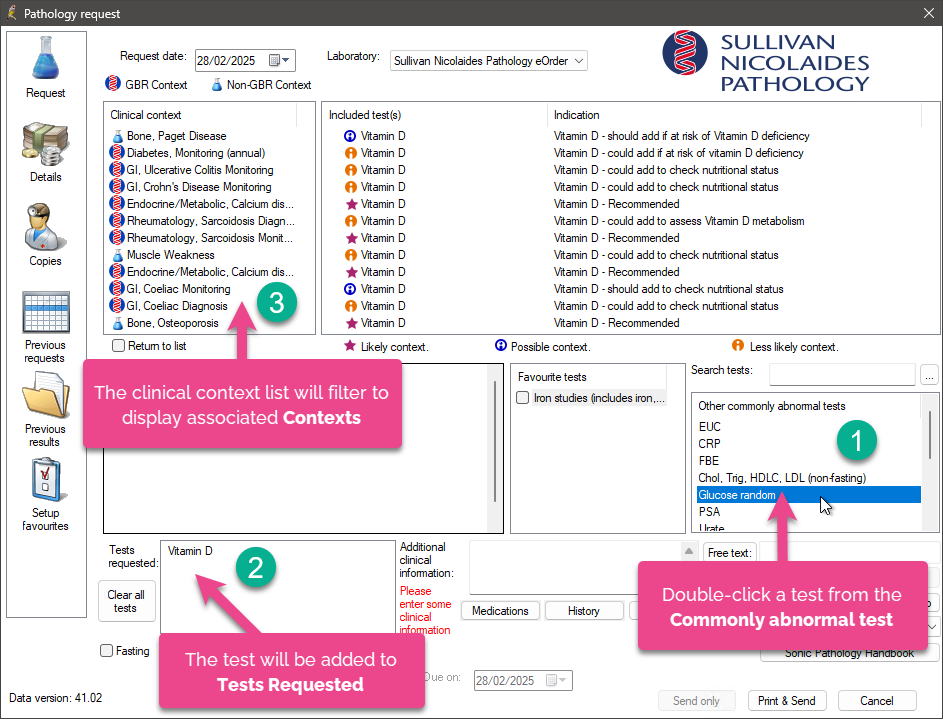
On the right side of the screen is the 'abnormal tests' list beneath a Search tests bar.

Double-click a test to add it to the Tests Requested list.
NOTE The Search tests search bar is for searching additional tests to add, and is unrelated to abnormal tests. Clear the search field to look at common abnormal tests again.
Add favourite tests, other tests, and free text tests
Favourites
The Favourite tests list is located in the middle of the Pathology Request screen.

Tick a test in this list to add to the Tests Requested list.
Favourite tests must be set up in the Setup favourites tab of this screen to appear for selection. You can compile favourite test lists for each laboratory you use.

Other tests
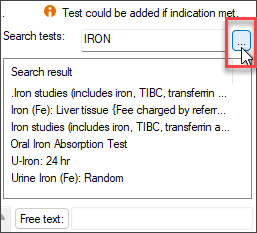
To search for other tests, use the Search Tests bar on the right side to search for additional tests using keywords.
The Commonly Abnormal tests field will be updated to display Search Results.
To search test names that include the specified text, instead of a related keyword, click the ellipsis button ....
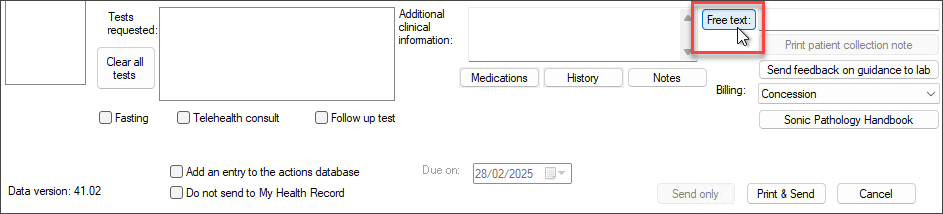
Free text
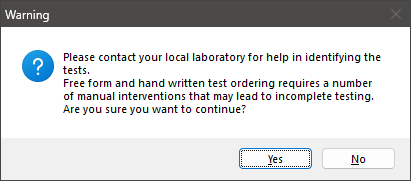
Use the Free text box located in the lower right corner of the screen to enter tests that are not available under Clinical Context, Abnormal tests, or Favourites.
Bp Premier will prompt you to confirm with the intended laboratory the test you are adding. Free text requests may not always be interpreted correctly by a laboratory, or the test may not be available.
Add tests with Test to Context mapping
Test to context mapping, also known as 'backmapping', involves adding tests from favourites or searches and then inspecting the related contexts for additional tests that might be useful.
NOTE If this option doesn't seem to be working, from the Pathology screen, go to the Setup Favourites tab and tick Enable “Backmapping” of tests to clinical contexts.
- From the patient record, press Ctrl+F6 or click the Pathology icon
 . The Pathology Request screen will appear.
 - Add a test from your Favourites tests list.
- The Clinical Contexts list will be updated to display all Contexts associated with the Test you selected from Favourites.
- Click on a Context to display a full panel of Recommended tests.
- Review the recommended tests and tick any tests that should be added to the Tests Requested list.

When you double-click a test from the Commonly Abnormal Test list, it is added to Tests Requested, and the clinical context list is filtered to show associated Contexts.
Tests that have been added by free typing into the Search tests field will only backmap if both the following are true:
- The test is a Recommended, Should, or Could test for a clinical context
- The typed test name matches the test name in the clinical context exactly.
The clinical context field will remain blank when tests that are not associated with a clinical context are added.
Add clinical information for the lab
Once you've included all of the tests you want in this request, you can provide Additional Clinical Information to the laboratory in a number of ways.
TIP To delete content from Additional Clinical Information, highlight the text with your mouse and press the backspace or delete keys.
Add free text
Free type directly into the text box. Press Enter to move to the next line.

Add from Today's Notes
Notes can only be added from the current consult. It is not possible to include notes from previous visits.
- Click Notes underneath Additional clinical information
- Use the mouse to select the text from today's notes you want to insert, and click Insert.
- The selected text will be added.


Add clinical context items
Right-click inside the Additional clinical information field to open a long menu of clinical items, based off the patient's demographic. Select an item to add to additional information.

Add from active Medical History or Rx
If the patient has current Rx or active conditions, the Medications, and Medical history buttons will appear at the bottom of the Pathology Request screen:
- A red plus sign indicates you must supply details before the request can be submitted.
- A green plus sign indicates active Rx or conditions are present and may need to be added.
- A tick indicates that Rx or conditions have been added.
- Click a button to add details. For example, if you click Medications, the Include Current Rx window will open showing all current Rx for selection.
- Select the medications or conditions to include in the pathology request and click OK. The button will be updated to a green tick.
Add a context to clinical information
If you double-click a context to add recommended tests to the Tests requested list, the context will usually also be added to Additional clinical information. You can also right-click a context and select Add to Clinical information to add the context without adding any tests.

Print collection notes for the patient
The Print patient collection note button in the lower right is enabled if the test requires any preparation from the patient, such as fasting.

Click the button to open a preview of the collection note, with patient name and laboratory logo at the top. Click Print to print the notes.
Out of pocket information for the patient
Potential out-of-pocket expenses are indicated in the general information box beneath the context list. The following example shows potential and actual out of pocket costs.

Pink indicates that a test may incur a patient expense. Red indicates that a test will incur a patient expense.
Add Cervical Screening tests
Depending on the patient's gender and age, cervical screening tests will appear in the recommended tests list for appropriate clinical contexts.
Selecting any test for cervical or vaginal screening will automatically open the CST details screen.

To rapidly order a routine cervical screening test, tick Routine CST, Normal Cervix, Asymptomatic at the top of the screen. Fields will be preselected and disabled for non-complex testing.
Otherwise, complete the details for the cervical or vaginal screening test and click OK to return to the Pathology Request screen.
Past history and Examination
The Follow-up/Past History and Symptoms for investigation sections on the right hand side are automatically populated with data recorded from the patient clinical record.
Past history is populated with past conditions:


Symptoms for investigation is populated by the Gynae section of History and Examination:


CST self-collection
If a self-collected CST is selected as a recommended test, the CST Details screen will only enable clinically appropriate options for selection. In the following example, selecting the Self collected Vaginal HPV test disables most of the options.


Look up supporting information
The Pathology Request screen for GBR contains several hyperlinks and right-click options to obtain more information about a context or test. See also Out of pocket information for the patient.
Information about a context's recommended tests
When you select a context, information about the tests associated is shown in the general information box beneath the context list.

Initial recommended tests are shown in green text, with supporting context following.
Tests of no value
Tests that are often ordered for a context but usually provide no added value are shown next, with supporting explanation.

Additional resources or tools associated with a context
Hyperlinks are available for most contexts in a Links section (seen in both examples above) that will open in your default web browser. These links provide clinical resources to aid decision-making.
Additional information about a test
In the Commonly abnormal tests and Tests requested fields, right-click on any test and select Additional Information to view a popup containing information about ordering or administering the test. Not all tests have additional information.

Information about Guidance-based Requesting
Click Sonic Pathology Handbook on the right side of the screen to open a Sonic website to download education materials. You may need a user account to access.

Send from a telehealth consult
If you are conducting a telehealth consult and do not need to print any request documentation to give to patient, tick the Telehealth consult check box at the bottom of the screen.
The option Send Only will be enabled. Click this button instead of Print & Send to submit the GBR request without printing anything.

Order follow-up tests
You can still use the GBR screen to order follow-up tests suggested by the laboratory. Add the test from favourites or search, and select the Follow up test option at bottom of screen. A note will be added to the Additional clinical information field for reference.

Send feedback about guidance-based requesting
If you have recommendations or questions regarding the information provided or the recommended tests for guidance-based requests, you can submit your data to your laboratory for consideration.
- To provide feedback, select the relevant clinical Context.
- Click Send feedback on guidance to lab on the right hand side.
- The Pathology Ordering Feedback screen will appear. Enter your comments in the text form at the bottom half of the screen. Read the explanatory text to ensure your submission applies only to guidance-based requests
- Click Send.


Troubleshooting
If guidance-based requests are not submitting correctly to the laboratory, or the Pathology Request screen does not look or operate as described in this guide, work through the issues below.
- Fetch3 is required to ensure GBR runs correctly. If you experience issues with information not being received electronically at the laboratory, speak to your IT provider to ensure Fetch3 has been installed.
- If the Pathology Request screen does not offer guidance-based requesting, check that the correct lab is selected in the Laboratory drop-down menu at the top of the screen. You can set your GBR lab to be your preferred laboratory in Setup > User Preferences > Pathology > Edit. This option will always select the laboratory when the Pathology Request screen is opened.
- You may also have laboratories set up with near-duplicate names, and have selected a lab not enabled for GBR at top of screen. You may wish to append '(GBR)' or similar to the labels for labs that have been set up for GBR.
Information correct at time of publishing (27 February 2025).


 AU
AU 