This article describes how to set up Bp Premier to submit Direct Bill Easyclaims through a Tyro terminal.
I have not set up Tyro at the practice before
If you have not yet set up Tyro with Bp Premier for private billing, you must:
- Purchase at least one Tyro terminal device suitable for your practice and connect the device to a Bp Premier workstation.
- Download the Tyro Terminal Adapter Configuration Software and install the software on each workstation that needs to access the Tyro terminal.
- Record the Tyro Merchant IDs provided by Tyro against the practice bank accounts registered in Bp Premier.
- Activate Tyro:
- For Orchid SP2+ see Configure Payment Integrations.
- For Orchid SP1 and below see Configure Easyclaim bulk billing.
For steps 1 and 2, refer to the user guides supplied by Tyro at their website: https://www.tyro.com/guides/. Bp Premier Support cannot assist with installing Tyro hardware or software. For more information, review the instructions for setting up Tyro for private claiming.
For step 3, refer to the setup instructions provided in Set up the Tyro Merchant ID. The steps are the same when setting Tyro up for direct or private billing.
I have already set Tyro up for private billing
If you have already set Bp Premier up for processing private patient billing through Tyro, you do not need to set up terminals or Merchant IDs again.
Start at Activate Easyclaim Bulk Billing in Orchid SP2+ if you are using Orchid SP2+.
Start at Enable EasyClaim Direct billing in Orchid SP1 and below if you are using Orchid SP1 and below.
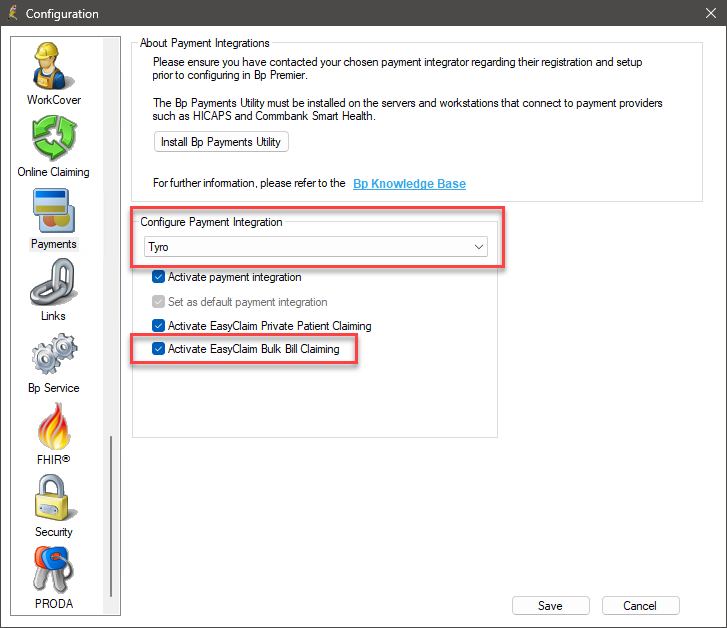
The Configuration menu in Orchid SP2 has been redesigned, and a new tab for managing Payments Integrations has been added. As part of the Payment Integration changes in Orchid SP2, the Tyro Setup.exe has been deprecated; Tyro can now be activated and configured by navigating to Setup > Configuration > Payments.
See Setup Payment Integrations for further information on the changes to Payment Integrations in Orchid SP2.
- Select Setup > Configuration > Online Claiming. The Configuration screen will appear.
- Select the Payments tab.
- Tick Activate EasyClaim Bulk Bill claiming and click Save.

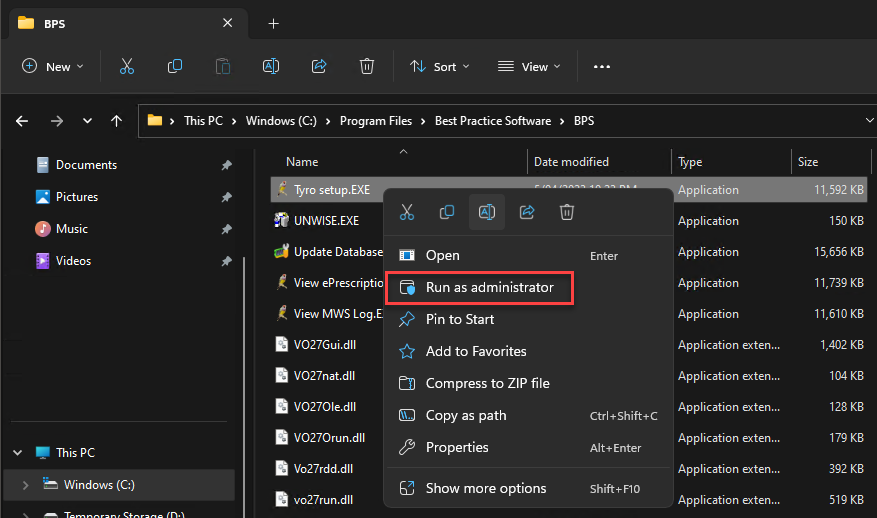
- Log in to Windows on the Bp Premier server as a user with Windows administrator privileges.
- Open a Windows file explorer and browse to the location C:\Program Files\Best Practice Software\BPS\.
- Scroll down to the file Tyro Setup.exe, right-click , and select Run as Administrator.
- Click Yes if Windows UAC or SmartScreen asks for confirmation.
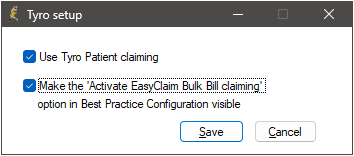
- Log in to the Login window with a Bp Premier user name and password with setup/configuration permissions enabled. The Tyro setup window will appear.
- Tick and click Save.


Complete the steps below on the server or every workstation successfully paired with a Tyro Terminal. You must log in as an administrator-level user with permissions to access Setup > Configuration.
- Log in to the Bp Premier server or workstation.
- Select Setup > Configuration > Online claiming.
- Tick Activate EasyClaim Bulk Bill claiming and click Save.

Last updated 13 December 2023.