This article describes how to process Medicare Easyclaim direct bills and patient claims using a Tyro terminal and explains how to:
- Activate Medicare Easyclaim for direct bill and private practice accounts.
- Process an invoice through Medicare Easyclaim.
- Review sent Medicare Easyclaim and resend unsent claims.
- Correct and resubmit an Medicare Easyclaim.
- Troubleshoot some common errors that may occur during online patient claiming.
The steps in this article assume that you have set up Medicare Web Services and Tyro, and tested that online patient claiming and Tyro work for your Bp Premier installation. If you have not set this up already, see the following articles for more information:
Enable Tyro Medicare Easyclaim in Orchid SP2 or later
The configuration menu in Orchid SP2 has been redesigned, and a new tab for managing Payments Integrations has been added. As part of the Payment Integration changes in Orchid SP2, the Tyro Setup.exe has been deprecated; Tyro can now be activated and configured by navigating to Setup > Configuration > Payments.
See Setup Payment Integrations for further information on the changes to Payment Integrations in Orchid SP2.
- Log in to the Bp Premier server as a user with administrator permissions.
- Select Setup > Configuration from the main screen. Select the Payments tab.
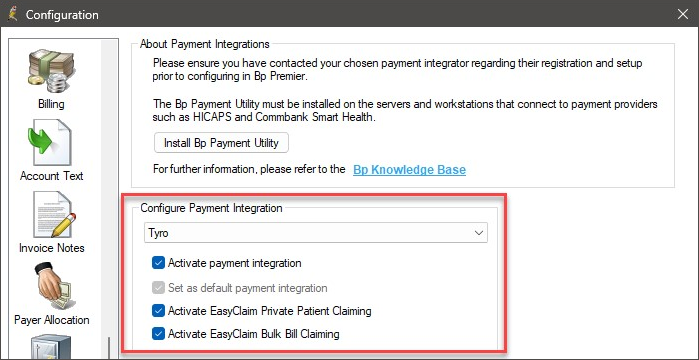
- In the Configure Payment Integration box, select Tyro from the drop down list.
- From the list of check boxes at the top of the screen, select:
|
Activate Payment Integration |
Always tick this option to use your Tyro terminal to process Easyclaims. |
|
Set as default payment integration |
When a payment integration is activated for the first time, the Set as default payment integration check box is automatically selected and the option will be greyed out. Only one payment integrator can be selected as the default; for further information, see Configuring Multiple Payment Integrations. |
|
Activate Easyclaim Private Patient Claiming |
Tick this option if your practice will be sending private practice claims by Easyclaim. |
|
Activate Easyclaim Bulk Bill claiming |
Tick this option if your practice will be sending Direct Bill (bulk bill) claims by Easyclaim. |
Enable Tyro Medicare Easyclaim in Orchid SP1 and below
Enable Medicare Easyclaim through the Bp Premier configuration screen.
- Log in to the Bp Premier server as a user with administrator permissions.
- Select Setup > Configuration from the main screen. Select the Online claiming tab.
- From the list of check boxes at the top of the screen, select:
- Send via Patient Claiming if Easyclaim is not configured.
- Send via Easyclaim if Activate Easyclaim Private Patient Claiming is also selected here.
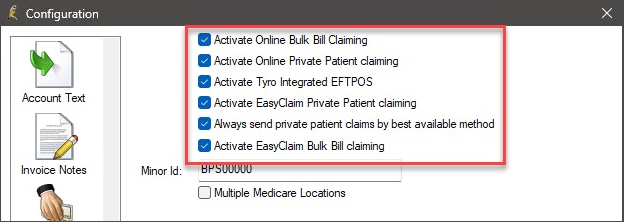
|
Activate Tyro Integrated EFTPOS |
Always tick this option to use your Tyro terminal to process Easyclaims. |
|
Activate Easyclaim Private Patient Claiming |
Tick this option if your practice will be sending private practice claims by Easyclaim. |
|
Always send private patient claims by best available method |
Tick this option to default the Payments screen to: |
|
Activate Easyclaim Bulk Bill claiming |
Tick this option if your practice will be sending Direct Bill (bulk bill) claims by Easyclaim. |
Bulk Bill Easyclaims make it possible to bulk bill a patient and send their claim to Medicare via Tyro without having to batch the invoice. You also do not have to print the DB4 forms when using Tyro Bulk Bill Easyclaims. A patient assigns the right to the practice to claim on their behalf by answering a question on the Tyro terminal.
If the Easyclaim button does not appear, the account may have services or service details that cannot be processed through Easyclaim, or Tyro may not be configured correctly. See Which items cannot be sent via Easyclaim? for more information.
DVA Direct Bill accounts cannot be processed via Easyclaim.
Process a Direct Bill Easyclaim
Tyro bulk bill Easyclaims can be processed and claimed directly from the Account Details screen. You do not need to pay the account from the Payment Details screen first, or batch for sending.
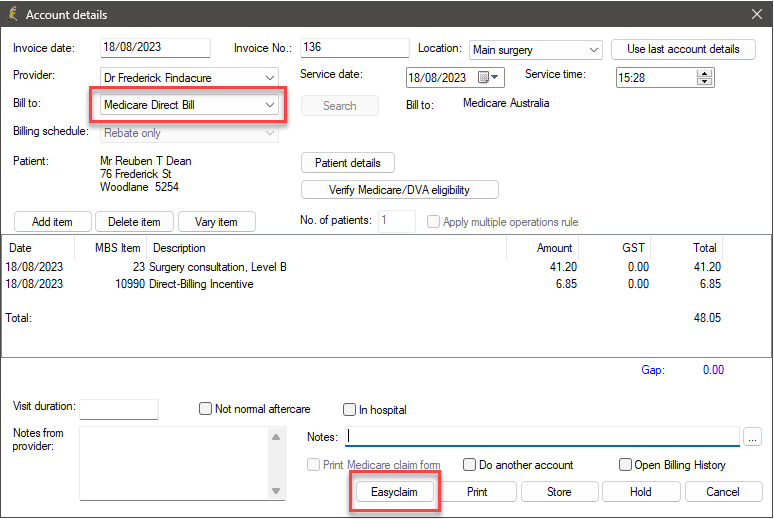
- After the doctor has finalised the visit, open the account from the appointment book.
- Select Medicare Direct Bill from the Bill to: drop-down.
- Click Easyclaim. The Tyro Medicare Easyclaim screen will appear while the claim is being processed, and will report the outcome of the claim:
The Pay Now button will become the Easyclaim button.
|
Outcome |
Form printed |
Claim status |
|---|---|---|
|
The claim is immediately assessed by Medicare and, if approved, a success message will appear. |
Tyro will print a Medicare claim receipt (the equivalent of the Bulk Bill Assignment of Benefit form) for the patient |
Approved |
|
The transaction is cancelled on the Bp Premier screen or the Tyro terminal. |
Tyro will print a docket to indicate ' Claim Cancelled'. |
Cancelled |
|
The claim is rejected and the rejection will be displayed on the Tyro terminal. |
None. |
Rejected |
What do I do next?
Regardless of Approved, Cancelled, or Rejected, Bp Premier will return to the Account Details screen. If the claim was approved, you can exit from this screen.
Just like Online Batches, the practice is paid for the service via Medicare overnight. Bp Premier is not updated until you run the Check for Payments process. For Tyro Bulk Bill Easyclaim, run the Check for Payments from the Tyro Transactions screen. You can also use this screen to review any rejections.
Depending on the reason for rejection, you may be able to send the claim again via Easyclaim, Batched Direct Bill, or Patient claiming. Try a different payment method, or wait a short while and click Easyclaim again to reprocess the payment.
The Tyro Transactions screen can be used to review any rejections and resubmit via an Online Batch or have the patient pay privately.
NOTE Medicare Easyclaim has a 5 minute delay before you can resend the claim to Medicare. You can wait 5 minutes or send the claim via Batched Direct Bill or Private Patient Claiming.
Easyclaim for patient claiming is used when a patient fully or partly pays a private invoice and the claim is submitted to Medicare via the Tyro terminal. When a patient pays through the Integrated Tyro solution, payment and claim are submitted one after the other in real time. Tyro payments are processed from the Payment Details screen like any other payment.
The following steps assume that the patient is paying the full amount. If the patient is only paying part of the full amount, see the next panel.
- After the doctor has finalised the visit, open the account from the appointment book.
- Select Patient from the Bill to: menu.
- Click Pay now. The Payment details screen will appear.
- Click in the payment method the patient is using: Cash, EFT, Credit Card, Direct Credit, or Cheque total. If you select EFT or Credit Card, the Use Tyro check box will appear and will be ticked automatically.
- You only need to change the MID from the default if you are depositing the payment into another provider's account. For almost all transactions you do not need to change this field.
- Tick Pay full amount at the top of the screen. Bp Premier will enter the amount owing into the selected payment method and the Payment total fields, and select all items in the invoice.
See Finish processing the payment for instructions on finalising the process
The steps are slightly different if the patient is not paying the full amount.
Patient is making a part payment
If the patient is paying only part of the amount owing:
- After the doctor has finalised the visit, open the account from the appointment book.
- Select Patient from the Bill to: menu.
- Click Pay now. The Payment details screen will appear.
- Click in the payment method the patient is using: Cash, EFT, Credit Card, Direct Credit, or Cheque total. If you select EFT or Credit Card, the Use Tyro check box will appear.
- Enter the partial amount being paid into the selected field.
- Tick the check box next to the item you wish to allocate the payment to. Otherwise, click Allocate if you need to allocate the partial payment across the services in the invoice. Auto-allocate will automatically distribute payment starting from the first service.
- The Payment total field will be updated.
- You only need to change the MID from the default if you are depositing the payment into another provider's account. For almost all transactions you do not need to change this field.
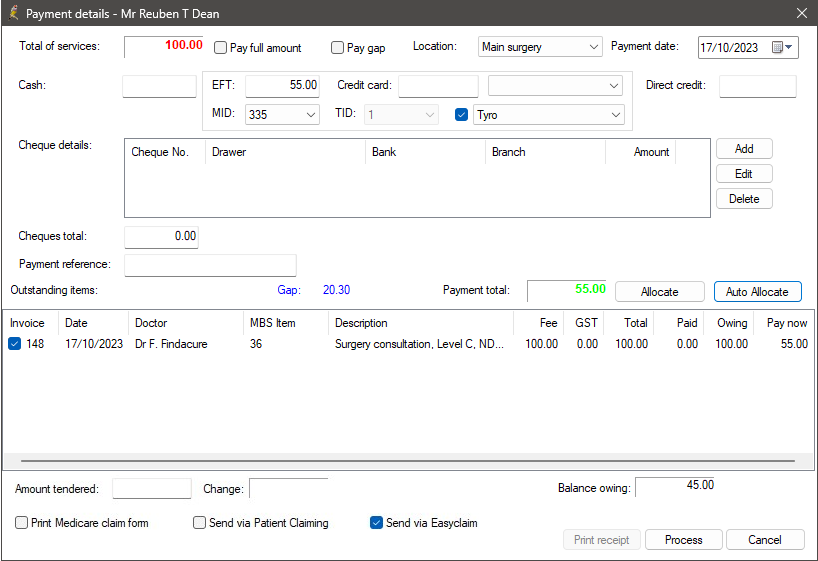
See Finish processing the payment for instructions on finalising the process
Patient is paying the gap
If the patient is only paying the gap between the practice fee and the rebate:
- After the doctor has finalised the visit, open the account from the appointment book.
- Select Patient from the Bill to: menu.
- Click Pay now. The Payment details screen will appear.
- Click in the payment method the patient is using: Cash, EFT, Credit Card, Direct Credit, or Cheque total. If you select EFT or Credit Card, the Use Tyro check box will appear and will be ticked automatically.
- You only need to change the MID from the default if you are depositing the payment into another provider's account. For almost all transactions you do not need to change this field.
- Tick Pay gap at the top of the screen. Bp Premier will enter the amount owing into the selected payment method and the Payment total fields, and auto-allocate payment to the services in the invoice.
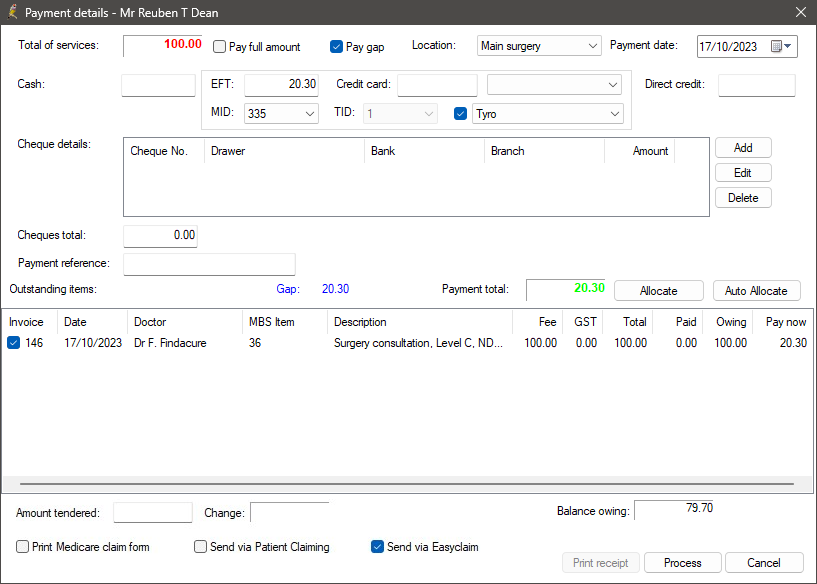
See Finish processing the payment for instructions on finalising the process
Patient is making a zero gap payment
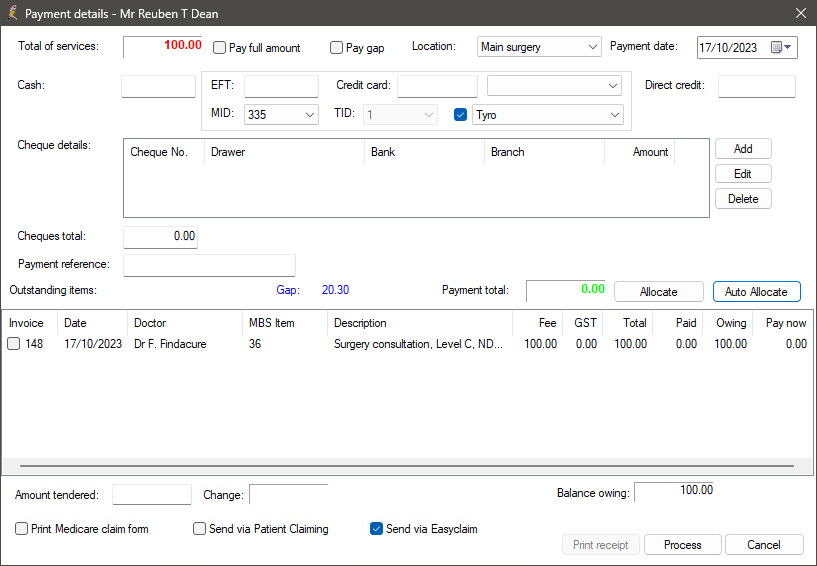
If you are processing an Easyclaim transaction where the patient is not paying any money:
- After the doctor has finalised the visit, open the account from the appointment book.
- Select Patient from the Bill to: menu.
- Click Pay now. The Payment details screen will appear.
- Leave all the payment fields empty.
- Leave Use Tyro unticked.
- Tick the invoice lines to be processed in this transaction.
- Tick Send via Easyclaim and click Process to process the account.
See Finish processing the payment for instructions on finalising the process
Patient is splitting payment types
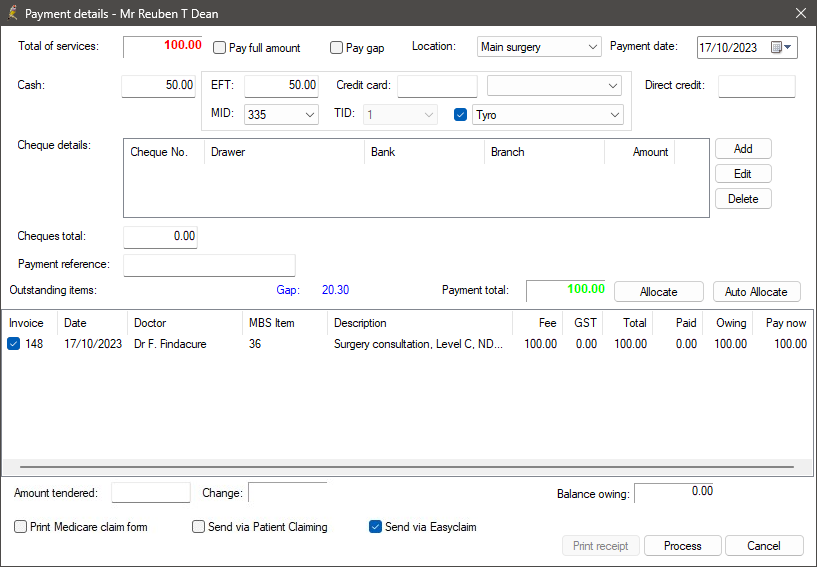
If the patient is paying using multiple payment types (for example, part EFT, part cash):
- Click in the first payment method the patient is using: Cash, EFT, Credit Card, Direct Credit, or Cheque total.
- Enter the amount to be paid using the method.
- Repeat steps 1–2 for each payment method being used by the patient.
- You only need to change the MID from the default if you are depositing the payment into another provider's account. For almost all transactions you do not need to change this field.
- The Payment total field will be updated.
- Click Allocate if you need to allocate the payment across the services in the invoice. Auto-allocate will automatically distribute payment starting from the first service.
If you select EFT or Credit Card, the Use Tyro check box will appear and will be ticked automatically.
See Finish processing the payment for instructions on finalising the process
Patient is paying with two cards
If the patient is paying using two cards (for example, EFT and Credit Card, or two different EFT cards):
- Click in the EFT field and enter the amount to be paid using the first card. The Use Tyro check box will appear and will be ticked automatically.
- Click Process to process the first payment.
- Click Close to close the Payment details screen.
- Select Open > Billing History to open the Billing History screen for the patient.
- Select the account you just processed in steps 1 and 2 and click the Pay single invoice button. The Payment details screen will reappear.
- Click in the EFT field and enter the amount to be paid using the second card. The Use Tyro check box will appear and will be ticked automatically.
The Payment total field will be updated automatically.
See Finish processing the payment for instructions on finalising the process
Patient is paying multiple invoices
If the patient is paying more than once invoice:
- Enter the payment details for the first invoice using one of the payment methods described in this section.
- Click Process to process the first payment.
- Click Close to close the Payment details screen.
- Select Open > Billing History to open the Billing History screen for the patient.
- Click the Pay all button. The Payment details screen will reappear.
- Enter the payment details for the remaining invoices using one of the payment methods described in this section.
See Finish processing the payment for instructions on finalising the process
Patient is paying after the service day
If a patient is paying an account at a later time:
- Select Open > Billing History to open the Billing History screen for the patient.
- Select the account the patient is paying and click the Pay single invoice button. The Payment details screen will appear.
- Enter the payment details for the invoice using one of the payment methods described in this section.
See Finish processing the payment for instructions on finalising the process
TIP If the Send via Easyclaim check box is invisible or greyed out, the invoice being processed contains items that cannot be claimed via Easyclaim. See What can you claim with Medicare Easyclaim? for more information. These items may be able to be transmitted by Online Private Patient Claiming.
- Select the rebate claim method the patient wants to use at the bottom of the Payment details screen.
- Click Process. The Tyro Terminal will activate, and Bp Premier will display prompts to guide you through the rest of the payment process:
- Swipe / Insert Card
- Enter PIN or Approved signature?
- Select Account type to use
-
If the payment is ‘Approved’, Tyro will print a docket. The docket is the ‘Merchant’ copy for the practice to keep for reconciliation purposes. A prompt will appear on the screen if you wish to print a copy for the patient.
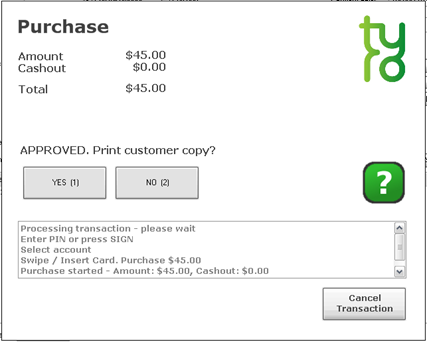
- If the claim was not successful, the patient must try another claim method or different card.

The below screens will appear on the Tyro terminal for the customer and in Bp Premier.
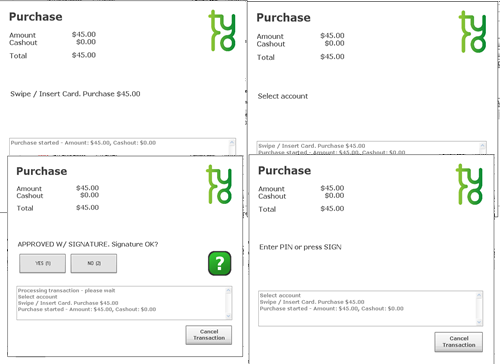
If the payment is ‘Declined’, the Tyro docket will contain an error message. Bp Premier will return to the Create Account screen so that the payment can be processed again.
The final step is to transmit the claim to Medicare.
- If the Send via Easyclaim option was ticked, the Tyro terminal will automatically start transmitting the claim to Medicare.
- If the patient paid by Cash, Cheque, or Direct Credit, a receipt will not have been generated during the payment process. After the claim has been processed, click Print Receipt to print a receipt for the patient.
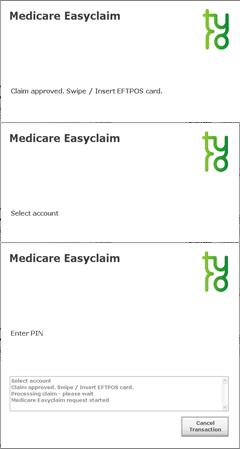
Approved
The claim is immediately assessed by Medicare and, if approved, the message Claim approved. Swipe / Insert EFTPOS card will appear. Ask the patient to insert or swipe their EFTPOS card they want to rebate paid into, and enter their PIN if required by the card type. The rebate will be deposited immediately to that account.
Tyro will print a Medicare claim receipt for the patient indicating the benefit rebated to their bank account. Bp Premier will return to the Payment details screen so you can print additional receipts if you need to.
Cancelled
If the transaction is cancelled on the Bp Premier screen or the Tyro terminal, Tyro will print a docket to indicate ' Claim Cancelled' . Bp Premier will return to the Payment details screen so the payment can be processed again.
Rejected
Depending upon the reason for rejection, you may be able to send the claim again via Easyclaim or Patient claiming. Bp Premier will return to the Payment details screen so the payment can be processed again. Tick a different check box to try a different method and click Process to reprocess the payment.
NOTE Integrated Medicare Easyclaim has a 5 minute delay before you can resend the claim to Medicare. You have the option to wait 5 minutes or send the claim via Private Patient Claiming.
Payment and claim through Tyro is now complete.
If you exited the Payment details screen after processing the payment but before submitting the claim to Medicare via Easyclaim or Patient Claiming, you can still submit the claim to Medicare if the patient is still present at the practice.
IMPORTANT This method is only available on the original payment date.
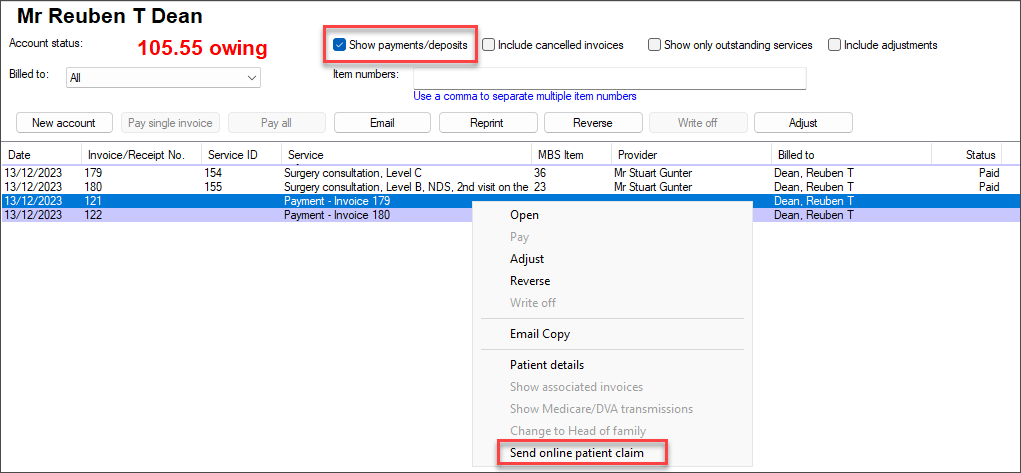
- Open Management > Patient Billing History from the main Bp Premier screen. The Billing History screen will appear.
- Click the folder icon from the toolbar or select File > Open Billing History. The Select Patient screen will appear.
- Enter the patient's name, highlight the patient in the list of results, and click Select.
- Tick Show payments/deposits at the top of the screen.
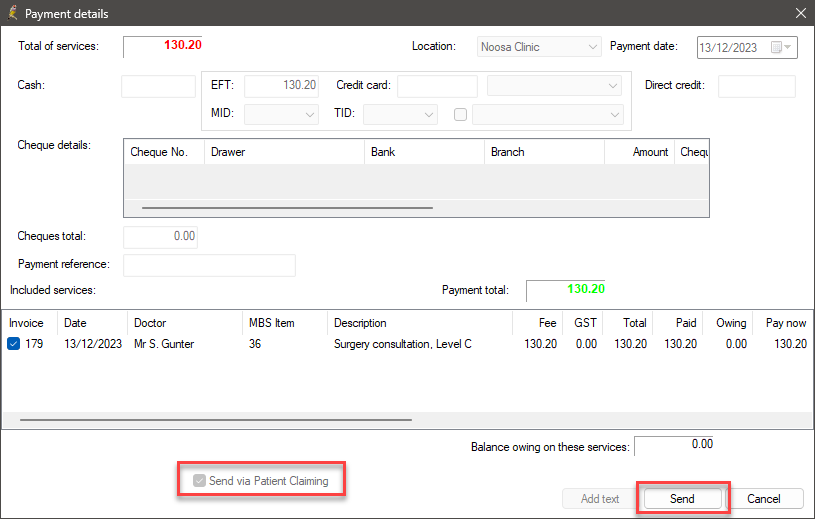
- Highlight the payment in the list you want to claim for. Right-click and select Send online patient claim. The Payment details screen will appear.
- The Send via Patient Claiming check box will be greyed out. To process the claim, click Send.
This section describes what happens when a claim for unpaid or partially paid accounts is submitted to Medicare.
Claiming Benefits for unpaid and partially paid accounts
Where the patient has not paid the account, the unpaid or partially paid private accounts may be submitted to Medicare. If Medicare benefits are assessed as being payable for the claim, a statement and/or Pay Doctor via Claimant Cheque (PDVC) in the provider's name will be sent to the patient's last known address as recorded by Medicare Australia.
It will be the patient's responsibility to present the cheque to the provider and arrange for payment of the account's balance, if any.
Pay Doctor via Claimant Cheques involving Medicare benefits cannot be sent directly to providers or to patients at a provider’s address (even if requested by the patient to do so).
If the patient does not forward the cheque to the practice, or the cheque has not been banked within 90 days, Medicare will cancel the cheque and pay the practice the rebate amount using Electronic Funds Transfer.
Patient authority to request PDVC cheque
To submit a gap payment, you will need to ensure the patient understands that they will receive a cheque and will need to forward it to the practice.
You will also need to get written permission from the patient, with the patient's signature and the date of the claim.
In Orchid S2, Direct Bill Easyclaim transactions are managed on the Payment Integration Transactions screen, formerly known as the Tyro Transactions screen. From the Bp Premier main screen, navigate to Management > Payment Integration Transactions or, if running version Orchid SP1 or below, Management > Tyro Transactions.
Each time a Tyro EFT Payment or Easyclaim transaction is transmitted, a log is made in the system to record the details of the transaction, including:
- the patient
- invoice number
- item number
- amount
- reference numbers
- date and time
- status
- user who performed the transaction.
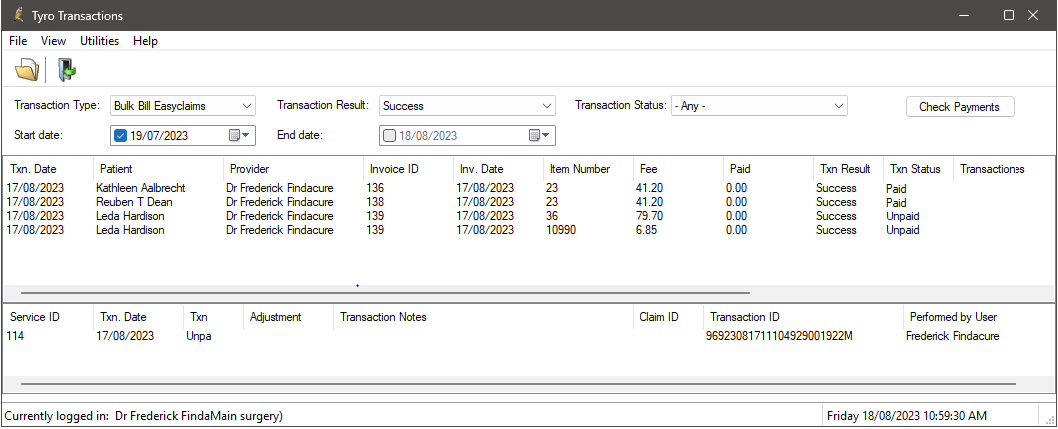
The top half of the screen shows each service that has been transmitted via Tyro Easyclaim to Medicare, including any amounts paid by Medicare, the transaction result, and status of the submission and any errors that may have occurred.
The bottom half of the screen shows the transactions associated with the selected service with information including Transaction Date, Transaction ID, Transaction Status, ClaimID that Medicare processed the transaction in, and the user who sent the service to Medicare. If an error has occurred, the row will also show the error message. If an adjustment has been made to the service, the Adjustment column will show the action taken.
The Transaction Result column in the top half indicates whether the service was successfully sent to Medicare or not (success or error).
The Transaction Status column can show the following values:
|
Status |
Description |
|---|---|
|
Unpaid |
The service has not yet been paid by Medicare. |
|
Failed |
Failed to be sent to Medicare. |
|
Paid |
Paid in full by Medicare. |
|
Received |
Medicare have processed the service but there is an error to be actioned. |
|
Resent via Medicare Batch |
Service was not paid by Medicare and a user has adjusted the service so it can be corrected and sent via Online Claiming Batch. |
|
Finalised |
Service was not paid by Medicare and a user has adjusted the service so it can be corrected to either Change Billing, Accept fee paid, or Write off. |
TIP When a service contains an error from the Bulk Bill Integrated Report, details about the error are shown in the Transaction Notes column in the transaction list.
From this screen, you can:
- Check for payments, which will update the status of services to indicate if they have been paid
- View the Patient Billing history and the Payment and Processing reports
- Adjust billing for a service (for claims with a status of ‘received’)
- Copy the Easyclaim Transaction ID (required for contacting Medicare to cancel processed claims).
Check for Payments in Orchid SP2 or later
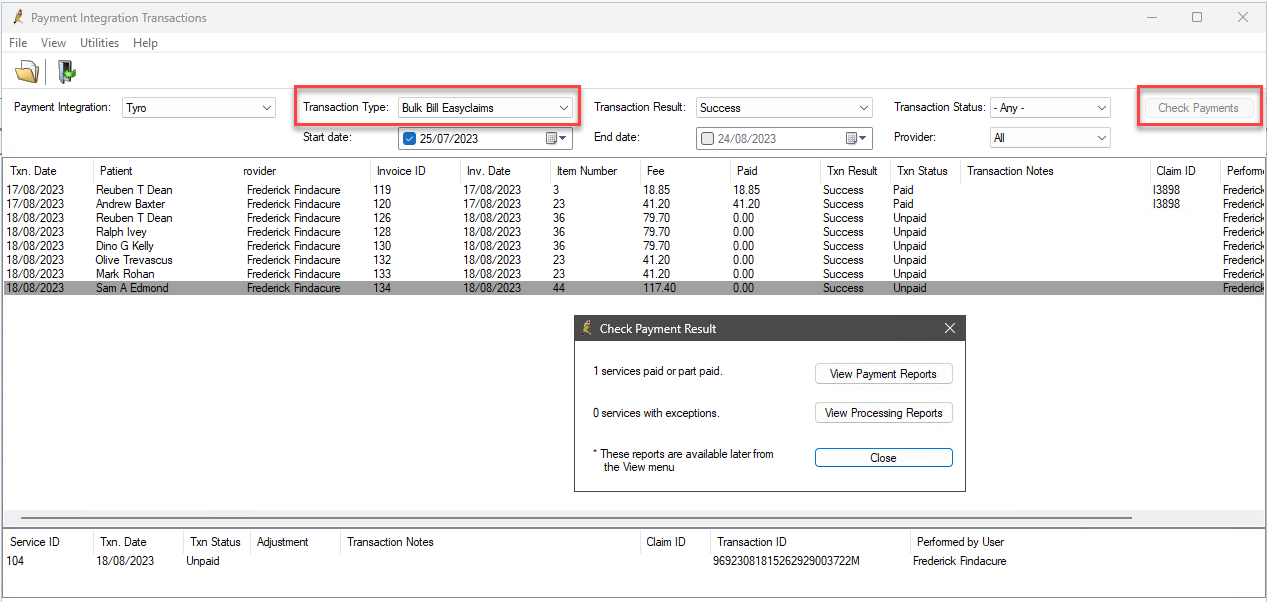
In Orchid SP2, when you first open the Payment Integration Transaction screen, the screen will show Tyro transactions by default. Tyro, by default, the screen will show transactions type 'Bulk Bill Easyclaims' and list all services that have been successfully transmitted to Medicare for the past month.
- From the Payment Integration Transaction screen, select a Transaction Type of Bulk Bill Easyclaims.
- Click Check Payments in the top right. Bp Premier will contact Medicare and attempt to download the Bulk Bill Payment and Processing reports for claims sent since the last payment check, and report on the success or failure of the payments check. Any services that have been paid will be updated and services which were rejected will be marked with their exception message.
- The Payment and Processing Reports can be printed from this screen or from the View menu.
Check for Payments in Orchid SP1 and below
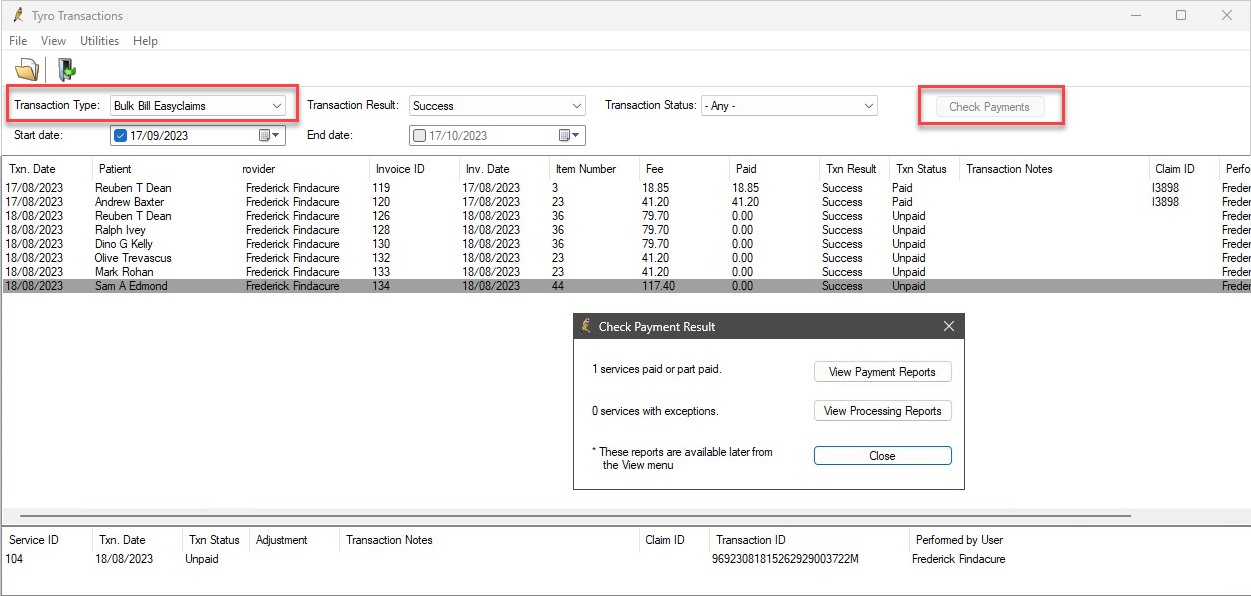
When you first open the Tyro Transactions screen, by default the screen will show transactions of type Bulk Bill Easyclaims and will list all services that have been successfully transmitted to Medicare for the for the past month.
- From the Tyro Transactions screen, select a Transaction Type of Bulk Bill Easyclaims.
- Click Check Payments in the top right. Bp Premier will contact Medicare and attempt to download the Bulk Bill Payment and Processing reports for claims sent since the last payment check, and report on the success or failure of the payments check. Any services that have been paid will be updated and services which were rejected will be marked with their exception message.
- The Payment and Processing Reports can be printed from this screen or from the View menu.
Easyclaim Payment report
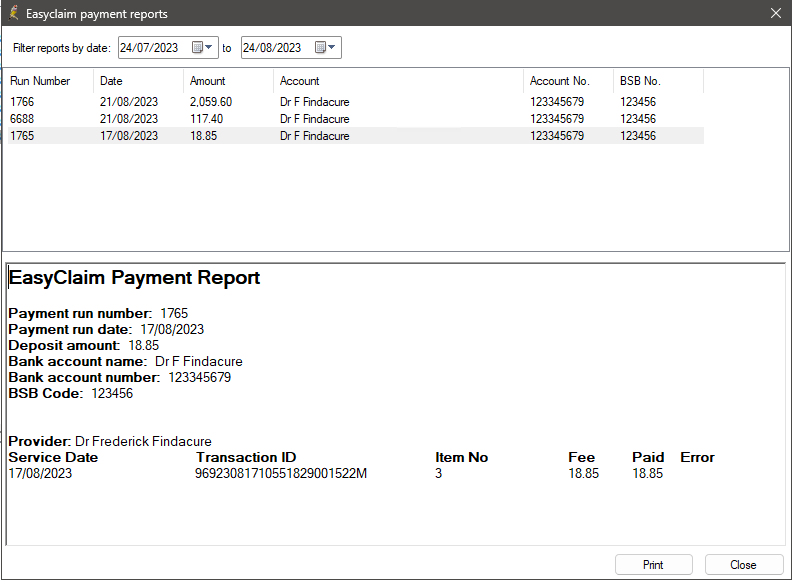
The Easyclaim Payment report is similar to the Online Claiming Payment report.
A Payment report will exist for each deposit into the practice’s bank account. The top section of the screen will show each Payment run (deposit) that has been processed and paid within the date range specified, together with the payment amount and bank account details.
The bottom section shows the transactions that were paid as part of that payment run. Transactions are grouped by provider to make it easier to identify when payments for multiple providers are paid into the one bank account by Medicare. This report can be printed if you require a hard copy.
Easyclaim Processing report
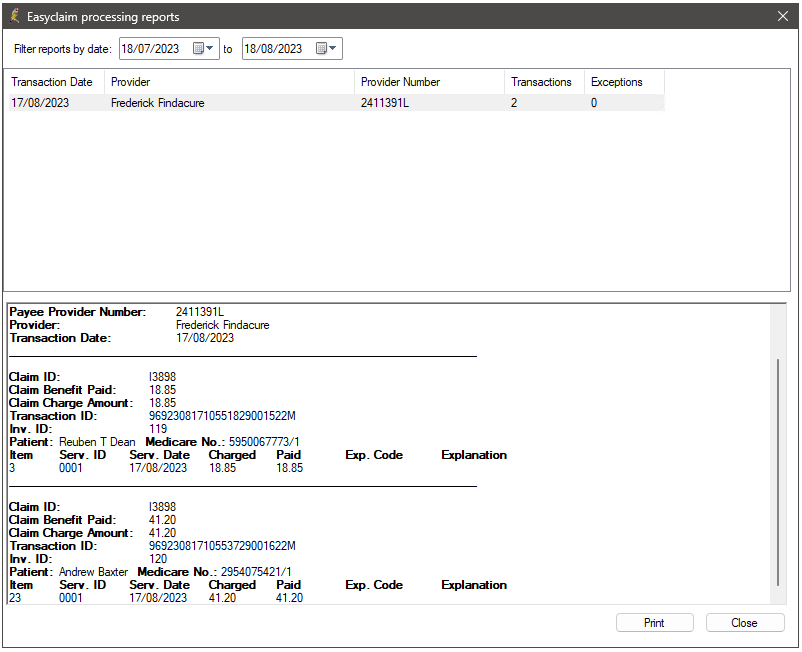
Processing reports show the exception list of all services where the amount paid was not the same as the amount claimed.
The top section shows a report for each provider that had services processed for them on a given date. The bottom section shows the related Claim ID, total benefit paid and total claimed amount, transaction ID, invoice ID, and patient details. Below this information, each item number claim and any errors relating to that item is listed.
With Tyro Easyclaim services, you can:
Once the check for payments has been run, you will need to action any services with the Txn Status 'received' as these have not been paid. Services with this status will have an error which needs to be addressed.

To identify the items that need action, filter the Payment Integration Transaction screen to show:
- Transaction Type of ‘Bulk Bill Easyclaims’
- Transaction Result of ‘Success’
- Transaction Status of ‘Received’.
Some common reasons an Easyclaim direct bill may need adjusting include:
|
Reason |
Explanation or example |
|---|---|
|
Maximum number of services for this item already paid |
This may occur when claiming for a care plan items or similar, where you can only claim one per patient per year |
|
No benefit payment for services performed by this provider |
Can occur if the provider is not entitled to claim the service |
|
Bulk bill additional item claims incorrectly |
This can occur due to another related item being rejected |
|
Rejected in association with another item in this claim |
This can occur due to another related item being rejected |
|
Service cancelled at providers request |
Occurs when the practice has called Medicare to ask that the claim be rejected due to a mistake. |
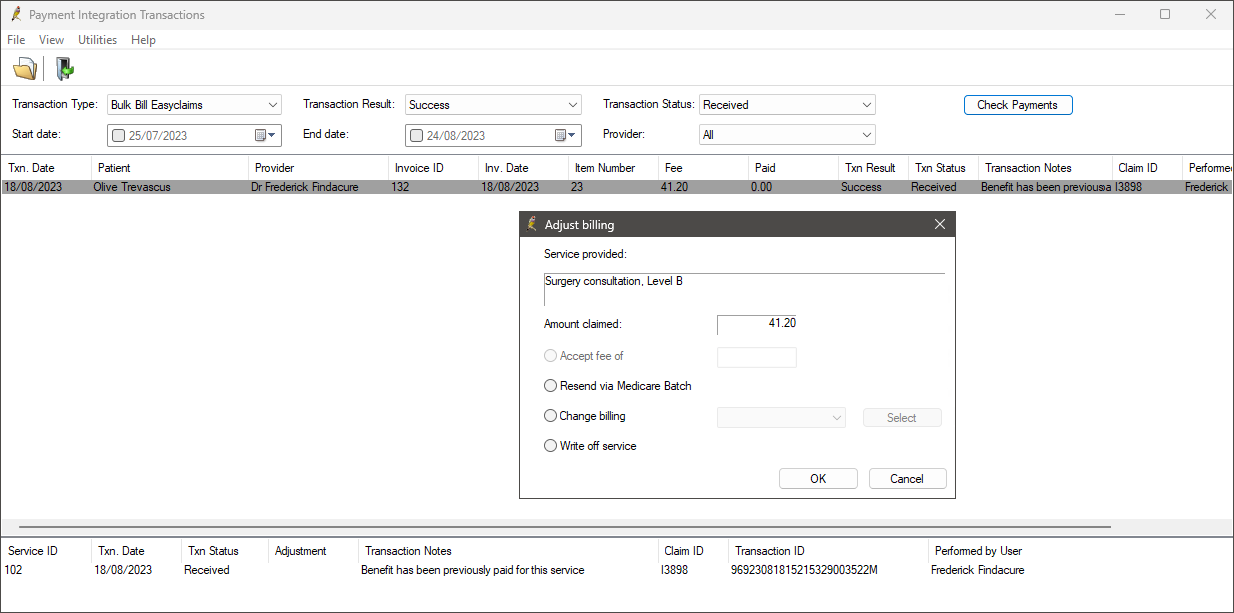
- Double-click the service you want to adjust, or right-click and select Adjust Service. The Adjust billing window will appear.
- Select the radio button that corresponds to the adjustment you want to make:
- Click OK to apply the billing adjustment to the service and return to the Tyro Transactions screen.
|
Field |
Description |
|---|---|
|
Accept fee of |
This will only be active if the service has been part paid. Select this option if you wish to mark the item as reconciled and accept this payment. |
|
Resend via Medicare batch |
Select if Medicare has had an issue on their end and they have requested that you resend the item. The item will be resent in an online claiming batch. You cannot resend a direct billed service through Tyro. |
|
Change billing |
Select if this service will not be paid by Medicare Direct Bill and you wish to change the billing type to another method. The service will be removed from the list, but will be present when the Transaction Status changes to ‘Received’. When you view the account in the Patient Billing History, the Billed to field will reflect the change. Adjust the invoice from this screen and send to the new payer. |
|
Write off service |
Select where Medicare will not pay the service and you have no opportunity to recover the cost via another method. Writing off removes the service from the invoice, or, if only one service exists, writes off the entire invoice. When you view the account in the Patient Billing History, the Status field will show Written off or Part Written off. |
Right-click a service and select Patient Billing History to open the Patient Billing History screen, if you need to view or adjust invoices.
Due to the speed at which Tyro processes payments and Medicare rebates, cancelling or refunding payments processed through Tyro is not straightforward. These instructions describe how to cancel a rebate and refund a payment made through Tyro.
Reverse the payment in Tyro
Refer to your Tyro terminal documentation for more information. Your terminal must be enabled to process refunds. As a security measure, you will need the Refund password set by your practice when first activating the Tyro terminal.
Reverse the payment in Bp Premier
IMPORTANT Tyro Medicare Easyclaim rebates to the patient are immediate. Adjustments to the Account or Payment cannot be made after the claim is approved. If you reverse a payment, you must take into account how any related claim has been transmitted, and you must contact Medicare to arrange cancellation.
- Select Management > Patient Billing History from the Bp Premier main screen.
- Search for and select the patient from the Billing History screen.
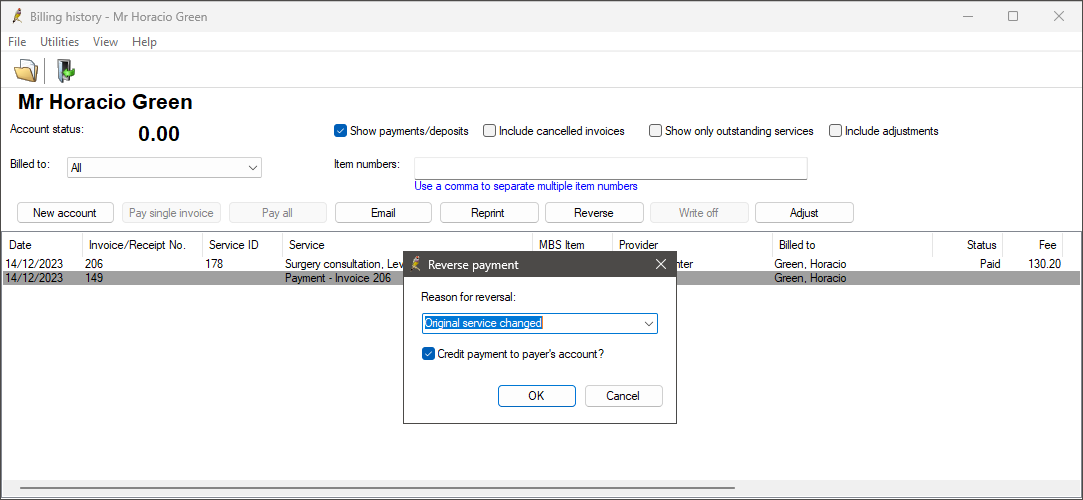
- Tick the Show Payments/Deposits check box at the top of the screen.
- Highlight the payment and click the Reverse button. Click Yes when Bp Premier prompts 'Are you sure you want to reverse this payment?'.
- Enter a Reason for reversal, or select a reason from the drop-down menu.
- You would normally leave the Credit payment to payer's account? check box unticked for Tyro payments. This check box creates a deposit in the patient's account, to be deducted from future payments, rather than refunding the amount.
- Any related invoices will change status to ‘Unpaid’, so that the invoice can be adjusted and payment re-entered.
IMPORTANT Tyro Integrated Medicare Easyclaim rebates to the patient are immediate. Adjustments to the Account or Payment cannot be made after the claim is approved. If you reverse a payment, you must take into account how any related claim has been transmitted, and you must contact Medicare to arrange cancellation. See Cancel an Easyclaim rebate for more information.
If the patient has had their claim processed via Easyclaim:
Due to the speed at which Easyclaims are rebated to the patient's bank account, Medicare rebates cannot be cancelled directly from Bp Premier. You must contact Medicare to arrange for Medicare to cancel the rebate to the patient’s account. You must supply Medicare with the Easyclaim Transaction ID.
To find the Easyclaim Transaction ID in Orchid SP2 or later:
- Select Management > Payment Integration Transactions from the main Bp Premier screen. The Payment Integration Transactions screen will appear.
- Select Tyro from the Payment Integration drop down.
- Select a Transaction Type of ‘Private Easyclaims’.
- Find the claim that you need to cancel and identify the Transaction ID.
- Right-click the claim and select Copy Transaction ID to clipboard to copy the transaction ID. Use Ctrl+V to paste the ID elsewhere.

To find the Easyclaim Transaction ID
- Select Management > Tyro Transactions from the main Bp Premier screen. The Tyro Transactions screen will appear.
- Select a Transaction Type of Private Easyclaims.
- Find the claim that you need to cancel and identify the Transaction ID.
- Right-click the claim and select Copy Transaction ID to clipboard to copy the transaction ID. Use Ctrl+V to paste the ID elsewhere.
This section provides some suggestions for troubleshooting issues with your connection to Medicare Web Services (MWS) and PRODA. If a submission has been declined, consult this list before calling Best Practice Software Support to see if you can resolve the problem.
NOTE If the Send via Easyclaim check box is invisible or greyed out, the invoice being processed contains items that cannot be claimed via Easyclaim. See What can you claim with Medicare Easyclaim? for more information. These items may be able to be transmitted by Online Private Patient Claiming.
|
Issue |
Solution |
|---|---|
|
|
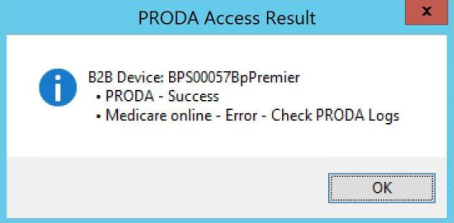
If you experience this error it means that either Medicare Web Services has not been set up at your practice, or your B2B device has expired. If you have not yet set up Medicare Web Services, follow the steps listed in Connect to Medicare Web Services to use Medicare Web Services functionality. If your B2B device has expired, you will need to re-register the device. Remove the device from Bp Premier and PRODA. Re-register your B2B device to continue using Medicare Web Services functionality.
|
|
|
When registering your B2B device, if you receive this message when you click Register or Check Access in Setup > Configuration > PRODA, it means that Medicare Online has not been linked as a service provider to your organisation in PRODA. Follow these instructions on the Services Australia website to Link Medicare Online to your organisation in PRODA. |
|
Issues with registering and setting up your organisation in PRODA. |
If you are having issues with registering and setting up your organisation in PRODA, you will need to call or email PRODA on 1800 700 199 or proda@servicesaustralia.gov.au. |
|
Error code 9007: The Location is not authorised to undertake the function on the date of transmission. The transmission has been rejected. Contact the Medicare eBusiness Service Centre for further assistance. |
Check that Medicare Online has been linked as a service provider to your organisation in PRODA. Follow these instructions on the Services Australia website to Link Medicare Online to your organisation in PRODA. If you continue to receive this error, call or email the Medicare eBusiness service centre on 1800 700 199 or ebusiness@servicesaustralia.gov.au. |
|
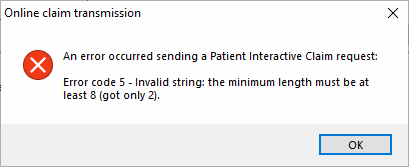
Error code 5 - Invalid string: the minimum length must be at least 8 (got only 2).
|
Ensure that the patient's home phone number is made up of eight numbers. If the patient has not provided a home phone number, leave this field blank. |
|
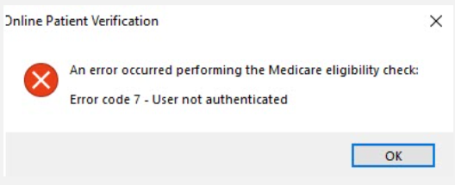
Error code 7 - User not authenticated.
|
This error could be a sign that Medicare Web Services is experiencing an outage or that the B2B device isn't functioning properly. The error may appear in a number of areas in the software that uses Medicare Web Services, including AIR, online claiming, patient claiming, Medicare verification, etc. If the error message is persistent, the B2B Device will need to be removed from Bp Premier and PRODA and then recreated. |
Last updated 12 January 2024.

