Bp Premier Support Guidance
Update your NASH Certificate for eRx Script Exchange
Affects: All users of Bp Premier and eRx Script Exchange.
This Support Guidance article contains instructions for the two issues described below: eRx Certificate Validation and the eRx adaper update.
In this article:
eRx Certificate Validation
eRx NASH certificate validation will begin on 06 August 2024, and will affect issuance of electronic prescriptions. Follow the instructions in the sections below to prepare for this change.
- eRx Certificate Validation
- Resolution Prerequisites
- Utility Resolution (preferred method)
- Manual Resolution
- Troubleshooting certificate update failure
erx.com.au certificate expiry and eRx adapter update
Download PDF Infographic: eRx Certificate expiring
The eRx adapter used by Bp Premier requires an update to manage the erx.com.au certificate expiration on 24 June 2024. The adapter update was included as part of the June 2024 Bp Premier Data update. However, some sites have reported issues with the adapter update, or have not yet run the June 2024 Data Update.
Only if you have received an internal error message after running the June 2024 data update, or Bp Premier Support has advised you to, follow the instructions below. If you ran the June data update without issue, you do not need to follow these steps.
eRx Certificate Validation
eRx Script Exchange has advised they will be enabling certificate validation on 06 August 2024 and any Practices using an expired NASH certificate will be unable to electronically transmit prescriptions to eRx Script Exchange. Practices must ensure an up-to-date NASH certificate has been configured for eRx Script Exchange.
The NASH certificate is used for the following services:
- My Health Record
- Health Identifier (HI) Service
- eRx Script Exchange
Resolution Prerequisites
To continue sending electronic scripts via eRx Script Exchange after 06 August 2024, you must:
- Have the June 2024 data update installed.
- Confirm that eRx Script Exchange is configured to use the latest NASH certificate.
NOTE If you have run the June 2024 data update and received an internal error message on eRx connectivity, refer to the final section in this article.
Before you Begin
- The NASH certificate should be downloaded from HPOS prior to completing these steps and saved to a location on the database server.
- The NASH certificate passphrase will be required.
- Only one NASH certificate / thumbprint should be used with eRx Script Exchange, regardless of user locations.
- If your database has multiple locations, and you have been issued location specific NASH certificate, please choose one certificate to be used for eRx Script Exchange.
- The new NASH certificate should not be installed into the eRx Setup utility (against any of the users) until Step Two and Step Three are completed.
eRx have provided a certificate update utility that is an easier method for updating the NASH certificate. This method is recommended. However, manual steps to resolve the issue have also been provided in this article.
IMPORTANT Complete the steps below on the Bp Premier database server.
Utility Resolution (preferred method)
Notes on running the Update eRx Certificates Utility
- You must run the utility as a Windows administrator .
- Your current NASH must be imported as the default in the Bp Certificate Import tool.
Download and Run the Update eRx Certificates Utility
IMPORTANT The utility needs Windows Administrator permissions to access the certificate store.
IMPORTANT Complete these steps on the Bp Premier Database Server.
- Download the Update eRx Certificates utility by right-clicking on the link and selecting Save link as or Save Target to save the file to a known location.
- Navigate to the location where you saved the download, right-click on the BP_eRxNASHCertUpdater_Utility.exe, and select Run as Administrator.The NASH Updater screen will appear.
- Click Next to install the updater. The Finish screen will appear.
- Click Finish. The Update eRx Certificates utility will perform a check to determine the expiry date of the current stored NASH certificate.
- One of the following three outcomes will be presented to you upon the conclusion of the NASH certificate expiry date check:
If the utility update was not successful, attempt the manual update steps.
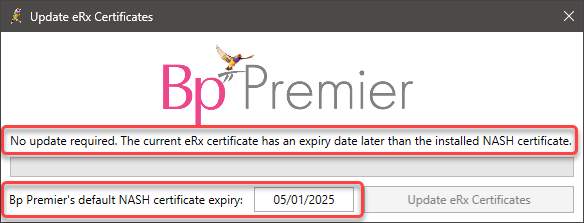
1. No update required:
- If you have received a No update Required response, there is no need for any additional steps.
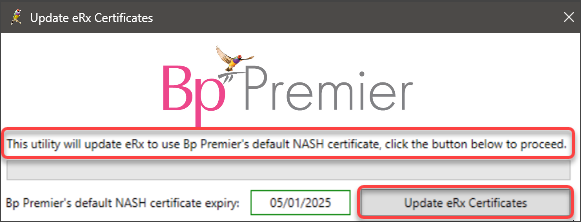
2. Update Required:
- If you have received a Update required response:
- Click Update eRx Certificates.
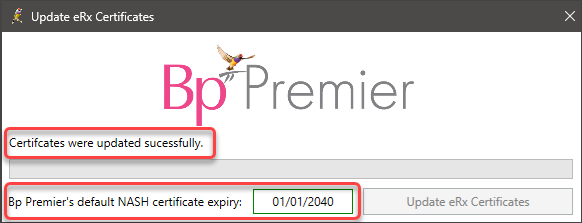
- The utility will update the NASH certificate for eRx Script Exchange and display the outcome of the update.
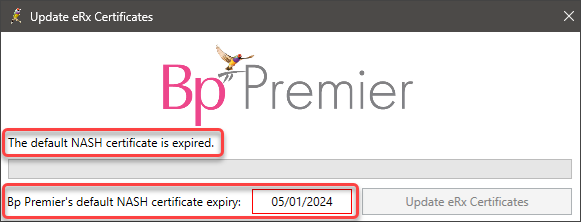
3. The default NASH certificate is expired:
- If you have received The default NASH certificate is expired response, you will be required to:
i. Renew your NASH Certificate
If the Update eRx Certificates Utility has detected that your NASH certificate requires renewal, you will need to obtain a new one from Services Australia via HPOS.
Any questions regarding renewing the NASH certificate or using HPOS should be directed to Services Australia using the following details:
|
NASH Certificates |
HPOS |
|---|---|
|
Phone: 1800 700 199 and select Option 1 Monday to Friday 8am to 5pm AWST Email: ebusiness@servicesaustralia.gov.au |
Phone: 132150 Select Option 6 Electronic Claiming or Health Professional Online Service (HPOS) Monday to Friday 8am to 5pm AWST |
Your passphrase for the new certificate will be sent separately, to the email address or mobile phone number your practice has registered in your HPOS account.
ii. Import a new NASH certificate for the HI Service and My Health Record
If the Update eRx Certificates Utility has detected that the NASH certificate used for the My Health Record or HI Service needs to be renewed, or if it states, Not Found, you will need to renew the NASH certificate and import it into Bp Premier.
Select Setup > Configuration > General and follow the instructions in this Knowledge Base article. Browse and select the renewed certificate you received from Services Australia.
When importing or renewing the NASH certificate, if you only have a single HPI-O for the practice then the NASH certificate should always be imported for the 'Default' location. If you have multiple locations with different HPI-O numbers then a NASH can be imported for each location. However one NASH certificate still needs to be imported for the 'Default' location as this certificate will be used for the nightly check on whether a patient has a My Health Record.
The certificate chosen for the 'Default' location can be any NASH certificate as long as it matches the HPI-O entered under Setup > Practice details > Change.
NOTE Ensure the updated NASH certificate has been imported as the default in the Bp Certificate Import tool as the utility will perform the update using this certificate.
iii. Import a new NASH certificate for eRx Script Exchange
Once you have renewed your NASH certificate and imported the new certificate into Bp Premier for My Health Record and the HI Service, you must re-run the Update eRx Certificates utility on the database server.
The Update eRx Certificates utility will check the NASH certificate's expiration date, and you should receive the Update Required response; complete the instructions to update the NASH certificate for the eRx Script Exchange.
Manual Resolution
You should only follow the manual resolution steps if the utility provided in the previous section did not work.
Step One: Run the utility to update eRx files
- Download the file eRxConfigurationPatch_1.exe to a known location. Your browser may alert that the file type presents a security risk. You can safely download this file.
- Move the exe file to the folder C:\Program Files (x86)\eRx on the Bp Premier server. .
- Double-click the exe file to start the application and extract to the following location
- Click Yes to All when prompted.
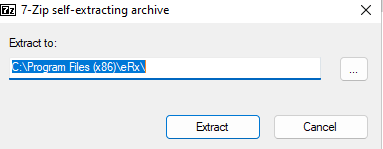
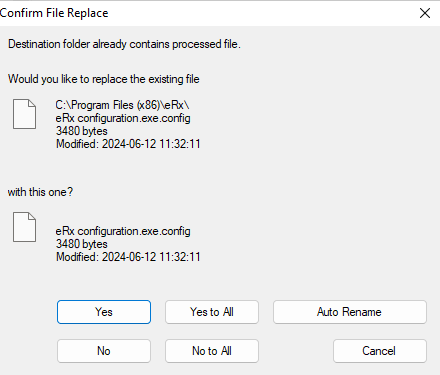
Continue with the manual NASH certificate update steps below.
Step Two: Install new NASH certificate into Local Computer (Trusted People)
- Search for MMC in the Windows Start menu and click Open.
- Click File, then Add/Remove Snap-in.
- Click Certificates > Add > Computer account > Next > Finish and then click OK.
- Expand Certificates (Local Computer) > Trusted People > Certificates.
- To install the new NASH certificate, right-click the Certificates folder under Trusted People.
- Click All Tasks and Import.
- The Certificate Import Wizard will open, click Next.
- Click Browse... and navigate to the location of your NASH certificate > select the NASH certificate and click Open.
- Click Next.
- Enter the NASH certificate passphrase into the Password field.
- Tick Mark this key as exportable…
- Click Next > Next > Finish.
- Complete steps 6 – 13 to install the old NASH certificate if it isn’t already present.
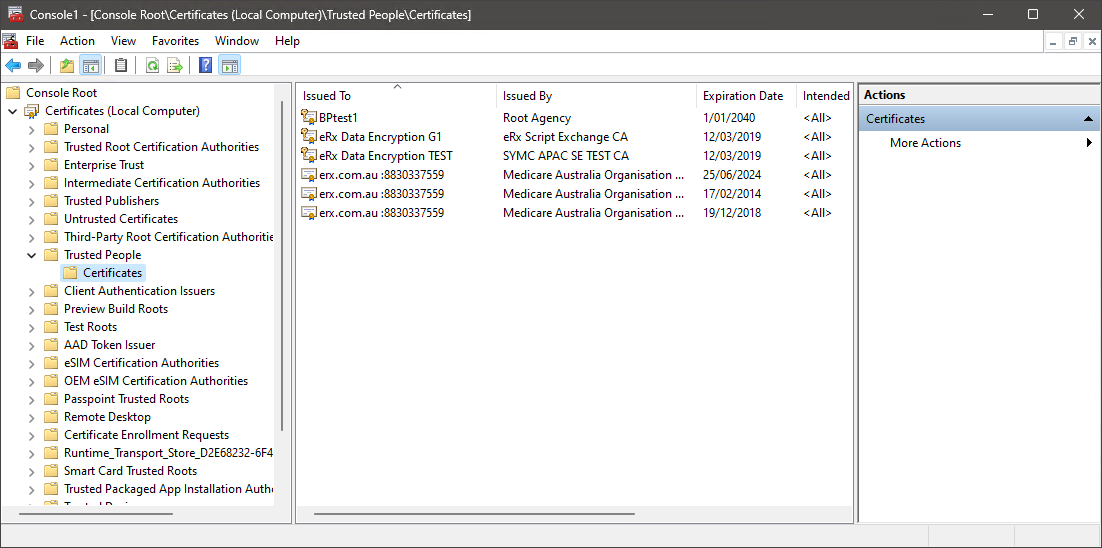
NOTE You may need to change the file type drop down to complete this step.
IMPORTANT Step Two cannot be completed unless the old NASH certificate (the cert currently used for eRx) and new NASH certificate are installed under Local Computer (Trusted People)
Step Three: Upload new thumbprint to the eRx Gateway
- Open the File Explorer and navigate to C:\Program Files (x86)\eRx.
- Right click on eRx configuration and click Run as administrator.
- At Step 3. Select Certificate to use for eRx ensure the new NASH certificate is highlighted and that the old NASH certificate is also listed.
- Tick Update certificate on eRx gateway and click Next.
- A new window should appear with progress bar.
- If an error occurs, please contact Bp Support for further troubleshooting. We may need to request eRx manually update the thumbprint on their end.
- If upload is successful, continue with Step Three.
NOTE The file size for this executable should be 72KB. If the file size is smaller, please contact Bp Support.
Step Four: Install new NASH certificate and Thumbprint against each of the users
- Navigate to the Best Practice installation directory. Generally, C:\Program Files\Best Practice Software\BPS.
- Right click on eRx Setup and click Run as administrator.
- Log in to the eRx Setup utility.
- Click Setup users.
- Select the first user and click Change. The eRx Setup screen will appear.
- Click on the ellipses and navigate to your NASH certificate.
- Click the NASH certificate and then Open.
- Enter the NASH certificate passphrase and click Save.
- Complete steps 5 – 9 for each of the users.
- Close out of the utility.
NOTE To locate the certificate, you may need to change the Files of type to All files.
eRx Script Exchange is now configured to use the most recent NASH certificate.
If the manual resolution was not successful, follow the instructions in the next section Troubleshooting certificate update failure.
Troubleshooting certificate update failure
If NASH certificate update fails after following the above steps, you will need to gather some information from your Bp Premier server to forward by email to Best Practice Software Support for review and resolution directly with eRx.
Submitting this information by email removes the need for Bp Support to gather this information from your practice and reduces resolution time.
To take screenshots, search for 'snipping tool' in desktop search to open the Windows Snipping Tool.
1. eRx adapter log
In a Windows file explorer on the Bp Premier server, browse to C:\eRx and copy the file erxadaper.log to a temporary location ready for insertion into an email.
2. NASH thumbprint and subject
- Log into the Bp Premier Server as a Windows Administrator.
- Search for MMC in the Windows Start menu and click Open.The Management Console will appear.
- From the left hand panel, browser to Trusted People > Certificates. Use Step Two: Install new NASH certificate into Local Computer (Trusted People) as a guide.
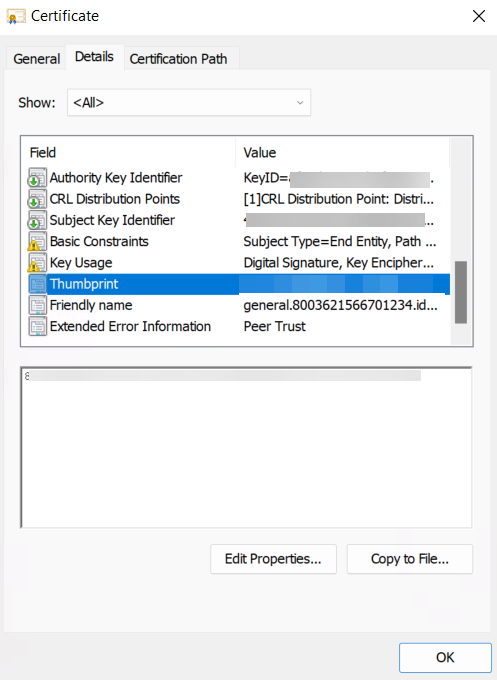
- Double-click the NASH certificate that you installed in previous steps. The NASH certificate will show general.HPIOno.id.electronichealth.net.au in the Issued By column.
- Select the Details tab.
- Highlight the Subject row and expand the screen to show the Value column. Take a screenshot of the Subject Value.
- Highlight the Thumbprint row and take a screenshot of the full Value column.
- Save the screenshots to the temporary folder.
- Exit Management Console.
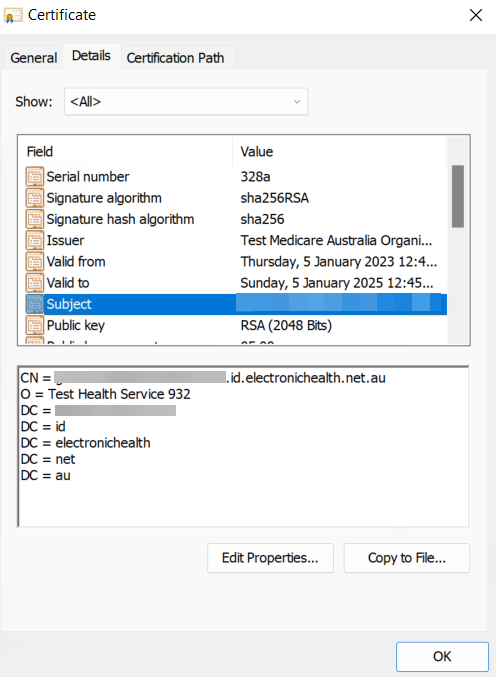
3. Bp Premier eRx Entity IDs
- In a Windows file explorer on the Bp Premier server, browse to C:\Program Files\Best Practice Software\BPS > eRx setup.exe. Right-click this file and run as administrator.
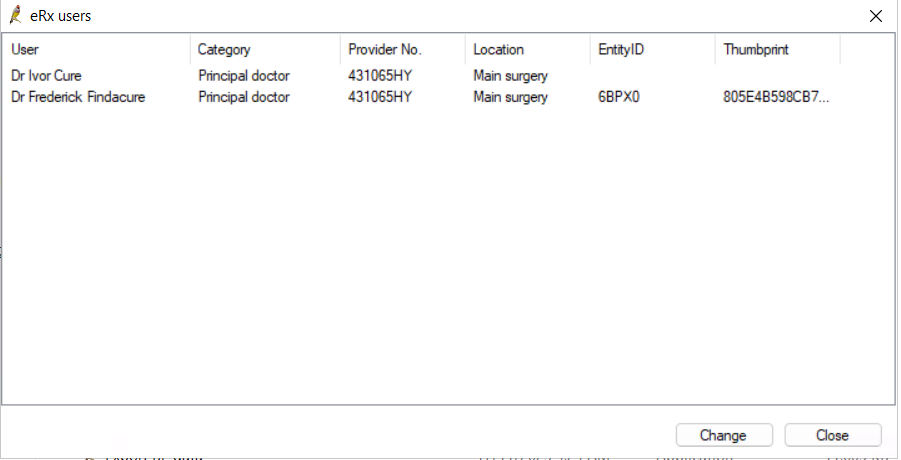
- From the eRx Setup utility, go to Password > Setup users.
- Take a screenshot of all Bp Entity IDs in the eRx users screen.
- Save the screenshot to the temporary folder.
- Close eRx Setup.
Email all screenshots to Best Practice Software Support.
Best Practice Software will forward the details on to eRx, who will update user setup details at the eRx end. Once this is complete, the practice will need to import the new NASH certificate for each user in Erx Setup utility. Instructions on remimporting a certificate for each user is described in Step 1.1 of this Knowledge Base article.
erx.com.au certificate expiry and eRx adapter update
Internal error message on June 2024 Data Update
If you have run the June 2024 Data Update and received the following internal message from Best Practice Software:
download the June 2024 update again and rerun the data update installation. If the date update reruns successfully with no further internal error message, no further action is required.
If you receive the same internal message, you must contact Bp Premier Support to assist resolving the issue. Manual resolution steps are provided in the next section.
Manual resolution for eRx adapter update
Download the supplied .exe file and follow these steps on the Bp Premier database server.
- Download the file UpdaterWithoutDotNet_v22.exe and save to a known location.
- Right-click the .exe file and select Run as administrator. A terminal window will appear and close after a period of time. No interaction is necessary.
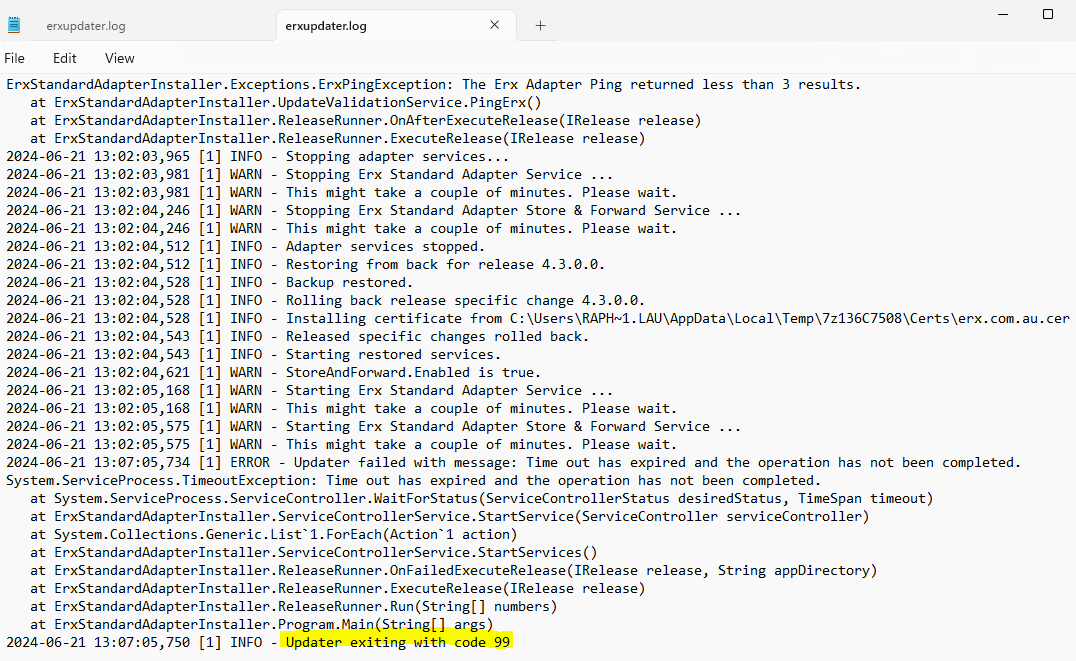
- In a Window File Explorer, browse to C:\erx\ and inspect the log file erxupdater.log in a text editor.
- Scroll to the bottom of the text file to find the exit code:
- If you received an exit code = 0, no action is required.
- If you received an exit code that is greater than 0 (such as '99' in the example), contact the Bp Premier support team for further assistance.
Last updated 24 June 2024.