To print pathology and radiology investigations and receive results electronically, you need to set up the components of the pathology workflow in Bp VIP.net:
- Install and configure the secure messaging software your practice will use to receive electronic results.
- Download or create pathology and radiology order form auto templates (Bp VIP.net AU only).
- Create the laboratories that will carry out investigations as Bp VIP.net organisations.
Follow the procedures below on the Bp VIP.net server for each messaging provider that you will be using.
NOTE In Australia, order forms are supplied by the laboratory and are unique to each laboratory. In New Zealand, order forms can be printed to an A5 size blank page and templates are not normally required.
Install messaging software
Messaging providers such as HealthLink and Argus are third party companies that securely transmit results, reports and documents to and from GP and specialist practices, hospitals, and pathology and radiology labs. Messaging software must be installed on your Bp VIP.net server to receive incoming results and put results in the assigned incoming folder.
Your practice may receive results using more than one messaging provider. Check with each of your messaging providers to identify the folder they download documents to (Receiving directory) and retrieve documents from (Sending directory). Write the folder locations down; you will need to select the folders when setting up the laboratory.
Set up order form auto templates
Bp VIP.net offers some ready-made order form templates from the online library. Or you can modify or create your own.
Download order form templates:
- Select File > Utilities > Live Update. The VIP Live Update screen will appear.
- Make the following selections:
- Section 1 — Select Import.
- Section 2 — Select Houston Library.
- Section 3 — Select Auto Templates.
- Section 4 — Select Houston FTP.
- Click Next.
- Tick /Australia or /New Zealand and click OK.
- Tick /Pathology and /Radiology and click OK.
- Tick AutoTemplates and any other pathology and radiology templates and click OK. .
- Select the requests you want to import. Click OK to import. You can view the imported templates in the word processor.
Create your own order form template
- Select Setup > Auto Templates.
- Click New from the buttons along the bottom, or click an imported template from the list on the left hand side and click Modify to edit.
- Use the Investigations fields form the Lookup fields list on the right hand side to insert details about the order and the provider.
- Click Save&Close and print a test page of the order to make sure it matches the laboratory requirements.
Add a laboratory organisation
Settings for laboratories, such as the folder incoming results are sent to, and the default order form template to use, are stored when you define the laboratory as an organisation in Bp VIP.net. You may have to contact the laboratory for some of the information required.
- Log in to the Bp VIP.net server.
- Press F2 or select Patient > Select from the menu to open the Search screen.
- Type in a descriptive name for the laboratory in the Search text field. Tick New Organisation. The Organisation Details screen will open at the Details tab with the name you just typed in the Name field, ready to be completed.
- Select a Role of 'Pathology' or 'Radiology' and enter the laboratory Code. Some of the tabs will be enabled.
- Complete the rest of the fields in the Details tab. The fields in this tab record contact details. You can add Associated Organisations on the right hand side.
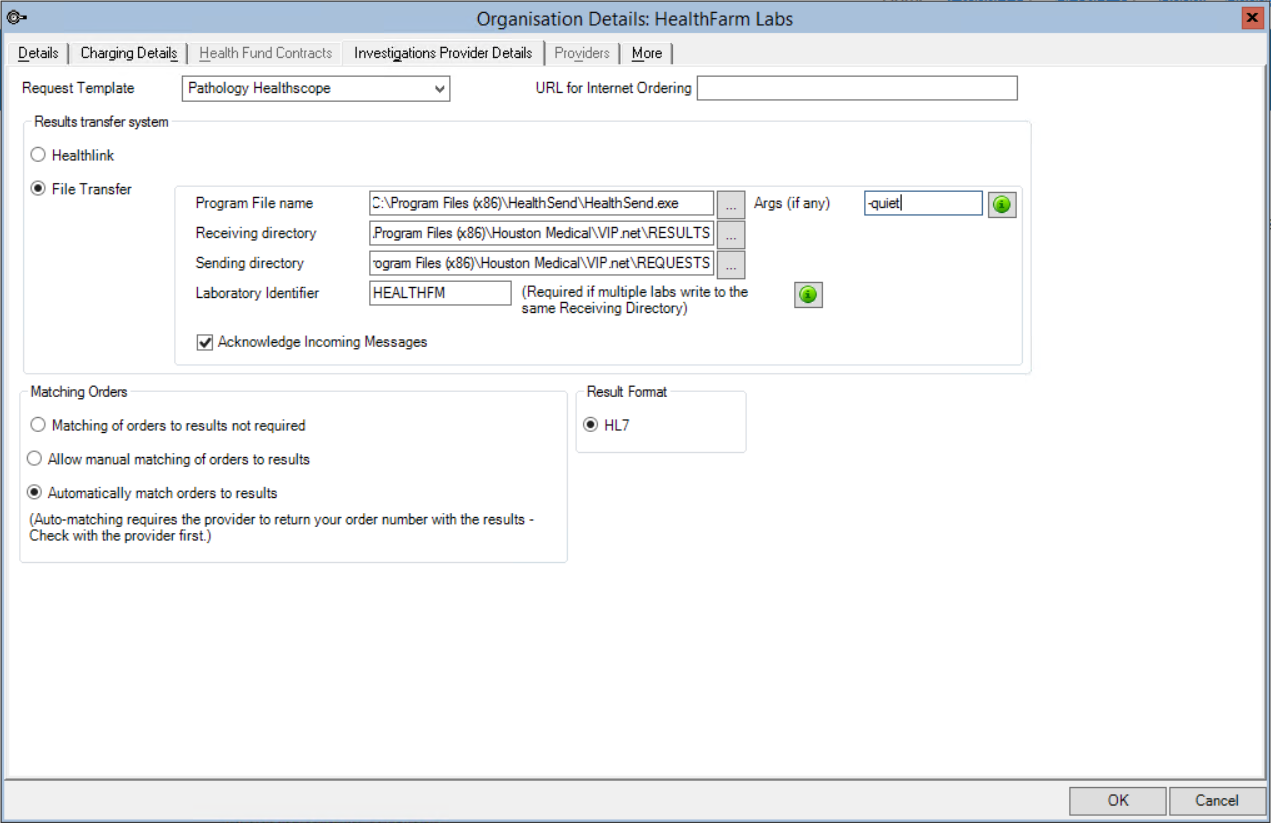
- Select the Investigations Provider Details tab. This tab records how the laboratory will receive investigations and send results.
- Select the Request Template to be used as the default order form for this laboratory. Order form templates usually apply only to Australian practices.
- If your practice is in New Zealand, select Healthlink.
- In the Program File name field, browse to the executable file for the file transfer program your practice uses to send and receive investigations. For example, if your practice uses Fetch, there will be a 'Fetch.exe' file or similar that will have been installed on the Bp VIP.net server. See Install messaging software for more information..
- Select the Receiving directory and Sending directory. These folders will be supplied or agreed upon by the secure messaging software.
- If your practice receives results from different labs that write to the same directory, enter the Laboratory Identifier. This can be supplied by the lab.
- Tick Acknowledge Incoming Messages to send a confirmation message back to the lab that the results have been received.
- Select whether Matching Orders is not required, manually performed, or matched automatically based on patient name, DOB, and gender.
- Select a Result Format of HL7.
- Click OK to save the organisation. You can now receive results from this lab.

If your practice does not use Healthlink to transfer investigations and results, select File Transfer.
NOTE Results must match a patient's surname, first name, DOB, and gender to be assigned automatically to that patient.
IMPORTANT Matching orders requires the laboratory to return the order number in the correct HL7 segment. When a request is made, the individual identifier number on the written request is returned from the laboratory so that Bp VIP.net can quickly identify all tests that have not been returned. However, the number is associated with the order, not with an individual test; as soon as the first result for any test within the order has been received, all tests in the order are marked as received.
What do I do next?
Last modified: July 2020